Make a keyhole collage
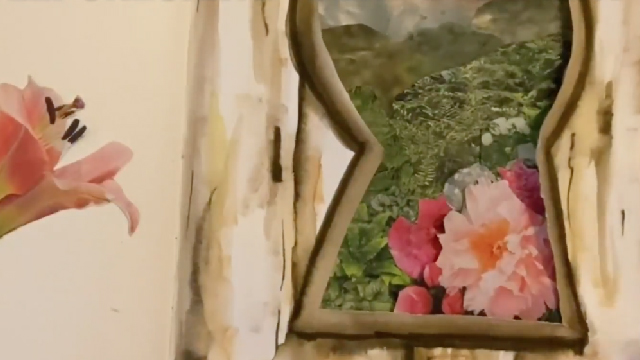
Make a keyhole collage by cutting keyhole-shaped openings from paper, arranging photos and colored papers, then gluing layers to reveal secret scenes.


Step-by-step guide to make a keyhole collage
Step 1
Clear a workspace and lay out all your materials where you can reach them easily.
Step 2
Pick one photo for the secret scene and choose two or three colored paper sheets for the layered keyholes.
Step 3
Cut the cardstock to the size you want your finished collage to be.
Step 4
Trim the photo so it matches the size of the cardstock base.
Step 5
Fold a scrap piece of paper and draw a simple keyhole shape to make a small template.
Step 6
Place the template on one colored sheet and trace the keyhole in the spot you want the secret peek to show.
Step 7
Carefully cut out the keyhole shape from that colored sheet.
Step 8
Trace the same template onto the second colored sheet slightly offset if you want a layered peek effect.
Step 9
Cut out the keyhole from the second colored sheet.
Step 10
Stack the photo and the cut colored sheets on the cardstock without glue to check how the keyholes reveal the secret scene.
Step 11
Glue the photo to the cardstock base and smooth it flat.
Step 12
Glue the first colored layer on top of the photo, lining up the keyhole so it reveals part of the picture.
Step 13
Glue the second colored layer on top and adjust so the keyholes create a fun layered peek.
Step 14
Add decorations or color around the edges to make your collage extra special.
Step 15
Take a photo of your finished keyhole collage and share it on DIY.org
Help!?
What can we use if we don't have cardstock or colored paper?
If you don't have cardstock, use sturdy cardboard from a cereal box trimmed to the finished collage size and replace the colored paper sheets with construction paper, painted printer paper, or magazine pages for the layered keyholes.
My keyhole layers don't line up when I glue them—how can I fix that?
When you reach the step that says 'Stack the photo and the cut colored sheets on the cardstock without glue to check,' secure the layers with tiny pieces of removable tape or binder clips and lightly pencil-mark the edges so the keyholes stay aligned as you glue each layer.
How can I adapt this activity for different ages?
For younger children, have an adult fold scrap paper and cut the keyhole template and colored sheets so they can glue and decorate, while older kids can draw their own keyhole shapes, cut multiple off‑set layers, and add detailed decorations.
How can we personalize or extend the finished collage?
Enhance the collage by adding extra shaped layers, decorating the edges with stickers or washi tape (as in the 'Add decorations' step), or make a flip panel to reveal the whole photo and then 'Take a photo of your finished keyhole collage and share it on DIY.org' for a series.
Facts about collage and paper crafts
🖼️ Collage was popularized by Pablo Picasso and Georges Braque in the early 20th century as part of Cubism.
✂️ Paper cutting is an ancient craft — examples have been found in China dating back to the 6th century.
📸 Photomontage (combining photos into new scenes) was a favorite technique of Dada and Surrealist artists.
🔍 Peepholes and keyhole-style openings let you frame a tiny secret scene and create a sense of surprise.
🧩 Layering photos and colored papers creates depth — overlaps help the eye read which pieces are in front or behind.
How do you make a keyhole collage?
What materials do I need for a keyhole collage?
What ages is this activity suitable for?
What are the benefits and variations of making keyhole collages?
