Make a magazine roll relief
Roll colorful magazine strips and glue them onto cardboard to create a textured relief artwork, exploring shapes, patterns, and simple collage techniques.

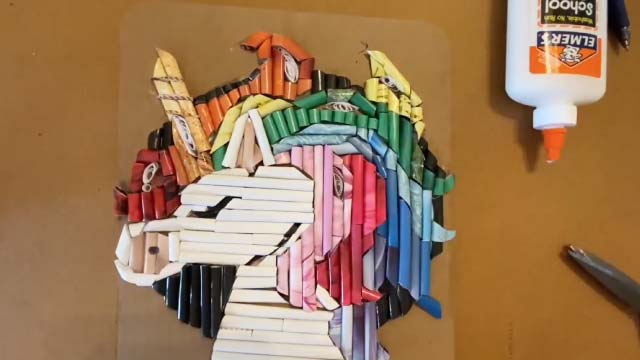

Step-by-step guide to make a magazine roll relief
Step 1
Place the cardboard on a clean flat workspace.
Step 2
Lightly draw a simple design outline on the cardboard with your pencil.
Step 3
Pick two to four colorful magazine pages that you like.
Step 4
Cut long strips about 1 to 2 centimeters wide from the chosen pages.
Step 5
Roll one strip tightly around a pencil to make a small coil.
Step 6
Slide the coil gently off the pencil.
Step 7
Put a small dab of glue on the coil's loose end to secure it.
Step 8
Make many coils until you have enough to fill your design.
Step 9
Arrange the coils on the cardboard to plan the colors and shapes.
Step 10
Glue each coil onto the cardboard following your planned layout.
Step 11
Make a few longer rolls or fold some strips to create extra textures.
Step 12
Glue the longer rolls or folded strips onto the cardboard where you want extra texture.
Step 13
Let your magazine roll relief dry completely.
Step 14
Share your finished creation on DIY.org
Help!?
What can we use instead of magazines if we don't have any?
Use colored junk mail, wrapping paper, old calendars, or scrap printer paper cut into long strips and roll them exactly like the magazine strips to make coils.
My coils keep unrolling or becoming flat — how can we fix them?
Roll each strip tightly around the pencil, add a small dab of glue to the coil's loose end as instructed, and hold the coil closed for a few seconds or use a toothpick to push glue inside for extra grip.
How can I adapt this magazine roll relief for different ages?
For younger kids, pre-cut wider strips (3–4 cm), use a thicker pencil or dowel to make bigger coils and simpler pencil-drawn designs on the cardboard, while older kids can cut 1–2 cm strips, make tiny coils, folded textures, and more intricate layouts before gluing.
How can we enhance or personalize the finished relief?
Add height and texture by stacking coils or gluing the longer rolls or folded strips as suggested, then paint or varnish the dried piece and mount it in a frame before sharing on DIY.org.
Watch videos on how to make a magazine roll relief
How to Make a Paper Roll Model Spacecraft | Fun Activities For Kids | Paper Crafts
4 Videos
How to Make a Paper Roll Model Spacecraft | Fun Activities For Kids | Paper Crafts
60 Easy Paper Projects - The new Red Ted Art Craft Book for Kids
Origami For Kids | Paper Crafts | Fun Activities For Kids

Fun Art Projects For The Month Of Making!
Facts about paper crafts for kids
🌀 Quilling (paper filigree) is an art form that uses rolled paper strips—just like rolling magazine pages for relief art!
♻️ Rolling old magazines into art is a fun type of upcycling that helps keep colorful paper out of the trash.
🌈 Glossy magazine pages reflect light and make bright, shiny rolls that add pop and texture to your artwork.
✂️ Cardboard is a sturdy, recyclable base that’s perfect for gluing lots of rolled strips into a relief collage.
🔢 By varying roll size, tightness, and spacing you can create hundreds of different patterns and 3D textures from the same materials.
How do you make a magazine roll relief?
What materials do I need to make a magazine roll relief?
What ages is magazine roll relief suitable for?
What are some variations and safety tips for magazine roll relief?
