Draw an Anatomically Correct Heart
Draw an anatomically correct human heart using pencil and colored pencils, label chambers and major blood vessels, and learn basic heart anatomy.


Step-by-step guide to draw an anatomically correct heart
How to draw HUMAN HEART in easy way | Heart Diagram | Yokidz Channel | YoKidz Drawing
Step 1
Gather your paper pencil eraser colored pencils and ruler and set them on a clean flat surface.
Step 2
Find a clear picture of an anatomically correct human heart to use as a reference.
Step 3
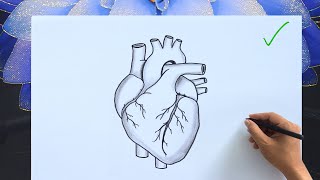
Use your pencil to lightly sketch the outer shape of the heart as a slightly tilted cone pointing left.
Step 4
Inside the outline draw two smaller rounded shapes at the top for the atria and two larger muscular shapes at the bottom for the ventricles.
Step 5
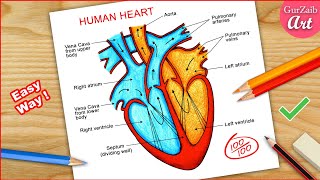
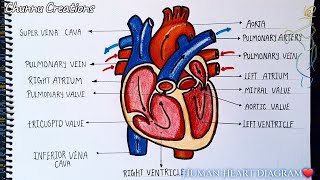
Add the major blood vessels by drawing an aorta arching from the left ventricle a pulmonary artery from the right ventricle pulmonary veins entering the left atrium and the superior vena cava entering the right atrium.
Step 6
Sketch simplified valves as thin flap shapes between each atrium and ventricle and at the bases of the aorta and pulmonary artery.
Step 7
Erase any extra construction lines and darken the final outlines of the heart and vessels with your pencil.
Step 8
Color-code the drawing using red for oxygen-rich areas and vessels and blue for oxygen-poor areas and vessels.
Step 9
Label the four chambers and the major blood vessels clearly with printed letters (Right Atrium Right Ventricle Left Atrium Left Ventricle Aorta Pulmonary Artery Pulmonary Veins Superior Vena Cava).
Step 10
Share your finished anatomically correct heart drawing on DIY.org to show what you learned.
Final steps
You're almost there! Complete all the steps, bring your creation to life, post it, and conquer the challenge!

Help!?
What can we substitute if we don't have colored pencils, a ruler, or a printed reference picture?
Use crayons or washable markers to color-code red and blue, the straight edge of a book or the side of a cereal box as a ruler for vessel lines, and a clear heart photo on a phone or in a book as your reference image.
My heart looks out of proportion or the vessels are in the wrong place — how do I fix it?
Lightly redraw the outer cone shape with your pencil using a small grid or measurements with your ruler, lightly trace or copy key landmarks from the reference (atria, ventricles, major vessels), then erase construction lines and darken the final outlines as instructed.
How can I change the activity for younger or older children?
For younger kids simplify to the outer cone and two big chambers with red/blue coloring and sticker labels, while older kids can add the valves, muscle shading, precise vessel placement, and full printed labels as in steps 4–10.
What are some ways to enhance or personalize the finished heart before sharing it on DIY.org?
Add arrows showing blood flow between the labeled chambers and vessels, a color key for oxygen-rich/poor areas, texture or shading to the ventricles, mount the paper on cardstock, photograph it, and upload the image with a short explanation to DIY.org.
Watch videos on how to draw an anatomically correct heart
How to Draw Human Heart Diagram Drawing / easy way - Step by step
4 Videos
How to Draw Human Heart Diagram Drawing / easy way - Step by step
Human Heart/ human heart structure and function /How to draw a diagram of a human heart in easy way
How to Draw a Human Heart | Easy Anatomy Diagram with Labels |Human Heart Drawing

Best way to draw and label the heart! | Heart Anatomy
Facts about heart anatomy for kids
❤️ Your heart beats around 100,000 times a day — that's over 35 million times a year!
🍼 A baby's heart starts beating at about three weeks after conception — one of the first organs to work.
🧭 The body's blood vessels would stretch about 60,000 miles — long enough to circle Earth more than twice!
🫀 The human heart is about the size of your clenched fist.
💪 The left ventricle has the thickest muscle wall because it pumps blood to almost the whole body.
How do I guide my child to draw an anatomically correct human heart step by step?
What materials do we need to draw an anatomically correct heart with labels?
What ages is this anatomically correct heart drawing activity suitable for?
What are the learning benefits of drawing an anatomically correct heart for kids?


One subscription, many ways to play and learn.
Only $6.99 after trial. No credit card required