Learn Botanical Calligraphy
Practice botanical calligraphy by writing plant names and decorating letters with leaf and flower illustrations using pens, pencils, and watercolors.


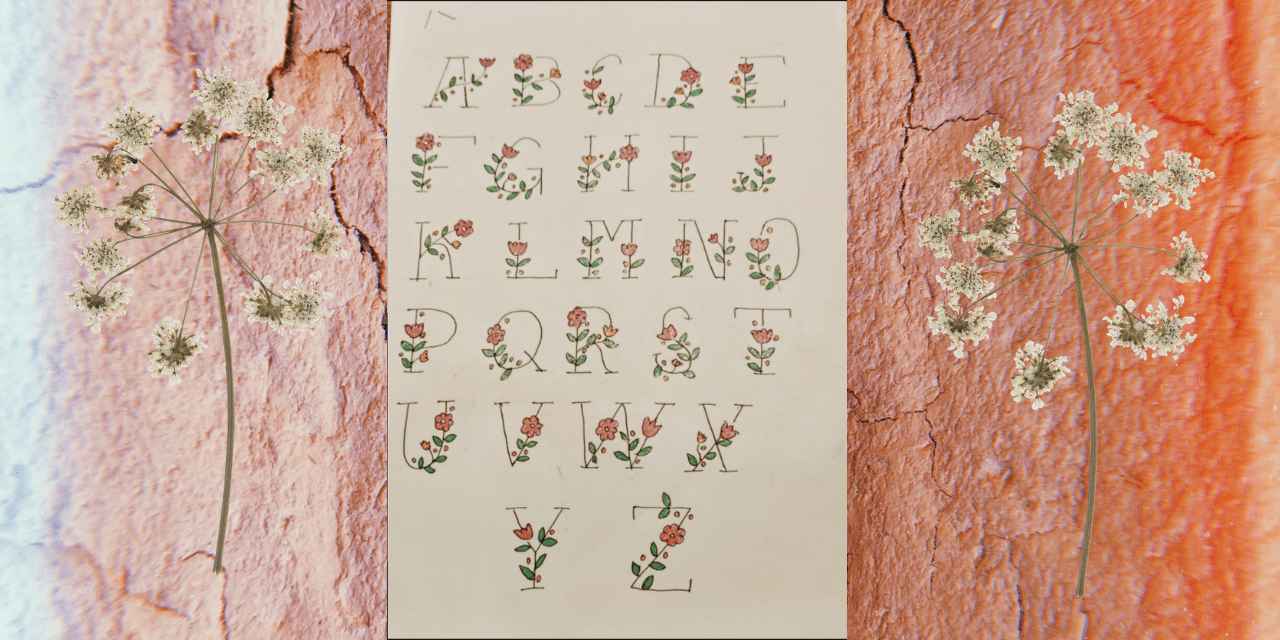

Step-by-step guide to learn botanical calligraphy
Step 1
Gather all the materials on a clean table.
Step 2
Make a tidy workspace with your scrap paper nearby for testing marks.
Step 3
Choose a plant name to write and pick one clear reference photo.
Step 4
Look closely at the photo and notice the shapes of the leaves flowers and stem.
Step 5
Warm up by practicing basic calligraphy strokes on scrap paper for a few minutes.
Step 6
Use the ruler to draw light pencil guidelines on your final paper.
Step 7
Lightly pencil sketch the plant name on the guidelines using simple letter shapes.
Step 8
Draw small leaf and flower sketches around and inside the letters using your reference.
Step 9
Carefully trace over your pencil letters and decorations with the fine liner pen.
Step 10
Wait until the ink is completely dry before touching the paper.
Step 11
Gently erase the pencil lines so only the inked letters and drawings remain.
Step 12
Paint the leaves and flowers with watercolors and let the paint fully dry.
Step 13
Share your finished botanical calligraphy on DIY.org.
Help!?
I can't find a fine liner pen—what can I use instead without ruining the watercolor step?
Use a waterproof pigment fineliner if possible, or test a black gel pen or ballpoint on your scrap paper to make sure the ink won't smear when you apply watercolors.
My ink keeps smudging or the paint lifts the ink—what should I do during the project to avoid this?
Follow the instruction to 'Wait until the ink is completely dry before touching the paper,' test your pen on scrap paper first, and if smudges occur let everything fully dry then carefully retrace smudged lines with your fine liner before erasing pencil lines.
How can I adapt the steps for different ages or skill levels?
For younger children use larger paper, ruler-drawn wide guidelines, simple letter shapes and chunky washable markers instead of a fine liner, while older kids can keep the pencil sketch and fine liner steps and add more detailed leaf and flower sketches and layered watercolor techniques.
How can we extend or personalize our finished botanical calligraphy?
Add the plant's scientific name in small penciled letters, paint subtle watercolor background washes, highlight dried ink with a metallic gel pen for accents, and photograph or frame the final piece to share on DIY.org.
Watch videos on how to learn botanical calligraphy
How to Learn Calligraphy for Beginners With A Normal Pen: TUTORIAL #calligraphy #learncalligraphy
4 Videos
How to Learn Calligraphy for Beginners With A Normal Pen: TUTORIAL #calligraphy #learncalligraphy
The Ultimate Guide to Calligraphy for Beginners | Basics of Learning Calligraphy #calligraphy
how to: beginner's guide to calligraphy
Learn Calligraphy: A Step-by-Step Calligraphy Tutorial for Beginners
Facts about calligraphy and botanical illustration
🌿 Around 390,000 plant species have been documented — that's a huge garden of names to practice!
✒️ Pointed-pen calligraphy makes thin upstrokes and thick downstrokes by changing pressure — like drawing with personality.
🎨 Watercolors were beloved by botanical artists because they capture delicate hues and dry fast for field sketches.
🌸 Many plant names come from Latin or honor people — fuchsia is named after the botanist Leonhart Fuchs!
📜 For centuries, herbals and manuscripts mixed plant names with tiny illustrations, turning labels into little artworks.
How do you practice botanical calligraphy by writing plant names and decorating letters?
What materials do I need for botanical calligraphy with pens, pencils, and watercolors?
What ages is botanical calligraphy suitable for?
What are the benefits of practicing botanical calligraphy with children?
