Make String Art Stars
Make string art stars using cardboard, pushpins, and colorful thread with adult help; design geometric patterns, learn angles and symmetry, and build fine motor skills.

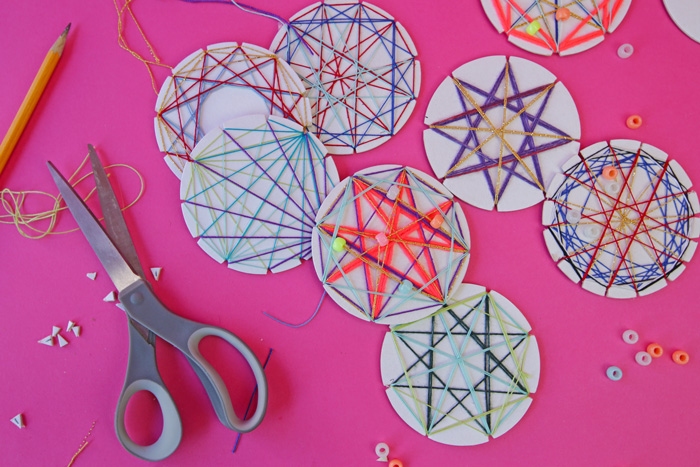

Step-by-step guide to make string art stars
Step 1
Place the cardboard sheet flat on a table or sturdy workspace.
Step 2
Trace a circle about the size you want your star by using a round object or drawing freehand.
Step 3
Use the ruler and pencil to mark five evenly spaced dots around the circle edge for the star points.
Step 4
Connect every other dot with a pencil line to draw a five-point star outline.
Step 5
With an adult's help push pushpins into the cardboard along the star outline about 1 cm apart and at each point.
Step 6
Tie the end of your colorful thread around one pushpin with a double knot to start.
Step 7
Pull the thread straight across the star to a pin that is not next to the starting pin.
Step 8
Loop the thread once around that pin and pull it snug but not too tight.
Step 9
Repeat pulling the thread to non-adjacent pins and looping around them until the star fills with crisscrossing thread.
Step 10
Tie the thread end tightly to a nearby pushpin to finish your pattern.
Step 11
Cut off any extra thread close to the knot with scissors.
Step 12
Secure the knot with a small piece of tape if needed to keep it from slipping.
Step 13
Share a photo of your finished string art star on DIY.org.
Help!?
What can we use if pushpins or cardboard are hard to find?
If you don't have pushpins, use small nails or thick sewing pins driven into a wooden or cork board, and if you don't have cardboard use foam board or a stiff poster board as the base.
My pushpins keep popping out or the thread keeps loosening—what should I do?
If pins come loose or the thread slips, pre-poke the marked star outline with a pencil, press pins fully into a sturdier backing like wood or cork, avoid pulling the thread too tight when looping, and secure knots with the small piece of tape mentioned in the instructions.
How can I adapt this string art for different age groups?
For younger children have an adult pre-insert the pushpins or use tape tabs and chunky yarn with wider spacing, while older kids can use finer embroidery floss, the 1 cm spacing shown for more detail, or replace the cardboard with a wooden board and small nails for a tougher project.
How can we personalize or extend the finished string art star?
To personalize the project, paint or decorate the cardboard before marking, use multiple thread colors and add beads between loops as you pull the thread across, varnish or frame the finished star for durability, and then share a photo on DIY.org as the instructions suggest.
Watch videos on how to make string art stars
String Art,How To Make Easy String Art, Shooting Star/DIY
3 Videos
String Art,How To Make Easy String Art, Shooting Star/DIY

How to Make String Art With Nails with your kids

How to make a Star with string, step by step, cats cradle
Facts about string art and geometry
🎨 String art makes smooth-looking curves out of straight lines by connecting points in patterns — magic from math!
📐 Curve stitching has been used as a hands-on way to teach geometry and angles to kids for over a century.
📦 Cardboard is a lightweight, recyclable craft hero — easy to cut, sturdy enough for pins, and great for crafting stars.
🧵 Wrapping and weaving thread helps build fine motor skills and hand-eye coordination in kids (hello, stronger pincer grip!).
✨ A 5-point star pattern shows rotational symmetry of order 5 — that means you can spin it and it still looks the same five times!
How do I make a string art star with my child?
What materials do I need for string art stars?
What ages is string art suitable for?
What are the benefits and variations of making string art stars?
