Make Raised Salt Art
Make raised salt art by drawing glue lines, sprinkling salt, and painting the textured patterns with watercolors to explore color mixing and texture.


Step-by-step guide to Make Raised Salt Art
Raised Salt Painting for Kids | Easy and Fun STEAM Art Idea
Step 1
Lay a protective sheet like newspaper or a paper towel on your table.
Step 2
Lightly sketch a simple picture or pattern on your watercolor paper with a pencil.
Step 3
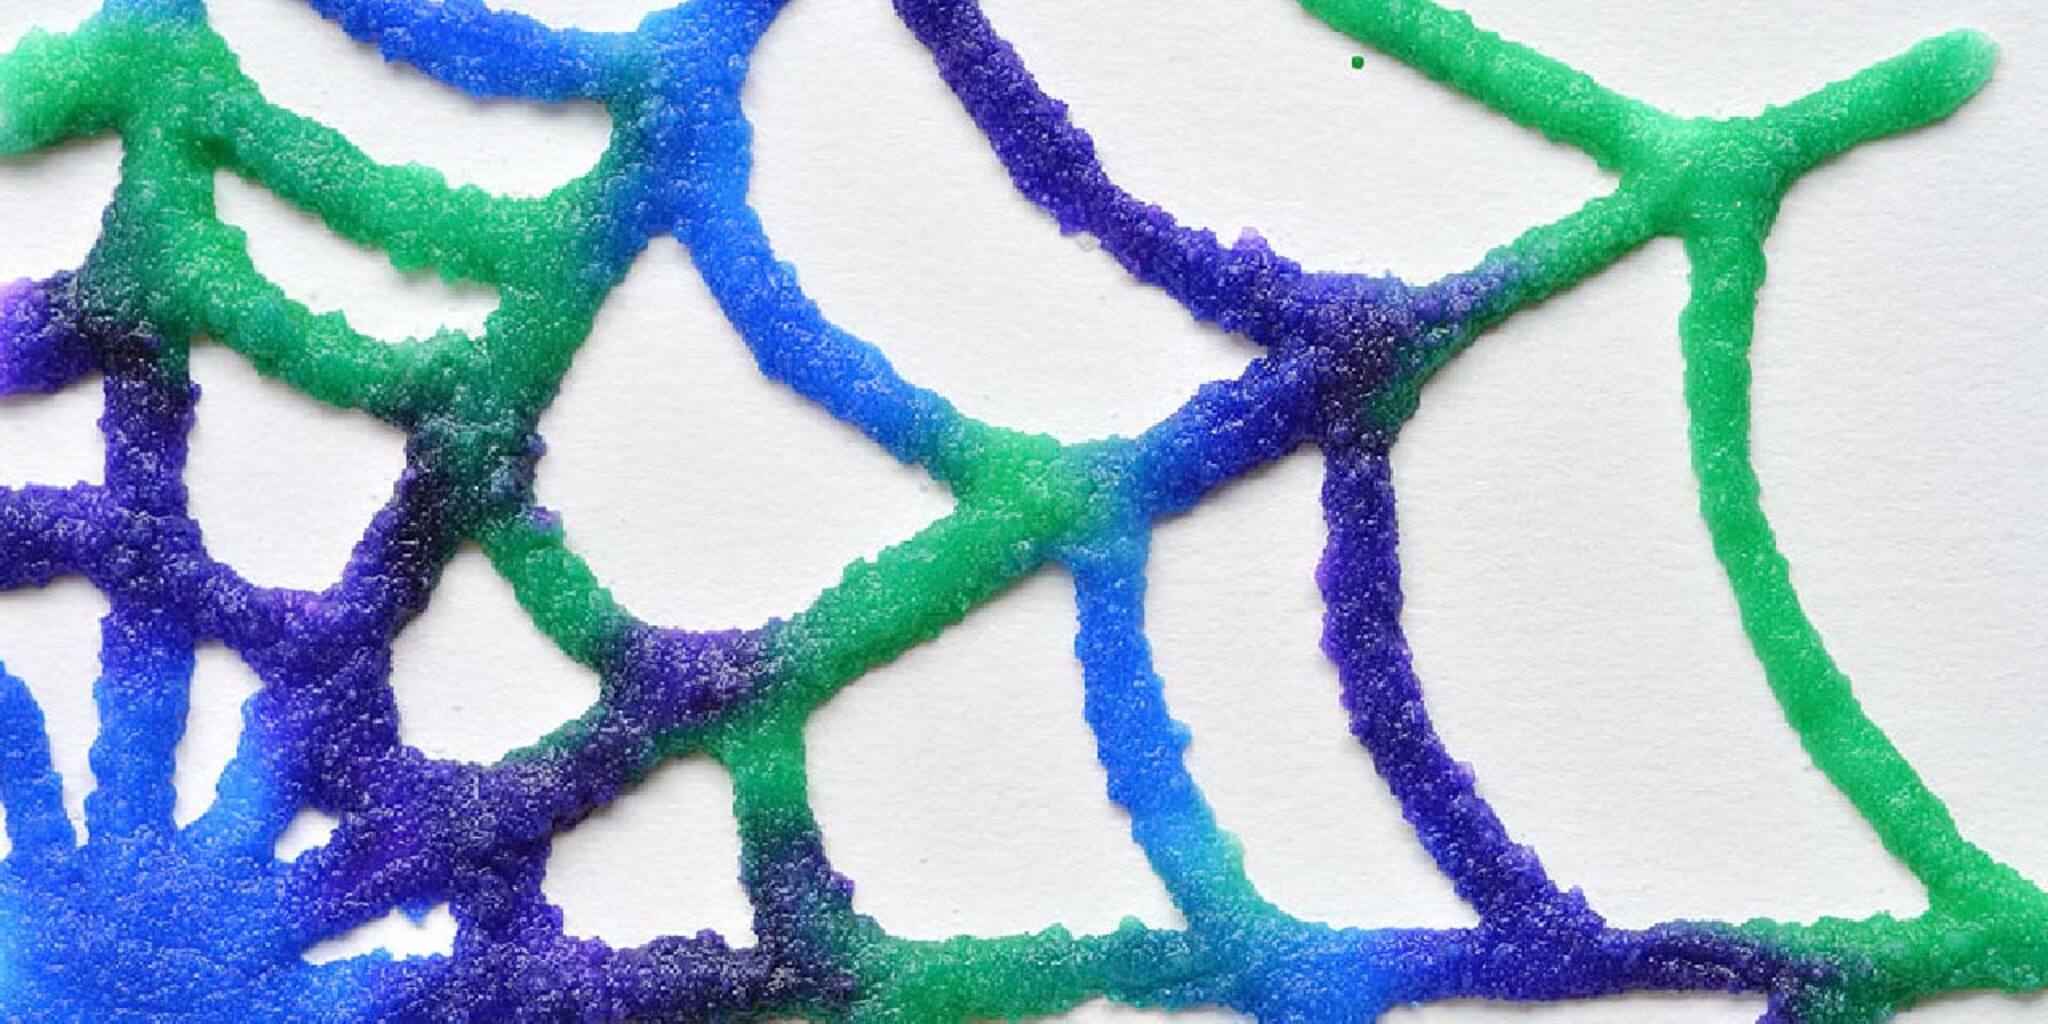
Squeeze a steady line of white school glue over your pencil lines to make raised patterns.
Step 4
Sprinkle salt generously over the wet glue until every glue line is covered.
Step 5
Gently tap the paper so extra loose salt falls into the tray without touching the glued lines.
Step 6
Let the glue and salt dry completely for at least one to two hours.
Step 7
Fill a cup with clean water for rinsing your brush.
Step 8
Dip your paintbrush into the cup of water to wet the bristles.
Step 9
Lightly blot the brush on a paper towel to remove extra water.
Step 10
Touch the wet brush to a watercolor pan to pick up one color.
Step 11
Paint inside the salt-lined areas with that color so the paint meets the raised salt lines.
Step 12
Paint nearby areas with different colors so the colors touch and mix at the edges.
Step 13
If paint pools, gently dab the extra water with a paper towel to soak it up.
Step 14
Let the painted artwork dry completely and then gently shake off any leftover loose salt into the tray.
Step 15
Share a photo of your finished raised salt art on DIY.org.
Help!?
What can I use if I don’t have white school glue or watercolor paper?
Use any clear-drying PVA or craft glue instead of white school glue and heavyweight cardstock or mixed-media paper in place of watercolor paper, but squeeze thinner glue lines and allow extra drying time so the salt adheres as described in the glue-and-salt steps.
My salt keeps falling off after drying—what should I do?
That usually means the glue dried before the salt was fully embedded, so reapply fresh white school glue over the affected pencil lines, sprinkle salt again as in step 4, gently tap off excess per step 6, and let it dry the full 1–2 hours to create sturdy raised edges.
How can I adapt this activity for a 3-year-old versus a 10-year-old?
For a 3-year-old, pre-draw bold shapes on the protective-sheet-covered table and pre-squeeze thick glue lines for them to sprinkle salt and dab paint with a blotted brush, while a 10-year-old can sketch finer designs on watercolor paper, use a smaller paintbrush to blend multiple watercolor pans, and experiment with controlled wet-on-wet mixing at the raised salt edges.
What's a fun way to make the finished raised salt art more special?
Try sprinkling colored table salt or fine glitter over the wet glue before drying, add diluted liquid watercolor to the pans for brighter washes, or cut and fold the dried paper into handmade cards to photograph and post on DIY.org.
Watch videos on how to Make Raised Salt Art
Raised Salt Painting with Kids | Fun & Easy Glue and Salt Art Activity
3 Videos

Raised Salt Painting with Kids | Fun & Easy Glue and Salt Art Activity
Easy Art for Kids: Raised Salt Painting!
Easy Raised Salt Painting for Kids | Fun & Creative Art Activity!
Facts about mixed-media and sensory art for kids
🎨 Glue lines act like tiny dams — when watercolor meets them it beads and dries into raised ridges you can touch.
🧂 Table salt soaks up water and pigment to make sparkly, starburst 'salt blooms' in wet paint.
🌈 Mixing just two watercolors can make dozens of new shades — try blue + yellow to explore many greens!
🖌️ Watercolors are transparent, so layering washes builds glowing color depth instead of hiding earlier colors.
🧪 The salt used in this craft is plain table salt (sodium chloride) — it's simple and safe for kids with supervision.
How do you make raised salt art?
What materials do I need for raised salt art?
What ages is raised salt art suitable for?
What are the benefits of raised salt art?
