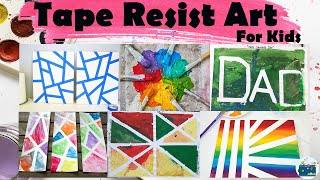
Make Tape Resist Watercolor Art
Make tape resist watercolor art by applying painter's tape to paper, painting over it, then removing the tape to reveal bold white lines.


Step-by-step guide to make tape resist watercolor art
Step 1
Clear a flat table and protect it with scrap paper or a paper towel.
Step 2
Put your watercolor paper flat on the protected area.
Step 3
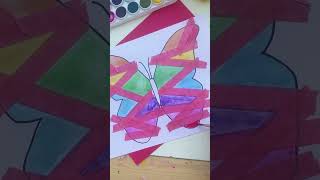
Tear or cut strips of painter's tape and stick them onto the paper to create a pattern.
Step 4
Press the edges of each tape strip firmly with your fingers so the tape seals to the paper.
Step 5
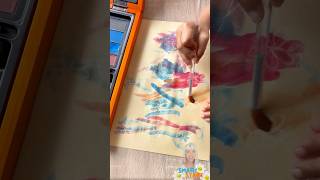
Squeeze a small amount of watercolor paint onto your palette or paper plate.
Step 6
Dip your paintbrush into the cup of water to wet the bristles.
Step 7
Pick up paint by swirling your wet brush in the paint on the palette.
Step 8
Paint over the exposed paper around the tape until you cover the areas you want colored.
Step 9
Rinse your brush in the cup of water before changing colors.
Step 10
Blot your brush on the paper towel to remove excess water after rinsing.
Step 11
Repeat Steps 7 through 10 to add more colors and blends until your picture looks how you want.
Step 12
Let the paint dry completely before touching the tape.
Step 13
Peel the tape off slowly at a low angle to reveal bold white lines and your tape-resist design.
Step 14
Take a photo of your finished artwork and share it on DIY.org.
Help!?
What can we use if we don't have painter's tape?
If painter's tape isn't available, use low-tack masking tape or washi tape and press the edges firmly as in Step 4 so the tape seals to the watercolor paper, avoiding heavy clear or duct tape that can tear the paper when removed.
My paint bled under the tape—how do I fix that?
If paint bleeds under the tape, firmly re-press the tape edges per Step 4 before painting, make sure you let the paint dry completely as directed in Step 12, and then peel slowly at a low angle in Step 13.
How can I adapt this activity for different ages?
For younger children use wider tape strips, big brushes, pre-cut tape pieces, and adult help with Steps 4 and 13, while older kids can cut thin tape for detailed patterns and experiment with more colors and blends in Steps 7–11.
How can we extend or personalize the tape-resist artwork?
To personalize the piece, try layering tape and repeating Steps 7–11 for multi-level patterns, sprinkle salt onto wet paint in Step 7 for texture, then let dry and peel in Step 13 before photographing to share on DIY.org.
Watch videos on how to make tape resist watercolor art
Tape Resist Art for Kids, Toddlers & Preschoolers || Activity of the Week
3 Videos
Tape Resist Art for Kids, Toddlers & Preschoolers || Activity of the Week
Crayon Resist Watercolor Art 🎨 | Easy Magic Painting for Kids
Tape Resist Painting Art
Facts about watercolor resist techniques
🎨 Watercolor paint can be reactivated with water even after it dries, so you can soften or lift colors later.
🏷️ Masking tape was invented in 1925 by Richard G. Drew at 3M to help painters get clean, sharp edges.
🧴 Masking fluid (also called liquid frisket) is a removable latex used by watercolorists to preserve white paper.
💡 Tape-resist works because the tape physically blocks pigment from touching the paper, leaving crisp white lines when removed.
🌈 Adding more water to watercolor paint makes colors lighter and more transparent — great for soft washes and gradients.
How do you make tape resist watercolor art?
What materials do I need for tape resist watercolor art?
What ages is tape resist watercolor art suitable for?
What are some fun variations and safety tips for tape resist watercolor art?
