Make a moisture sensor
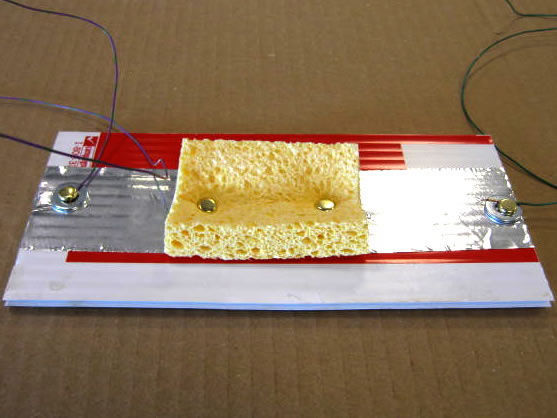
Build a simple moisture sensor using two probe nails, wires, a resistor, an LED, and a small battery to test soil dampness with adult supervision.


Step-by-step guide to make a moisture sensor
Simple Soil Moisture Sensor Circuit | Science Project
Step 1
Gather all the materials on a table so everything is ready before you start.
Step 2
Ask an adult to stay with you and help when you handle the battery and tools.
Step 3
Use the wire stripper or scissors to strip about 1 centimeter of insulation off each end of the three wires.
Step 4
Wrap one stripped wire around the head of the first nail and secure it with electrical tape so the metal is connected.
Step 5
Wrap a second stripped wire around the head of the second nail and secure it with electrical tape.
Step 6
Find the LED long leg and twist or tape the resistor to that long leg so they are connected firmly.
Step 7
Tape the free end of the resistor to the positive side of the battery so the resistor touches the positive terminal.
Step 8
Twist or tape the wire from the first nail to the short leg of the LED so the LED is connected to that nail.
Step 9
Tape the wire from the second nail to the negative side of the battery so the circuit can be completed through the soil.
Step 10
Push both nails into the soil in the pot or cup about 2 centimeters apart so the nails do not touch each other.
Step 11
Pour a small cup of water onto the soil near the nails to moisten the soil and help it conduct better.
Step 12
Watch the LED to see if it glows brighter when the soil is wet and dimmer when the soil dries.
Step 13
Share a photo or video of your finished moisture sensor project on DIY.org
Help!?
What can we use instead of a wire stripper or nails if those are hard to find?
If you don't have a wire stripper you can carefully use scissors to strip about 1 centimeter of insulation as in step 3, and if you don't have nails you can straighten metal paperclips, wrap the stripped wire around them, and push them into the soil instead of nails.
My LED won't light — what parts of the setup should I check first?
If the LED doesn't glow, check that the resistor is taped to the battery positive terminal, the LED's long leg is connected to that resistor, the short leg is connected to the wire from the first nail, the second nail's wire is taped to the battery negative, each wire has about 1 cm stripped, and the soil is moist so the circuit can complete.
How can I change the activity for different ages?
For younger kids have an adult pre-strip wires, wrap the resistor to the LED and insert the nails while the child watches pouring water and observing the LED, and for older kids let them strip wires, twist or tape connections themselves and use a multimeter to measure how LED brightness changes with soil moisture.
How can we extend or personalize the moisture sensor project?
You can add a small toggle switch between the resistor and the battery, use multiple nails at different depths to compare LED brightness as the soil dries, decorate the pot, and then share photos or a video of the finished sensor on DIY.org.
Watch videos on how to make a moisture sensor
Science Experiments 04 Soil Moisture Sensor
4 Videos
Science Experiments 04 Soil Moisture Sensor
Arduino Soil Moisture Sensor (Lesson #14)
How to Use a Soil Moisture Sensor with Arduino - Step-by-Step Tutorial
![Capacitive soil moisture sensor v1.2 Arduino code [Step by step instructions]](https://img.youtube.com/vi/z4ciPHk8jBU/mqdefault.jpg)
Capacitive soil moisture sensor v1.2 Arduino code [Step by step instructions]
Facts about basic electronics for kids
🪴 A simple two-probe moisture sensor uses the soil's electrical conductivity—wetter soil completes the circuit and can light an LED.
⚡ Ohm's Law (V = I × R) helps you pick a resistor so the LED gets the right current and doesn't burn out.
🔋 Tiny coin-cell batteries can power a little LED circuit for hours, but always build and test with an adult and disconnect when not in use.
🔩 Stainless-steel nails resist rusting much better than plain iron nails when left in moist soil, so they make longer-lasting probes.
🌱 Using moisture sensors in gardens can lower water use—smart irrigation systems sometimes save up to 50% of water.
How do you build a simple moisture sensor with nails, wires, an LED and a battery?
What materials do I need to make a DIY soil moisture sensor?
What ages is this moisture sensor activity suitable for?
What safety tips should we follow when building and testing the sensor?
