Make a fabric hacker bracelet
Weave fabric strips into a hacker style bracelet, adding beads and a secret color code to practice patterns, measuring, and fine motor skills.


Step-by-step guide to make a fabric hacker bracelet
How Do You Make Bracelets? | Step-by-Step DIY Bracelet Making for All Skill Levels
Step 1
Use the ruler to measure around your wrist and add 1½ inches for comfort and tying
Step 2
Cut four fabric strips each about twice your measured wrist length plus 6 inches
Step 3
Fold all four strips in half together and tie an overhand knot at the fold to make a loop for the bracelet closure
Step 4
Attach the knotted loop to a table or cushion with a safety pin or tape so the strips hang down and stay steady
Step 5
Spread the hanging strips so you have two center strips and one outer strip on each side
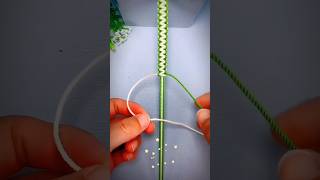
Step 6
Take the far-right outer strip and cross it over the two center strips then tuck it under the far-left outer strip
Step 7
Take the far-left outer strip and cross it under the two center strips then push it up through the loop created on the right side
Step 8
Pull both outer strips tight to form a neat hacker-style knot
Step 9
On scrap paper write a secret color code by assigning bead colors to letters or numbers before you add any beads
Step 10
When you want to add a coded bead slide the bead onto the outer strip that will move next and position it near the knot before you tighten the next knot
Step 11
Repeat Steps 6 to 8 and use Step 10 to add beads following your secret code until the woven section reaches your wrist measurement
Step 12
Tie a final tight knot to secure the weaving then trim the excess fabric leaving small tails and tuck or stitch the tails into the weave to hide them
Step 13
Share your finished fabric hacker bracelet and its secret color code on DIY.org
Help!?
What can we use if we don't have fabric strips, beads, or a safety pin as listed in the instructions?
Use old T‑shirts cut into strips, ribbon, shoelaces, or yarn instead of fabric strips, substitute buttons or large pony beads if you don't have beads, and fasten the knotted loop in Step 4 with a binder clip or strong tape if you lack a safety pin.
The knots keep slipping or the weave looks uneven—what should we check or do differently?
If the hacker knots in Steps 6–8 slip or look uneven, make sure the loop is firmly pinned in Step 4, flatten and align each strip before pulling tight, and finish with the final tight knot and a small stitch or fabric glue in Step 12 to lock the weave.
How can I adapt this bracelet activity for different age groups?
For younger kids have an adult pre-measure and cut the four fabric strips and use larger beads while guiding them through Steps 6–8, and for older kids let them measure, cut, follow the full knot sequence, and create a longer bracelet with a more complex secret color code in Step 9.
What are simple ways to personalize or extend the bracelet project once the basic weave is done?
Personalize the bracelet by mixing patterned fabrics, adding charms or extra beads during Step 10 to mark parts of your secret color code, embroidering initials on the tails before tucking in Step 12, and then share a photo on DIY.org as suggested in Step 13.
Watch videos on how to make a fabric hacker bracelet
Easy bracelet from two threads - beginner friendly video tutorial
4 Videos
Easy bracelet from two threads - beginner friendly video tutorial
How to make fabric friendship bracelets - DIY tutorial
Easy bracelet making at home || how to make easy bracelet | easy beaded bracelet | diy easy bracelet
How to Make a Simple String Bracelet: Step-by-Step!
Facts about weaving and textile crafts for kids
🧵 Friendship bracelets are a form of weaving and knotting that have been traded as tokens of friendship for centuries.
🔢 With just 5 colors you can create 3,125 different 5-strip/bead sequences — great for making secret color codes!
🧠 Weaving, braiding, and bead-threading help build fine motor skills and hand–eye coordination in kids.
📏 Measuring the wrist first keeps a bracelet comfy — many kids’ wrist sizes fall between about 12–16 cm (4.7–6.3 in).
💡 Hacker-style bracelets mix bright patterns and secret codes, turning craft time into playful pattern practice and little puzzles.
How do you make a fabric hacker bracelet?
What materials do I need for a fabric hacker bracelet?
What ages is this activity suitable for?
What are the benefits of making a fabric hacker bracelet?
