Build a solar powered charger
Build a simple solar charger with a small solar panel, rechargeable battery, and USB module, learning about renewable energy and circuits.

Step-by-step guide to build a solar-powered charger
How to Make a Foldable Solar Mobile Charger | Solar Charger Project
Step 1
Lay out all materials on a clean table so you can see everything clearly.
Step 2
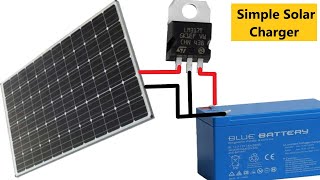
Have an adult help you identify the positive wire color red and the negative wire color black on the solar panel and on the controller.
Step 3
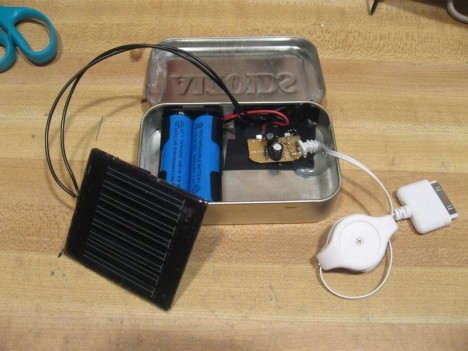
Attach the solar panel wires to the controller input terminals using the alligator clips matching red to the controller + and black to the controller -.
Step 4
Plug the rechargeable battery connector into the controller battery port matching the battery connector orientation.
Step 5
Move the solar panel into bright sunlight so the controller can start receiving power.
Step 6
Watch the controller charging LED to confirm the controller shows it is charging the battery.
Step 7
Plug the USB cable into the controller USB output port so you can power a device later.
Step 8
Secure any loose wires with small pieces of electrical tape so nothing pulls loose.
Step 9
Place the controller and battery neatly inside the small plastic box and close the lid to protect the parts.
Step 10
Label the box with the marker and adhesive label with a name like Solar Charger and today’s date.
Step 11
Leave the solar panel in the sun for at least one hour to charge the battery inside the controller.
Step 12
Test your charger by plugging a small USB device into the USB cable and then share your finished creation on DIY.org
Help!?
What can we use instead of hard-to-find alligator clips or the small plastic box?
If you can't find alligator clips, strip and loop the solar panel wires under the controller's input screw terminals or use a small terminal block, and if you don't have the small plastic box use a clean Tupperware container or pencil case to hold the controller and battery.
The controller's charging LED won't turn on — what should we check?
If the charging LED doesn't light, verify red is connected to the controller + and black to -, make sure the rechargeable battery connector is fully plugged in, secure any loose alligator clips or wires with electrical tape, and move the solar panel into brighter sunlight.
How can we adapt the activity for younger kids or make it more challenging for older kids?
For younger children have an adult handle step 2–4 (identifying wires and attaching clips) while the child lays out materials, closes the box, and watches the LED, and for older kids add soldered connections, a larger battery, or design an adjustable panel mount before labeling and testing the USB output.
What are simple ways to extend or personalize the solar charger project?
Enhance the charger by adding an inline switch on the controller's USB output, installing a blocking diode at the panel input, upgrading to a larger solar panel for faster charging, mounting the panel on a tilt stand for better sunlight during step 5, and decorating the plastic box with stickers and a personalized label.
Watch videos on how to build a solar-powered charger
Back to Basics: DIY 12V Solar Power System Build (Step by Step for Beginners!)
4 Videos
Back to Basics: DIY 12V Solar Power System Build (Step by Step for Beginners!)
Charge Anywhere! - DIY Solar Power Bank
![How To Make Solar Panel Battery Charger Using Costom PCB - 100% Working [ENGLISH] American TechNova](https://img.youtube.com/vi/XjA910Y32AU/mqdefault.jpg)
How To Make Solar Panel Battery Charger Using Costom PCB - 100% Working [ENGLISH] American TechNova
How to Make a Simple Solar Battery Charger
Facts about solar energy and basic electronics
☀️ The sunlight that hits Earth in one hour could power the whole world for about a year (that’s a lot of sunny superhero energy!).
🔋 Small rechargeable batteries like lithium-ion can be charged hundreds of times before they need replacing — perfect for many DIY chargers.
🔌 USB charging commonly uses 5 volts, so most DIY USB modules convert the solar panel’s output to a steady 5V for safe phone charging.
🪙 Pocket-sized solar panels usually produce just a few watts — enough to charge phones or small gadgets, but not to run a toaster.
⚡ Solar panels still make electricity on cloudy days because they can use diffuse light, just less than on bright sunny days.
How do I build a simple solar-powered USB charger with a small panel, battery, and USB module?
What materials and parts do I need to build a kid-friendly solar charger?
What ages is this solar charger activity suitable for?
What are the benefits, safety tips, and simple variations for this solar charger project?
