Make a solar electric cell
Build a small solar electric cell using a tiny photovoltaic cell, cardboard, wires, and an LED to learn how sunlight generates electricity.

Step-by-step guide to make a solar electric cell
Tutorial: Solar Cell Operation
Step 1
Gather all materials from the list and put them on a clear table.
Step 2
Cut the cardboard into a square about 10 cm by 10 cm using scissors.
Step 3
Place the photovoltaic cell face up in the center of the cardboard.
Step 4
Tape the photovoltaic cell to the cardboard so it lies flat and won’t move.
Step 5
Strip about 1 cm of insulation off both wire ends using a wire stripper or sandpaper.
Step 6
Find the positive terminal on the photovoltaic cell by looking for a + sign or a red mark.
Step 7
Tape one stripped wire to the cell’s positive terminal so the bare wire touches the terminal.
Step 8
Tape the other stripped wire to the cell’s negative terminal so the bare wire touches the terminal.
Step 9
Identify the LED leads and note that the longer lead is the positive lead.
Step 10
Attach the wire from the cell’s positive terminal to the LED’s long lead by twisting the bare wire around the lead and taping it.
Step 11
Attach the wire from the cell’s negative terminal to the LED’s short lead by twisting the bare wire around the lead and taping it.
Step 12
Take your cardboard solar cell outside into bright sunlight.
Step 13
Point the photovoltaic cell toward the sun and watch to see if the LED lights.
Step 14
Share your finished solar electric cell on DIY.org.
Help!?
What can we use instead of a standalone photovoltaic cell if it’s hard to find?
If you can’t find a bare photovoltaic cell, salvage the small solar panel from a broken solar garden light or a solar calculator and follow the instructions to place it face up on the 10 cm × 10 cm cardboard and tape it down.
My LED doesn’t light when I take the cardboard outside—what should I check?
If the LED doesn’t light, make sure you stripped about 1 cm of insulation, that the wire taped to the cell’s '+' is connected to the LED’s longer lead and the wire on '-' to the short lead, that all taped connections and twists are tight, and that the photovoltaic cell is pointed at bright sunlight.
How can I change the activity for younger or older kids?
For younger children, have an adult cut the 10 cm cardboard square and pre-strip the wires so the child can position the photovoltaic cell and tape wires to the LED, while older kids can try wiring two cells together before testing to increase brightness or add a multimeter reading after step 11.
How can we extend or personalize the solar cell project after it works?
After you confirm the LED lights, personalize the project by decorating the cardboard, adding a small toggle switch between the cell wire and LED lead, or taping two photovoltaic cells side-by-side on the cardboard to boost light output and then share the upgraded build on DIY.org.
Watch videos on how to make a solar electric cell
How do solar panels work? - Richard Komp
4 Videos
How do solar panels work? - Richard Komp
![Solar Energy - How Do Solar Panels Work? - [Video for Kids] #education #learningjunction](https://img.youtube.com/vi/viQInAU0ekc/mqdefault.jpg)
Solar Energy - How Do Solar Panels Work? - [Video for Kids] #education #learningjunction
Lecture 7: Photovoltaic cells

16. Solar Cell Characterization
Facts about solar energy and basic circuits
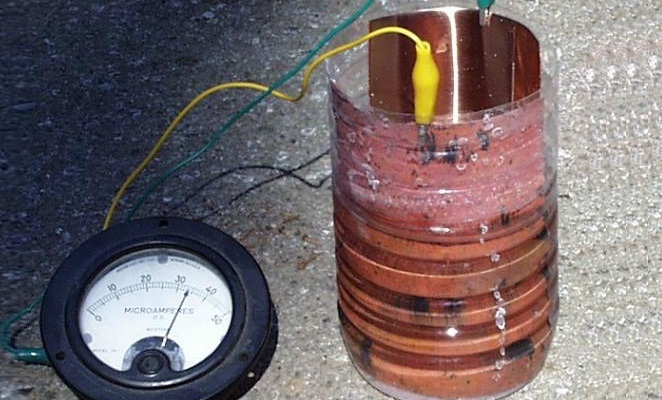
☀️ Sunlight hitting a photovoltaic cell frees electrons and creates electric current — no moving parts needed!
🔋 A tiny silicon solar cell typically makes about 0.5–0.6 volts in bright sunlight, so you can stack them to get more power.
💡 Low-power LEDs can light up with just a few milliamps, perfect for simple solar-powered projects.
🧪 The photovoltaic effect was first observed in 1839 by French scientist Edmond Becquerel when he was just 19 years old.
🌍 The solar energy that reaches Earth in about one hour is roughly enough to power the entire world for almost a year.
How do you build a small solar electric cell with a photovoltaic cell, cardboard, wires, and an LED?
What materials do I need to make a kid-friendly solar cell project?
What ages is this solar electric cell project suitable for?
What safety tips should I follow when making a small solar electric cell with kids?
