Find the wind
Build a simple wind vane and cup anemometer from cardboard, straws, and cups. Measure wind direction and strength outdoors and record results.


Step-by-step guide to Find the wind
When does wind occur? | What makes wind? | How is wind formed? | Wind Facts for Kids | Weather Facts
Step 1
Gather all the Materials Needed and bring them to your workspace outside.
Step 2
Cut a wind vane arrow about 10 centimeters long from the cardboard using the scissors and marker.
Step 3
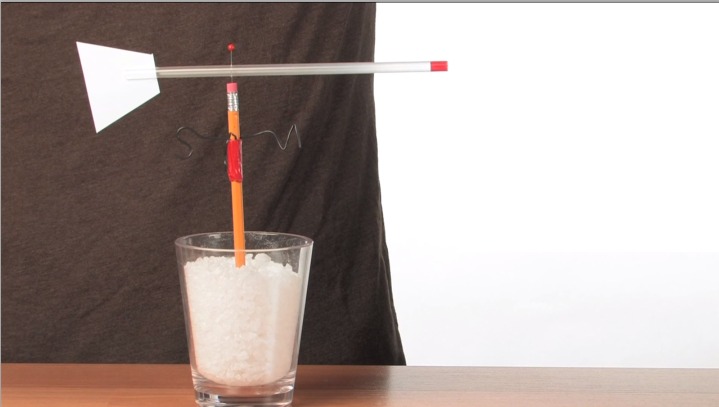
Tape the cardboard arrow to the middle of one straw so the straw balances and can spin freely.
Step 4
With adult help push a pushpin through the center of that straw into the pencil eraser so the straw can rotate on the eraser like a pivot.
Step 5
Lay the other two straws in a cross and tape them together at their centers to make a spinning cross.
Step 6
Tape one paper cup to each straw end with all cup openings facing the same rotation direction so the wind can catch them.
Step 7
With adult help push a pushpin through the center of the crossed straws into the other pencil eraser so the cup cross can spin on the eraser.
Step 8
Press both pencils upright into soft soil or grass so the wind vane and the cup anemometer stand steady and can spin.
Step 9
Use a compass or a phone compass to find north so you have a direction reference.
Step 10
Wait until the wind vane arrow stops wobbling and then look at which compass direction the arrow is pointing and write that direction down.
Step 11
Start the stopwatch and count how many full spins the cup anemometer makes in 30 seconds and write the number down.
Step 12
Repeat the 30 second spin count two more times and write each result down.
Step 13
Add your three spin counts and divide by three to find the average spins per 30 seconds.
Step 14
Multiply the average by 2 to convert to spins per minute as a simple wind-strength number.
Step 15
Take a photo or note of your wind vane and anemometer results and share your finished creation on DIY.org.
Help!?
What can we use instead of cardboard or straws if we don't have them?
Use a cereal box or stiff paper cut to about 10 centimeters for the wind vane arrow and replace plastic straws with thin wooden skewers or pencil halves taped together, following the same taping and balancing steps.
My wind vane or cup anemometer keeps wobbling or won't spin smoothly — what should I check?
Check that the cardboard arrow is taped at the straw's center so the straw balances, adjust the tape to find the balance point, and with adult help make a small hole in the pencil eraser before pushing the pushpin through so each straw can rotate freely on the eraser pivot.
How can I adapt this activity for younger kids or older kids who want more challenge?
For younger children, pre-cut the 10 cm arrow and pre-poke eraser holes so they can tape cups and count spins for 10 seconds with supervision, while older kids can precisely record three 30-second trials, calculate the average spins per 30 seconds and multiply by 2 to compare wind strength at different locations with a compass reference.
How can we extend or personalize our wind vane and anemometer project after completing the basic steps?
Decorate the cardboard arrow and paper cups, mount the pencils in a PVC or wooden base for sturdiness, mark compass bearings on a paper circle to record vane directions, and log average spins per minute over several days before taking a photo to share on DIY.org.
Watch videos on how to Find the wind
Where Does Wind Come From? | The Science of Flying | SciShow Kids
3 Videos
Where Does Wind Come From? | The Science of Flying | SciShow Kids

Air and Wind for Kids: Learn About How Wind and Air Affect Weather | Harmony Square Science

What is Wind Energy | Science for Kids
Facts about weather instruments and wind measurement
🧭 Weather vanes (also called wind vanes) were used by the ancient Greeks over 2,000 years ago to show wind direction.
🌬️ The cup anemometer was invented in 1846 by John Thomas Romney Robinson and is still a common tool to measure wind speed.
📏 Meteorologists often use the Beaufort scale to describe wind—Beaufort 3 (a gentle breeze) is about 12–19 km/h (7–12 mph).
🔭 Wind speed usually increases with height, so readings on towers or weather balloons are often stronger than at ground level.
🌎 Wind happens because air moves from high-pressure areas to low-pressure areas, helping push weather systems around the Earth.
How do I build and use a simple wind vane and cup anemometer to find the wind?
What materials do I need to make the wind vane and cup anemometer?
What ages is this wind activity suitable for?
What are the benefits, safety tips, and fun variations for this wind experiment?
