Build an arduino powered weather station
Build an Arduino-powered weather station to measure temperature, humidity, and air pressure using sensors, display readings, and learn basic coding and electronics.

Step-by-step guide to build an Arduino-powered weather station
Weather Station with Arduino Tutorial
Step 1
Clear a clean workspace and lay out all materials so you can find each part easily.
Step 2
Plug the Arduino into the computer using the USB cable to power it and allow code uploads.
Step 3
Press the BME280 sensor and the I2C display gently into the breadboard so their pins are accessible.
Step 4
Connect the BME280 to the Arduino by wiring VCC to 5V GND to GND SDA to A4 and SCL to A5 on the Arduino.
Step 5
Connect the I2C display to the Arduino by wiring VCC to 5V GND to GND SDA to A4 and SCL to A5 so the display shares the I2C lines.
Step 6
Open the Arduino IDE on your computer and select Arduino Uno and the correct serial port from the Tools menu.
Step 7
Install the libraries Adafruit BME280 Adafruit Unified Sensor Adafruit GFX and Adafruit SSD1306 using the Library Manager in the Arduino IDE.
Step 8
Open or paste a weather station sketch that reads the BME280 and writes to the I2C display into the Arduino IDE.
Step 9
Check the sketch for I2C addresses and display settings and change any address numbers to match your modules if needed.
Step 10
Click Upload in the Arduino IDE to compile the sketch and send it to the Arduino and wait until the upload completes.
Step 11
Open the Serial Monitor and look at the display to verify temperature humidity and pressure readings appear and look reasonable.
Step 12
Share a photo and short description of your finished Arduino-powered weather station on DIY.org
Help!?
What can I use if I can't find the BME280 or the I2C display?
If you can't find a BME280, substitute a BMP280 for temperature and pressure (no humidity) or a DHT22 for temperature and humidity but you'll need to rewire the sensor to a digital pin, install the corresponding library, and update the sketch's sensor-reading lines accordingly.
What should I do if the display shows nothing or the sensor readings are wrong after uploading the sketch?
If readings don't appear or look wrong, first check that SDA is wired to A4 and SCL to A5 with a common GND and 5V, run an I2C scanner sketch to confirm the module address, ensure the Adafruit BME280/SSD1306/GFX libraries are installed, and then update the I2C address numbers in the sketch before uploading again.
How can I adapt this activity for different age groups?
For younger children have an adult plug in the Arduino and pre-insert the BME280 and I2C display while the child labels wires and watches the Serial Monitor, for middle-schoolers let them wire VCC/GND/SDA/SCL and install libraries with guidance, and for teens assign changing I2C addresses in the sketch and adding simple data-logging code as a challenge.
How can we extend or personalize the weather station after it works?
To extend the project add an SD card module and RTC to log timestamped readings, or replace the Uno with an ESP8266/ESP32 and modify the sketch and libraries to send temperature, humidity, and pressure to ThingSpeak or display graphs on the I2C screen, then mount the setup in a 3D-printed or weatherproof case.
Watch videos on how to build an Arduino-powered weather station
DIY Arduino Weather Station | Make a Pocket Weather Device to Monitor Environment
4 Videos
DIY Arduino Weather Station | Make a Pocket Weather Device to Monitor Environment
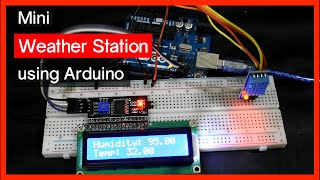
Mini Weather Station using an Arduino
Arduino Weather Station Project with BMP180 and DHT11 Sensors

Make Your Own DIY Weather Station (Easy Tutorial)
Facts about Arduino and electronics for kids
🔌 Arduino started in Italy in 2005 to give students an affordable way to build interactive electronics.
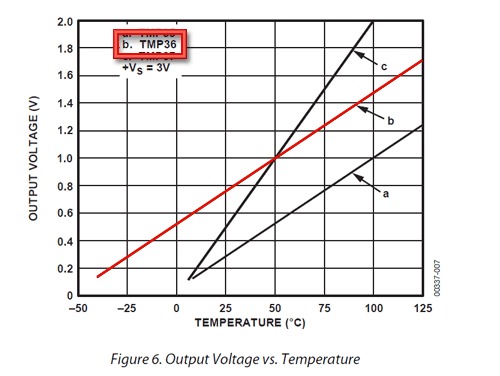
🌡️ The BME280 is a tiny all-in-one sensor used in hobby weather stations to measure temperature, humidity, and air pressure.
📉 A steady drop in air pressure is a classic sign that stormy weather may be on the way — meteorologists watch pressure closely.
📶 I²C (two-wire) communication lets many sensors share just two wires (SDA and SCL), saving Arduino pins for other parts.
🧑💻 Learning to read sensors and write simple Arduino sketches teaches coding and electronics skills used in robots and gadgets.
How do I build an Arduino-powered weather station for kids?
What materials do I need to make an Arduino weather station?
What ages is building an Arduino weather station suitable for?
What are the benefits and safety tips for this project?
