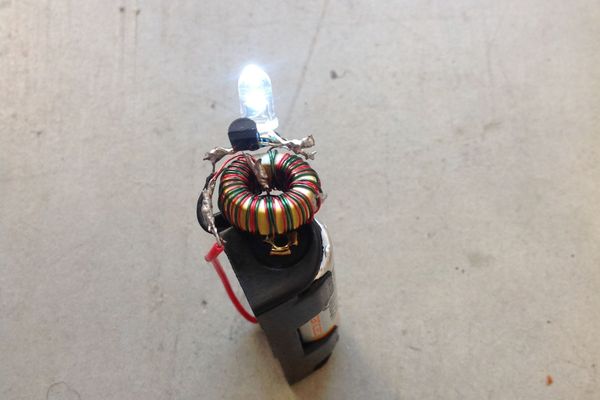
Make a joule thief circuit
Build a joule-thief circuit to light an LED from a nearly dead battery using wire, transistor, resistor, and a small ferrite core with adult help.


Step-by-step guide to make a joule thief circuit
Step 1
Gather all the materials on a clear workspace so everything is ready.
Step 2
Cut about 50 cm of magnet wire and fold it in half to make a loop and two free ends.
Step 3
Wind the folded wire around the ferrite toroid making 8 to 12 neat turns while keeping the loop on one side.
Step 4
Use sandpaper or the wire stripper to remove about 5 mm of enamel from the loop and from both free ends so the copper is shiny.
Step 5
Put a small piece of tape on each free end to keep them separate and easy to handle.
Step 6
Twist the loop end to the LED long leg (anode) and secure the connection with tape.
Step 7
Twist one free end of the coil to the LED short leg (cathode) and secure that connection with tape.
Step 8
Wrap one end of the 1 kiloohm resistor to the other free coil end and secure it with tape.
Step 9
Hold the transistor with its flat face toward you and the leads pointing down then attach the resistor other end to the middle pin (base) and tape it.
Step 10
Connect the transistor emitter (left pin when flat face is toward you) to the battery negative terminal with a short piece of wire and tape.
Step 11
Connect the LED short leg and its attached coil free end to the transistor collector (right pin) and secure the connection with tape.
Step 12
Have an adult carefully connect the battery positive to the loop/LED anode connection so the circuit can start.
Step 13
Share your finished joule-thief circuit and a photo of it on DIY.org.
Help!?
What can we use instead of a ferrite toroid or magnet wire if those are hard to find?
Substitute a small ferrite bead or a toroidal core salvaged from an old power supply for the ferrite toroid and use thin insulated copper wire (22–26 AWG) stripped of insulation in place of enamel magnet wire, then still wind 8–12 turns as instructed.
My LED won't light—what should I check first when following the steps?
Make sure you fully remove the enamel at the loop and free ends with sandpaper (step about 5 mm), verify you wound 8–12 neat turns around the ferrite toroid, confirm the transistor is held with its flat face toward you so the emitter/base/collector connections match the instructions, and ensure the battery is fresh and the LED anode/cathode are connected as described.
How can I adapt this joule thief for younger children or for older kids who want more challenge?
For younger children have an adult pre-strip wires, wind the coil, and make the battery and transistor connections with tape per the instructions while the child assembles and observes, and for older kids let them solder joints, experiment with different resistor values instead of the 1 kiloohm, and measure voltages with a multimeter.
What are simple ways to improve or personalize our finished joule-thief before sharing it on DIY.org?
Improve durability by soldering taped connections, add a small toggle switch and battery holder, mount the coil and transistor on perfboard or inside a decorated box, and try different colored LEDs so you can photograph and describe variations when you post to DIY.org.
Facts about basic electronics and circuits
🔋 A nearly-dead AA battery can still power an LED when a joule thief squeezes the leftover energy into usable light.
⚡ The joule thief is a tiny boost converter that uses switching to make a higher voltage than the battery alone.
🧲 Ferrite cores are made from iron-oxide ceramics and help concentrate magnetic fields so small coils work efficiently.
🔩 You only need one transistor, one resistor, a small coil on a ferrite core, and an LED to build a working joule thief — super simple!
💡 Hobbyists love joule thieves because they’re a fun way to recycle energy and learn how inductors and transistors interact.
How do you build a joule-thief circuit to light an LED from a nearly dead battery?
What materials do I need to make a joule-thief circuit?
What ages is building a joule-thief suitable for?
What safety tips should we follow when making a joule-thief, and are there easy variations?
