Identify a fossil
Examine real or replica fossils with a magnifying glass, make rubbings, compare features to field guides, and record observations to identify each specimen.


Step-by-step guide to identify a fossil
Fossils for Kids | Learn all about how fossils are formed, the types of fossils and more!
Step 1
Gather all the Materials Needed and bring them to a flat table or workspace.
Step 2
Place your fossils and magnifying glass on the workspace so they are easy to reach.
Step 3
Choose one fossil specimen to study first.
Step 4
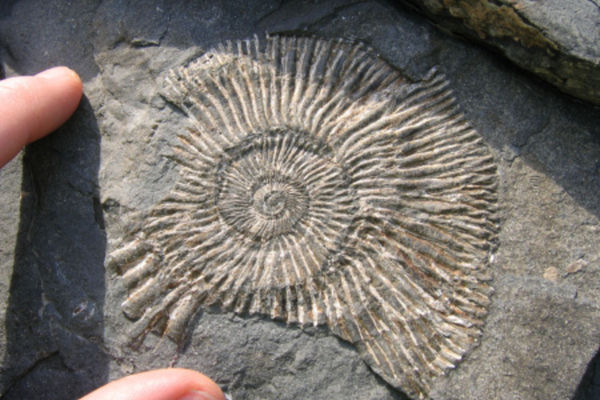
Examine the chosen fossil with the magnifying glass and look for details like ridges bumps or spiral shapes.
Step 5
Lay a sheet of paper over the fossil and hold it steady with a small piece of tape.
Step 6
Rub the paper gently with a crayon to make a clear rubbing of the fossil surface.
Step 7
Write a short observation in your notebook describing the rubbing and the fossil’s texture shape and size.
Step 8
Open the field guide and compare your rubbing and observations to the pictures and notes in the guide.
Step 9
Decide which fossil in the guide most closely matches your specimen and write the likely identity in your notebook.
Step 10
Repeat Steps 3 through 9 for each remaining fossil specimen you have.
Step 11
Create a final labeled page showing each fossil rubbing its name and one sentence about how you identified it.
Step 12
Share your finished fossil identification page and photos of your rubbings on DIY.org.
Help!?
What can we use instead of a magnifying glass or hard-to-find fossils?
If you don't have a magnifying glass use a smartphone camera zoom or a jeweler's loupe to examine details in Step 4, and if real fossils are hard to find use clean shells, fossil replicas from toy kits, or textured rocks as substitutes for Step 3.
My rubbing came out faint or smudged—how can I fix it?
If your rubbing in Step 6 is faint, make sure the paper is taped flat as in Step 5, use the crayon on its side with the wrapper removed for broader strokes, or switch to thinner paper so the fossil's ridges and bumps show more clearly.
How can I adapt this activity for different age groups?
For younger children (ages 3–6) simplify Steps 4–6 by using large crayons, pre-taped paper, and adult help writing the notebook note in Step 7, while older kids (10+) can add measurements, scale bars, and deeper field guide research in Steps 8–11.
What are some ways to extend or personalize the fossil identification project?
To extend the activity, make Step 12 a mini-exhibit by mounting each rubbing on colored paper with its name and the one-sentence ID from Step 11, photograph the pages for Step 13, and create a themed album to share on DIY.org.
Watch videos on how to identify a fossil
What is a Fossil | Types of Fossils | How are Fossils formed | Educational video for Kids
4 Videos
What is a Fossil | Types of Fossils | How are Fossils formed | Educational video for Kids
Fun Facts about Fossils | Interactive | Learn about what fossils are and how they form

The basics of fossils for KS1 & KS2
What are Fossils? Science For Kids
Facts about paleontology for kids
🦴 The oldest known fossils are about 3.5 billion years old — tiny signs of ancient microbes!
🔬 A magnifying glass can reveal tiny growth lines and shell textures that help you tell fossils apart.
🐚 Ammonites were shelled cephalopods and make great index fossils for figuring out rock ages.
🕰️ Trilobites lived from about 521 to 252 million years ago and left thousands of species for scientists to study.
👩🔬 Mary Anning, a 19th-century fossil hunter, discovered important fossils like ichthyosaurs and inspired paleontology.
How do I run a fossil identification activity with my child?
What materials do we need to identify fossils at home or in class?
What ages is fossil identification suitable for?
What safety tips and fun variations can I use for fossil identification?
