Build a rocket vehicle
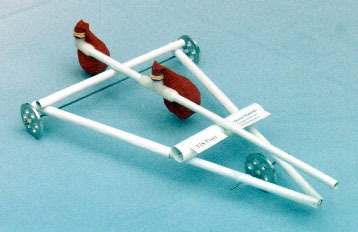
Build a balloon-powered rocket vehicle from a plastic bottle, wheels, straw, and tape to explore thrust, motion, and simple engineering through hands-on testing.


Step-by-step guide to build a balloon-powered rocket vehicle
How to make a Rocket | Working model for school and science exhibition
Step 1
Gather all your materials on a clear table so you're ready to build.
Step 2
With adult help use scissors or an awl to make one small hole on each side of the bottle near one end and another matching pair near the other end for the axles.
Step 3
Push one skewer straight through the lower pair of holes so equal lengths stick out both sides.
Step 4
Push the second skewer straight through the upper pair of holes so equal lengths stick out both sides.
Step 5
Attach wheels by sliding one wheel onto each skewer end and tape them in place so they won’t fall off.
Step 6
Trim any extra skewer that sticks out too far so the wheels do not rub the ground.
Step 7
Roll the bottle gently to check the wheels spin freely and do not wobble badly.
Step 8
Tape the straw along the top center of the bottle with the straw’s opening pointing backward and the other end extending past the bottle.
Step 9
Stretch the balloon’s open end over the free end of the straw and tape the balloon neck tightly so no air escapes at the connection.
Step 10
Blow through the straw to inflate the balloon until it is nice and round.
Step 11
Pinch the straw or twist the balloon neck to hold the air inside so it won't escape yet.
Step 12
Place your rocket vehicle on a flat surface with the straw opening pointing backward.
Step 13
Release the straw or untwist the balloon neck to let the air rush out and watch your rocket zoom forward.
Step 14
Share your finished rocket vehicle on DIY.org
Help!?
What can we use if we don't have wooden skewers or plastic wheels for the axles and wheels?
If you don't have skewers use wooden dowels, thick pencils, or straight sticks for the axles and replace the wheels with bottle caps, sturdy jar lids, or cardboard circles taped or glued to the axles.
My rocket won't roll straight or the wheels rub—how can I fix that?
If wheels rub or wobble, trim any extra skewer that sticks out, reinsert the skewers so equal lengths stick out both sides through the matching pairs of holes, and secure each wheel with tape or small folded cardboard washers to stop sliding and rubbing.
How can I adapt the building steps for different ages?
For toddlers and preschoolers have an adult make the holes and push skewers while the child decorates and tapes the balloon and straw, for elementary kids supervise them cutting holes and assembling axles and wheels, and for older kids let them experiment with straw length, balloon size, and wheel placement to improve speed and performance.
What are some fun ways to improve or personalize our balloon rocket vehicle?
You can add cardboard fins taped to the bottle for stability, decorate with markers and stickers, fit a tapered paper nozzle over the straw to focus airflow, or attach a small payload to test how far the rocket can carry weight.
Watch videos on how to build a balloon-powered rocket vehicle
Build a Cardboard Space Station Rocket! | DIY Craft for Kids
4 Videos

Build a Cardboard Space Station Rocket! | DIY Craft for Kids
What Tools do You Need for Building Skill Level 1 Model Rockets?
How to make a rocket for school project/How to make a simple Rocket model with paper plastic bottle
A Beginners Guide To Model Rockets!
Facts about thrust, motion, and simple engineering for kids
🎈 Balloons are a great demo of Newton's third law — push air out one way and the balloon zips the other way!
🚀 The same idea behind your balloon car (expelling mass to make thrust) is the basic principle of real rockets.
🧪 A bigger balloon usually stores more air and can make a balloon car go faster and farther — size matters for thrust!
🛞 Cutting friction (smooth axles, aligned wheels) often helps your vehicle travel farther than just adding more air.
♻️ Using a recycled plastic bottle turns trash into toys — fun for learning and good for the planet.
How do you build a balloon-powered rocket vehicle?
What materials do I need to build a balloon-powered rocket vehicle?
What ages is a balloon-powered rocket vehicle suitable for?
What are the benefits and safety tips for this balloon rocket activity?
