Create a sprite sheet
Create a sprite sheet by drawing sequential character poses on grid paper, scanning or photographing them, and arranging frames digitally to make simple game animations.


Step-by-step guide to create a sprite sheet
Create a Sprite Sheet for Your Game - Fast and Simple
Step 1
Gather your materials and find a quiet table to work at.
Step 2
Decide on one simple action to animate like walking waving or jumping.
Step 3
Choose how many frames you want (4 to 8 is good) and draw equally sized frame boxes in a row using the grid and ruler.
Step 4
Lightly draw the character in the first box showing the starting pose.
Step 5
Lightly draw the character in the last box showing the ending pose.
Step 6
Lightly fill in the middle boxes with the in-between poses so each frame changes a little from the last.
Step 7
Trace over your pencil drawings with the fine-tip pen or marker and wait for ink to dry.
Step 8
Erase the pencil lines gently so only the clean inked frames remain.
Step 9
Color your character the same way in every frame so colors stay consistent.
Step 10
Take clear photos or scan each frame making sure the camera is straight above the paper and lighting is even.
Step 11
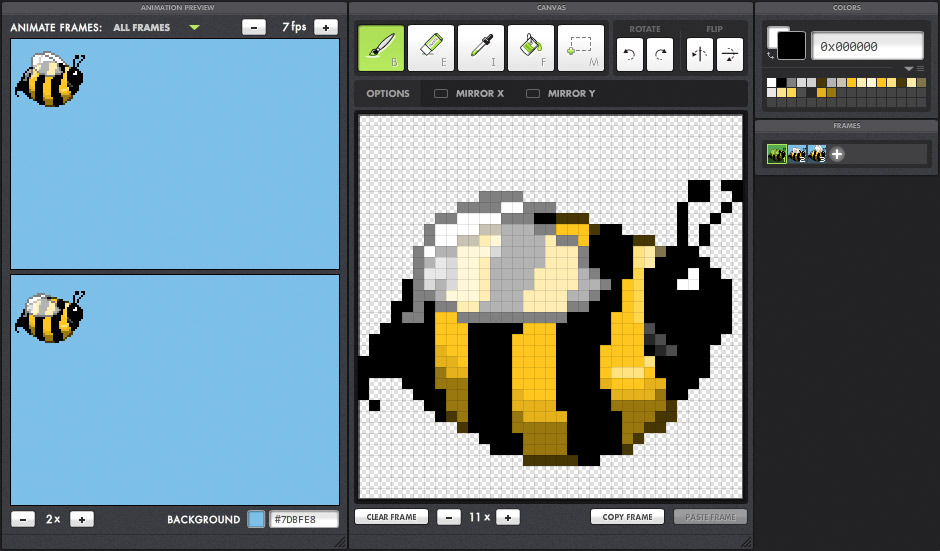
Transfer the images to a computer and create a new blank image whose width equals one frame width multiplied by the number of frames and whose height equals one frame height.
Step 12
Place each photo side-by-side in order into the new image with no gaps and save the combined image as a PNG.
Step 13
Open a simple sprite animator or slideshow tool and load your PNG to check the frames play in order at a steady speed.
Step 14
Fix any frames that look off by editing the image or re-scanning just that frame and updating the PNG.
Step 15
Share your finished sprite sheet and a short description of your animation on DIY.org.
Help!?
What can I use if I don’t have a fine-tip pen, scanner, or ruler?
Use a thin felt-tip marker or ballpoint pen instead of the fine-tip pen, a smartphone camera held steady over the paper instead of a scanner (following step 10's straight-above lighting tip), and a straight book edge or printable grid as a ruler substitute for drawing frame boxes in step 3.
My photos look crooked or the frames don't line up in the combined PNG—how do I fix it?
Reshoot each frame with the camera held directly above and the paper taped flat for even lighting as in step 10, then crop every image to the exact same frame width and height before placing them side-by-side as described in step 12 so the PNG aligns.
How can I adapt this activity for younger kids or make it more challenging for older kids?
For younger children use just 4 larger frames, pre-printed character outlines, and crayons for steps 3–9, while older kids can use 6–8+ frames, add more subtle in-between poses in step 6, and do digital edits after step 11 to smooth motion.
What are creative ways to extend or personalize the finished sprite sheet?
Add a consistent background color or props in each frame before saving the PNG in step 12, create alternate outfits/colors by editing individual frames, import the sheet into a sprite animator in step 13 to tweak timing and loops, and then share the variations on DIY.org in step 15.
Watch videos on how to create a sprite sheet
HOW TO MAKE SPRITE SHEETS FOR YOUR UNITY GAME - TUTORIAL
4 Videos

HOW TO MAKE SPRITE SHEETS FOR YOUR UNITY GAME - TUTORIAL
How to Create a Character Sprite Sheet
How to Make a Sprite Sheet from a 3D Animation in Blender
Create a Sprite with the Scratch Paint Editor | Tutorial
Facts about sprite sheets and pixel art
🕹️ Early video games used sprites because hardware couldn't redraw entire screens quickly, so sprites let tiny characters move independently.
🎨 A sprite sheet packs many animation frames into one image file — that makes games faster and uses less memory.
🧩 Pixel art sprites can be tiny: classic game characters were often just 8×8 or 16×16 pixels.
📸 You can create modern sprite sheets by scanning paper drawings or photographing sketches and arranging the frames in photo editors.
⏱️ Simple game animations often look good at 6–12 frames per second, so you don't always need lots of frames.
How do I create a sprite sheet by drawing sequential character poses on grid paper?
What materials do I need to make a sprite sheet from drawings?
What ages is drawing and digitizing sprite sheets suitable for?
What are the benefits of making a sprite sheet with children?
