Build an electric motor
Build a simple electric motor using a battery, magnet, and coiled wire; assemble, test rotation, and learn basic electromagnetism safely.


Step-by-step guide to build a simple electric motor using a battery, magnet, and coiled wire
Build a Simple Electric Motor | Science Project
Step 1
Ask an adult to supervise the whole project.
Step 2
Clear a flat workspace with plenty of room to work.
Step 3
Cut about 50 cm of enameled copper wire with the wire cutters.
Step 4
Wrap the wire around the AA battery 8 to 12 times to make a tight coil and leave about 3 cm of straight wire free at each end.
Step 5
Slide the coil off the battery carefully so it keeps its round shape.
Step 6
Bend the two free wire ends so they become straight axles sticking out from opposite sides of the coil.
Step 7
Use sandpaper to rub the enamel off only the bottom half of each straight axle end until shiny copper shows.
Step 8
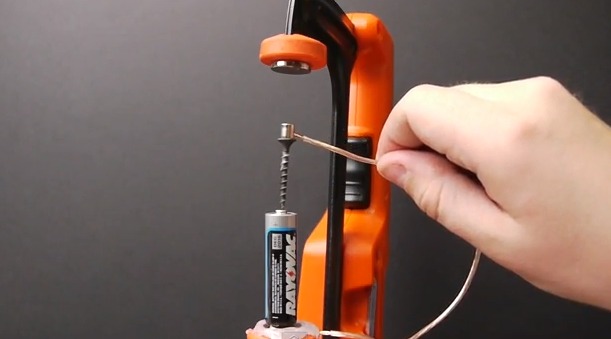
Straighten the two paperclips with the pliers and bend each into a small upright loop at the top to hold the wire axles.
Step 9
Remove a small strip of the battery label to expose metal on the side of the battery.
Step 10
Tape one paperclip so its foot contacts the top terminal of the battery and tape the other paperclip so its foot contacts the exposed metal on the battery side making two upright supports that do not touch each other.
Step 11
Place the magnet on the battery top and then rest the coil axles in the paperclip loops so the coil sits above the magnet and the sanded bottom halves of the axles touch the loops.
Step 12
Give the coil a gentle spin with your finger to start it and watch it rotate; if it does not spin adjust the loop heights or magnet position slightly until it turns freely.
Step 13
Take a photo or short note about how your motor turned and share your finished creation on DIY.org
Help!?
Can I substitute any materials if I can't find enameled copper wire or a small magnet?
If enameled copper wire is unavailable, use thin insulated copper wire (about 22–26 AWG) and strip the insulation where you would sand in the sandpaper step, and if you don't have a neodymium magnet you can stack two or three small fridge magnets on the battery top as described in the 'place the magnet on the battery top' step.
My coil won't spin—what should I check first?
Check that you fully sanded the bottom half of each axle until shiny copper in the sandpaper step, that those sanded halves make firm contact with the paperclip loops from the support/taping steps, the paperclip supports do not touch each other, and that the coil is balanced and can turn freely above the magnet.
How can I adapt the project for different age groups?
For younger children have an adult do the 50 cm wire cutting, the tight 8–12 turn wrapping and the sandpaper step while the child helps wind and watches, and for older kids let them measure turns, experiment with magnet strength or paperclip loop height, or add a simple switch under supervision.
How can we extend or personalize the motor once it works?
To enhance the project, decorate the coil with colored tape before wrapping, attach a lightweight paper propeller to the axle, try different numbers of turns (8–12) or stacked magnets on the battery top to change speed, and mount the paperclip supports on a small cardboard base for a steady display before photographing to share on DIY.org.
Watch videos on how to build a simple electric motor using a battery, magnet, and coiled wire
Build an Electric Motor
4 Videos
Build an Electric Motor

DIY Simple Electric Motor | How Does it Work? | Science Project

Electric Motor Build - Make a simple electric motor

How to Build a Simple Electric Motor | Easy Science Project for Beginners
Facts about electromagnetism and basic electronics for kids
⚡ Michael Faraday built one of the first simple electric motors in 1821 using a wire, a magnet, and a bit of ingenuity.
🧲 Neodymium magnets are much stronger than fridge magnets and can make tiny DIY motors spin way faster.
🔋 A single AA battery (~1.5 V) can power many small homemade motors — sometimes even a coin cell will make them turn!
🌀 Wrapping more turns of wire into a coil makes a stronger electromagnet, which helps the motor produce more torque.
🚗 Electric motors like the ones you build at home are the same basic idea used in toy cars, fans, and drones.
How do I build a simple electric motor using a battery, magnet, and coiled wire?
What materials do I need to build a kid-friendly electric motor?
What ages is building a simple electric motor suitable for?
What safety tips and variations should I use when teaching kids to build a motor?
