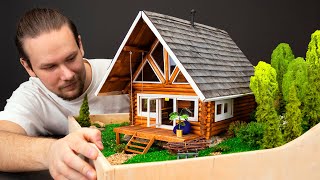
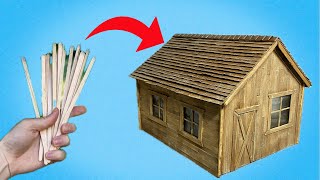
Build a cabin
Build a small model cabin using craft sticks, cardboard, glue, and paint to learn measuring, basic construction, and creative design with adult supervision.


Step-by-step guide to build a small model cabin
DIY Mini Log Cabin | How to make Miniature House From Cardboard and Old Magazines | DIY Mini House
Step 1
Gather all materials and clear a flat workspace so you have room to build.
Step 2
Use the ruler and pencil to draw a rectangle on the cardboard for the cabin floor deciding how big your cabin will be.
Step 3
Cut out the cardboard floor along your pencil lines with scissors.
Step 4
Arrange craft sticks side by side to match the length of one long side of the floor and glue them together to make the first long wall panel.
Step 5
Arrange craft sticks side by side to match the length of the other long side of the floor and glue them together to make the second long wall panel.
Step 6
Arrange craft sticks side by side to match the short side of the floor and glue them together to make the first short wall panel.
Step 7
Make the second short wall panel the same way by gluing craft sticks side by side to match the remaining short side.
Step 8
Glue one long wall panel upright to the edge of the cardboard floor and hold it steady until the glue sets.
Step 9
Glue the opposite long wall panel upright to the other long edge of the floor and press the corners together.
Step 10
Glue one short wall panel to a short edge connecting the two long walls and press the corner to secure it.
Step 11
Glue the final short wall panel to close the rectangle and press all corners so the cabin walls are stable.
Step 12
Cut two identical cardboard rectangles for the roof pieces that overhang the walls a little and glue craft sticks across them if you want a shingled look.
Step 13
Glue the two roof pieces together at the top and attach the finished roof to the top of your cabin.
Step 14
Paint and decorate your cabin any way you like and let it dry completely.
Step 15
Share a photo of your finished cabin on DIY.org so everyone can see your awesome creation.
Help!?
I can't find craft sticks—what can I use instead to make the wall panels?
If you don't have craft sticks, substitute folded cardboard strips or thin balsa wood and follow steps 4–6 by arranging those strips side by side and gluing them to form each wall panel.
The walls keep falling over while I glue them upright—how can I fix that?
When gluing the long and short wall panels upright to the cardboard floor (steps 8–11), stabilize them with clothespins or small clamps and glue small cardboard corner braces inside the seams to hold corners steady until the glue dries.
How can I adapt this cabin build for different ages?
For younger kids, have an adult pre-cut the cardboard floor and wall panels and let them glue craft sticks together and paint (steps 2–6 and 14), while older kids can measure and cut the floor themselves (steps 2–3), use a craft knife and hot glue for sturdier assembly (steps 8–13), and add detailed roofing and trim.
What are some ways to personalize or improve the finished cabin?
Personalize the cabin by cutting a door and windows into one wall panel before gluing (step 11), add interior furniture from scrap cardboard, glue a battery tea light inside before attaching the roof (step 13), and paint shingle patterns on the craft-stick roof pieces (step 14).
Watch videos on how to build a small model cabin
Building a Mini Wooden Cabin - DIY Craft
3 Videos
Building a Mini Wooden Cabin - DIY Craft
How To Make Miniature Wooden Chalet | Woodworking DIY
From Coffee Stir Sticks to Miniature Cabin
Facts about model building and basic construction for kids
🪵 Abraham Lincoln was famously born in a log cabin — log cabins were common frontier homes in early America.
📏 A standard craft (popsicle) stick is about 4.5 inches (11.4 cm) long — great for measuring and building tiny walls.
📐 Making a model cabin teaches scale and fractions; many miniature projects use a 1:12 scale like dollhouses.
🖌️ Thin coats of craft paint can dry in 20–60 minutes, so small builders can paint and keep creating the same day.
🧩 Corrugated cardboard is lightweight but strong — its fluted middle layer gives model structures extra sturdiness.
How do I build a small model cabin with craft sticks?
What materials do I need to build a craft-stick cabin model?
What ages is this craft suitable for?
What safety tips should I follow when making a craft-stick cabin?
