Build a simple machine
Build a simple lever using a ruler, pencil, and small weights to lift objects and learn about force and balance.


Step-by-step guide to build a simple lever
Simple Machines for Kids: Science and Engineering for Children - FreeSchool
Step 1
Gather all the materials and bring them to a flat table or floor space.
Step 2
Lay the pencil on the table horizontally to act as the fulcrum.
Step 3
Place the ruler across the pencil so the pencil is under the middle and the ruler can rock like a seesaw.
Step 4
Put the small object you want to lift near one end of the ruler.
Step 5
Place one small weight on the opposite end of the ruler at about the same distance from the pencil as the object.
Step 6
Watch the ruler to see if the object lifts when the weight is on the other side.
Step 7
If the object does not lift move the weight farther from the pencil and test again.
Step 8
If it still does not lift add one more weight and test again.
Step 9
Slide the small object closer to the pencil and test how many weights are needed now.
Step 10
Move the weight closer to the pencil and test how that changes the number of weights needed.
Step 11
Draw a quick sketch or write one sentence on your paper about what changed when you moved the weights or the object.
Step 12
Share a photo and a short sentence about your finished lever and what you learned on DIY.org
Help!?
What can we use instead of a pencil or ruler if those exact materials are hard to find?
Use a round wooden dowel, a marker, or a rolling crayon as the fulcrum in place of the pencil and a yardstick, stiff book cover, or flat piece of cardboard cut to ruler length instead of the ruler so the setup can still rock like a seesaw.
Why won't the small object lift when I put the weight on the opposite end and what should I try first?
If the object doesn't lift, make sure the pencil is under the ruler's midpoint so the ruler can pivot, then move the weight farther from the pencil or add one more small weight as the instructions direct to increase the turning force.
How can I adapt this lever activity for younger children or for older kids who want more challenge?
For preschoolers use larger safe items like blocks and toy cars and focus on moving the weight and drawing a quick sketch, while older kids should measure and record distances from the pencil and count weights to explore mechanical advantage quantitatively.
How can we extend or personalize the project to make a stronger display or science fair entry for DIY.org?
Label the ruler with distance marks, test several fulcrum positions and different small objects and weights, photograph each trial, and write a one-sentence conclusion about which arrangement lifted the object and why to share on DIY.org.
Watch videos on how to build a simple lever
My 6 Simple Machines Playground- STEM Projects for Kids
4 Videos
My 6 Simple Machines Playground- STEM Projects for Kids
How To Build a Rube Goldberg Machine | STEM Lesson Plan
Rube Goldberg 6 Simple Machines
Six Simple Machine Project Using All Six Machines - Rube Goldberg
Facts about simple machines for kids
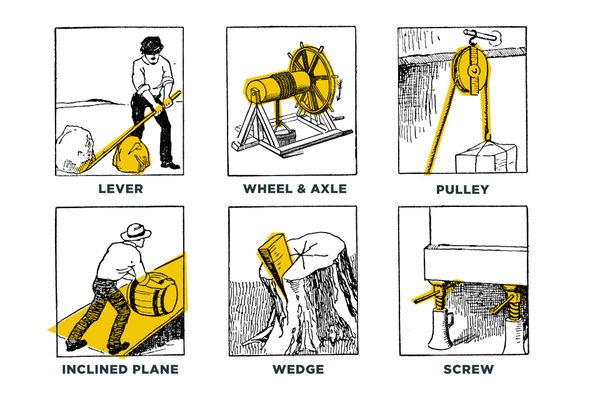
⚖️ Levers are one of the six classical simple machines — they help you lift heavy things by changing how force is applied.
🧠 Archimedes explained the lever’s power and famously said, “Give me a place to stand…” when talking about moving large loads.
🎯 There are three classes of levers: first (seesaw), second (wheelbarrow), and third (tweezers), each arranged differently between fulcrum, effort, and load.
📏 You can build a real working lever with a ruler (beam), a pencil (fulcrum), and coins or small weights — perfect for hands-on experiments.
🧮 Mechanical advantage is the ratio of distances from the fulcrum (effort distance ÷ load distance) — it tells you how much easier a lever makes work.
How do you build a simple lever with a ruler, pencil, and small weights?
What materials are needed to make a lever for lifting small objects?
What ages is making a simple lever suitable for?
What are the benefits and safe variations of the lever activity?
