Build a mini transport system
Build a mini transport system using cardboard, toy vehicles, ramps, and pulleys to move cargo between stations while learning about forces and simple machines.


Step-by-step guide to build a mini transport system
DIY || Modes Of Transport || Land, Water & Air Transportation || Cardboard Crafts ||
Step 1
Gather all the materials and put them on a clear table or floor space so you can reach everything.
Step 2
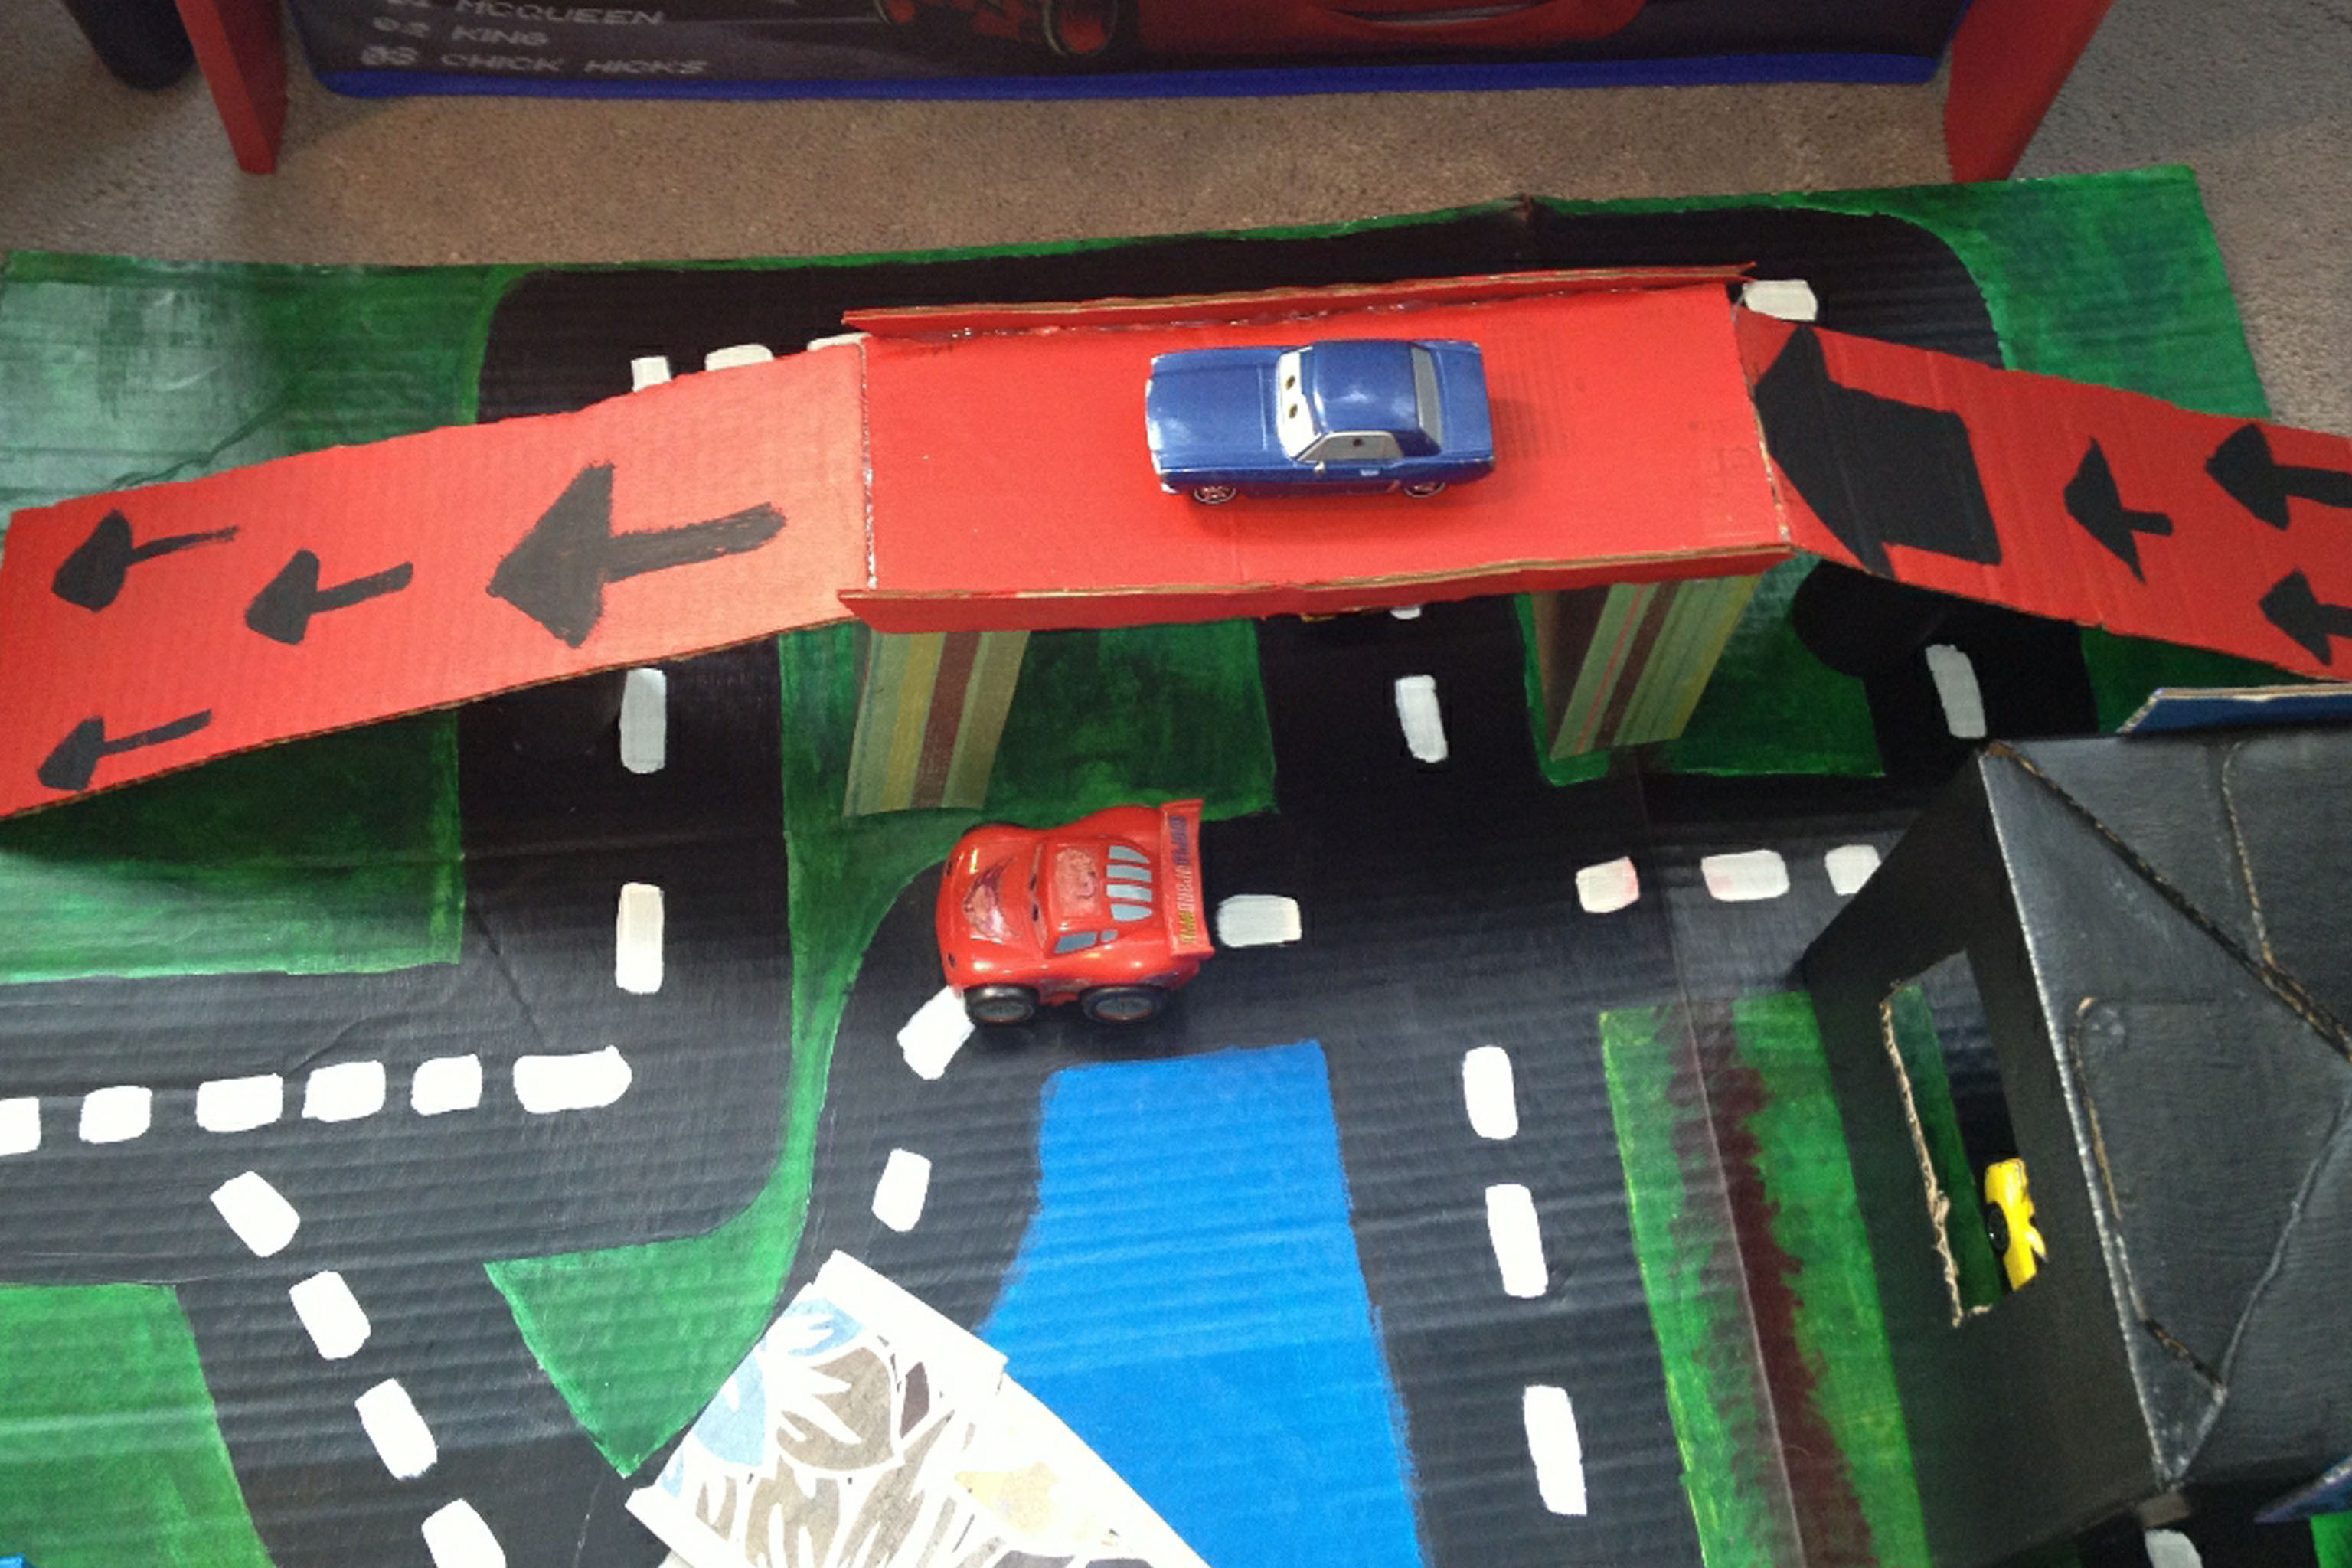
Pick where your two stations will sit and place two cardboard bases about one arm's length apart.
Step 3
Cut two ramp pieces from cardboard that will connect each station to the floor or to a lower level.
Step 4
Tape each ramp to a station so the ramps are steady and make a smooth slope.
Step 5
Make a cargo carrier by taping a bottle cap or small box to a toy vehicle or a small cardboard platform.
Step 6
Build two cardboard towers for the pulley supports by folding or stacking and taping small pieces of cardboard upright.
Step 7
Lay a pencil or wooden skewer across the top of the two towers so it sits like an axle.
Step 8
Loop a piece of string over the pencil so the string can slide back and forth like a pulley.
Step 9
Tie one end of the string securely to the cargo carrier and leave the other end free as your control line.
Step 10
Place the cargo carrier and toy vehicle at the top of a ramp and release it to test the ramp path and connection to the pulley.
Step 11
Pull the free end of the string to lift or move the cargo between stations using the pulley system.
Step 12
Adjust the ramp height or add a rubber band brake until the cargo moves at a steady speed along the ramp.
Step 13
Draw or write one sentence about how gravity and friction changed how the cargo moved.
Step 14
Share your finished transport system and what you learned on DIY.org.
Help!?
What can I use if I don't have a bottle cap, toy vehicle, pencil, or wooden skewer?
Use a small folded cardboard platform or a LEGO plate taped to a tiny block instead of the bottle cap or toy vehicle, and substitute a chopstick, thin dowel, or straw for the pencil/skewer when you lay the axle across the towers (steps: make a cargo carrier; lay a pencil or wooden skewer across the top of the two towers).
Why does the cargo stop or tip on the ramp and how can we fix it?
If the cargo stops or tips, add extra tape where the ramp meets the station to steady the slope, rebalance the carrier by taping its base flat to the toy vehicle or platform, and then adjust the ramp height or add the rubber band brake until it moves at a steady speed (steps: tape each ramp to a station; make a cargo carrier; adjust the ramp height or add a rubber band brake).
How can I adapt the activity for different age groups?
For ages 3–5 pre-cut the ramps and let them place stations and move the carrier, ages 6–8 can cut and tape the ramps and towers and thread the string, and ages 9+ can add a second pulley, vary cargo weights, and measure run times to study friction (steps: pick where stations will sit; cut two ramp pieces; build two cardboard towers; loop a piece of string over the pencil).
How can we extend or personalize the mini transport system to make it more challenging or creative?
Decorate the stations, add extra towers for a multi-stage pulley, test different cargo weights like bottle caps versus small boxes, attach a ruler and stopwatch to record times, and then share your modified design and your one-sentence conclusion about gravity and friction on DIY.org (steps: build towers; tie string to the cargo carrier; place the cargo on the ramp; draw or write one sentence).
Watch videos on how to build a mini transport system
Paper truck. Diy craft. Easy tutorial for nursery kids. Means of transport. Step-by-step tutorial.
4 Videos
Paper truck. Diy craft. Easy tutorial for nursery kids. Means of transport. Step-by-step tutorial.
Transport Model | Project on means of transportation | School Craft|

Means Of Transport For Children - Land, water and air transport for kids
How to Make Mini Bus | DIY Homemade Bus From Waste Box - Very Easy
Facts about simple machines and forces
🧰 A single fixed pulley only changes the direction of a force, but combining pulleys in a block-and-tackle can make lifting much easier.
🛤️ An inclined plane (ramp) reduces the force needed to lift an object — you travel farther but use less push.
📦 Corrugated cardboard is super strong for its weight; its fluted middle layer gives it surprising load-bearing power.
🚗 Toy cars are great physics testers: changing mass, wheel size, or ramp angle shows clear differences in speed and distance.
⚙️ Four of the six classic simple machines (inclined plane, lever, pulley, wheel and axle) are often used together in mini transport systems.
How do I build a mini transport system to move cargo between stations?
What materials do I need to build a mini transport system with cardboard, ramps, and pulleys?
What ages is this mini transport system activity suitable for?
What are the benefits, safety tips, and easy variations for this mini transport system activity?
