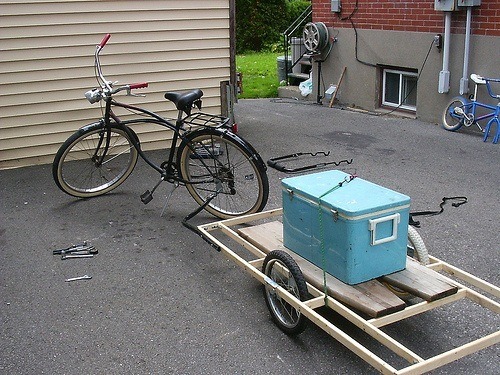
Build a cargo transporter
Build a small cargo transporter vehicle from cardboard, wheels, axles, and string, then test hauling and balancing small objects safely.


Step-by-step guide to build a small cargo transporter
Transport Model | Project on means of transportation | School Craft|
Step 1
Clear a flat workspace and lay down scrap paper to keep things tidy.
Step 2
Use the ruler and pencil to draw a cardboard rectangle about 20 cm long and 10 cm wide for the vehicle base.
Step 3
Cut out the rectangle carefully with scissors while an adult watches if you need help.
Step 4
Measure and mark two points centered near each short end about 1.5 cm from the edge for the axles.
Step 5
Cut the plastic straws into four pieces about 3 cm long to make axle sleeves.
Step 6
Tape one straw piece underneath each marked point so the straw holes line up straight across the base.
Step 7
Push the two wooden skewers through the straw sleeves so they stick out the same amount on each side to form axles.
Step 8
Make a small center hole in each bottle cap using the tip of the scissors with adult help.
Step 9
Slide a bottle cap onto each skewer end to be a wheel and secure each cap with a tiny piece of tape so they stay on but can still turn.
Step 10
Cut and glue small cardboard pieces to the base edges to make low cargo walls so things won’t fall out.
Step 11
Tape one end of the string to the front center of the base to make a tow line for pulling.
Step 12
Place one small lightweight object into the cargo bed near the middle of the transporter.
Step 13
Gently pull the string to tow the transporter a short distance and watch how smoothly it moves.
Step 14
If it tips or wobbles ask an adult to help move the cargo toward the center to improve balance.
Step 15
Share a photo or story about your finished cargo transporter on DIY.org
Help!?
What can I use if I don't have wooden skewers or bottle caps?
Use straight pencils or thin dowels as axles and substitute bottle caps with large plastic jar lids or beads with holes, making a small center hole and securing them with the tiny pieces of tape as in the wheel step.
My transporter wobbles or the wheels don't turn smoothly—what should I check?
Check that the plastic straw sleeves are taped straight at the two marked axle points, trim or sand skewer ends so they stick out equally, and use tiny, loose pieces of tape on the bottle-cap wheels so they stay on but can still turn.
How can I adapt this activity for different age groups?
For younger kids, pre-cut the 20 cm × 10 cm cardboard base and pre-cut the straw sleeves and holes so they can focus on taping and adding wheels, while older kids can measure and mark the axle points themselves, glue sturdier cardboard cargo walls, or experiment with moving the cargo to improve balance.
How can we extend or personalize the cargo transporter once it's built?
Decorate the cardboard base with paint or stickers, add higher glued cardboard walls or a taped-on tailgate for bigger loads, and try adding a rubber-band motor on the skewers to make the transporter move by itself.
Watch videos on how to build a small cargo transporter
DIY || Modes Of Transport || Land, Water & Air Transportation || Cardboard Crafts ||
4 Videos
DIY || Modes Of Transport || Land, Water & Air Transportation || Cardboard Crafts ||
How to Make Mini Bus | DIY Homemade Bus From Waste Box - Very Easy
Paper truck. Diy craft. Easy tutorial for nursery kids. Means of transport. Step-by-step tutorial.
We Built the Ultimate Toy Car Transporter
Facts about simple machines and model vehicle building for kids
🛞 The wheel and axle is one of the oldest simple machines — people started using wheels about 5,500 years ago to move heavy loads more easily.
⚖️ If the cargo's center of mass moves outside the wheelbase the transporter will tip — keeping weight centered helps prevent spills.
🔩 A straight, smooth axle (like a wooden dowel) plus small washers lets wheels spin with less wobble and rubbing.
📏 A wider wheelbase and a lower cargo position make a vehicle much more stable — race cars use the same trick for balance.
♻️ Corrugated cardboard is lightweight but strong because of its fluted middle layer — folding it into beams makes surprisingly sturdy supports.
How do I build a simple cardboard cargo transporter with my child?
What materials and tools do we need to build a cardboard cargo transporter?
What ages is building a cardboard cargo transporter suitable for?
What safety tips should I follow when making a cardboard cargo transporter?
