Experiment with fungi
Make spore prints from store-bought mushrooms to observe and compare different spore patterns, colors, and shapes while practicing careful handling and recording.


Step-by-step guide to make spore prints from store-bought mushrooms
Easy Fungi Science Experiments for Children
Step 1
Wash your hands with soap and water to make your experiment clean and safe.
Step 2
Choose two or three different store-bought mushrooms to compare and put them on your work surface.
Step 3
Place a sheet of white paper flat on the table where you will work.
Step 4
Place a sheet of dark paper flat next to the white paper for better contrast.
Step 5
Put a sticky label or a piece of tape on each paper and write a name or number for identifying the print.
Step 6
Cut off the stem of the first mushroom close to the cap using the knife or scissors with adult help.
Step 7
Place the mushroom cap gill-side down in the center of the labeled paper.
Step 8
Cover the cap and paper gently with the bowl to keep dust out and help spores fall.
Step 9
Leave the covered cap undisturbed for at least 6 hours or overnight up to 24 hours.
Step 10
Remove the bowl carefully from the paper.
Step 11
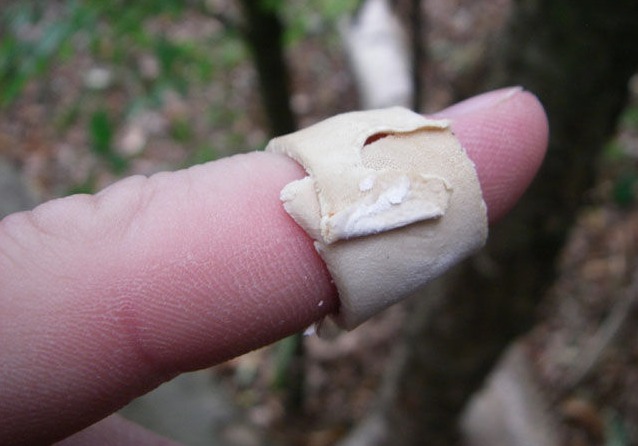
Gently lift the mushroom cap straight up from the paper to reveal the spore print.
Step 12
Use a magnifying glass to look closely at the print and write the color pattern and any shapes you see in your notebook.
Step 13
Repeat steps 6 to 12 for each other mushroom on a new labeled paper to collect more prints.
Step 14
Share your finished spore prints photos sketches and notes on DIY.org.
Help!?
If I don't have dark construction paper, sticky labels, or a bowl, what can I substitute so the spore print steps still work?
Use a clean piece of black cardboard or a sheet of black garbage-bag material for the dark paper (steps 3–4), write identification on masking tape or a Post-it instead of a sticky label (step 5), and cover the cap with a clean glass mixing bowl, wide jar, or plastic container upside-down for the bowl (step 7).
My spore print came out very faint or blank—what common mistakes in the steps should I check and how can I fix them?
If prints are faint or missing, confirm you cut the stem close to the cap (step 6), placed the cap gill-side down (step 7), left it covered and undisturbed for at least 6–24 hours (step 8), and try both white and dark paper to improve contrast (steps 3–4).
How can I adapt this mushroom experiment for younger children or make it more challenging for older kids?
For preschoolers have an adult do the cutting and covering (steps 6–8) while the child makes simple sketches, and for older kids let them cut with supervision, use a magnifying glass and notebook to record detailed color patterns and shapes (steps 11–12) and research mushroom ID online before sharing (step 13).
What are some ways to preserve, personalize, or extend the spore prints after lifting the cap?
After gently lifting the cap (step 12) you can preserve the print by covering it with clear packing tape or a light spray fixative, mount and label the print on cardstock, photograph and annotate it, and then share the finished photos, sketches, and notes on DIY.org (step 13).
Watch videos on how to make spore prints from store-bought mushrooms
Fungi | Science for Kids
4 Videos

Fungi | Science for Kids
What are fungi? - The Fungi Kingdom for kids
All About Fungi
![Fungi Science At Home [Mushroom Spores & Fungi Sugar Experiment]](https://img.youtube.com/vi/7qfoiv-oko8/mqdefault.jpg)
Fungi Science At Home [Mushroom Spores & Fungi Sugar Experiment]
Facts about fungi and mycology for kids
🍄 A single mature mushroom can release millions to billions of microscopic spores into the air.
🎨 Spore prints come in many colors—white, pink, brown, black, and purple-brown—and color is a key clue for identification.
🔬 Mycologists use spore print color together with gill and cap features to help identify mushroom species.
⏰ Making a clear spore print usually takes 6–24 hours of the cap sitting on paper or foil so spores can fall.
🛒 Common store-bought mushrooms (Agaricus bisporus: button, cremini, portobello) typically leave a brown to chocolate-brown spore print.
How do you make spore prints from store-bought mushrooms?
What materials do I need to make mushroom spore prints at home?
What ages is the spore print activity suitable for?
What safety tips should I follow when making mushroom spore prints?
