Make a walkway
Build a backyard stepping stone walkway using flat stones, sand, and paint; measure spacing, arrange stones safely, and decorate each stone.

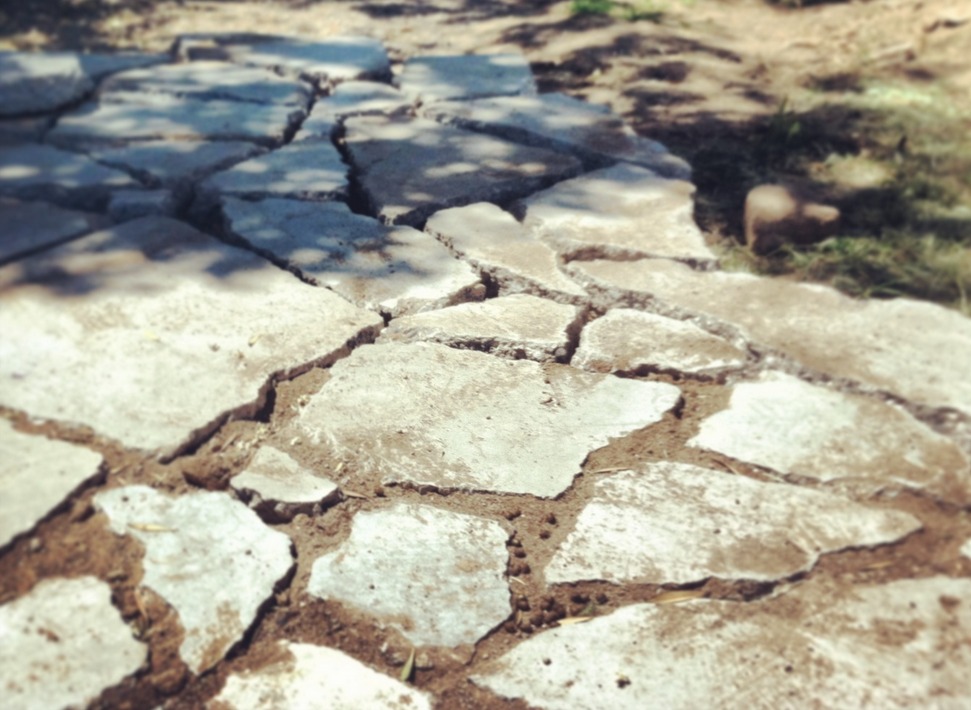

Step-by-step guide to build a backyard stepping stone walkway
Easy DIY Playhouse Ideas For Your Kids
Step 1
Gather all materials and put them in one spot so you are ready to build.
Step 2
Choose the path for your walkway and remove sticks toys and other debris from that area.
Step 3
Use the tape measure and chalk to mark where each stone will go leaving about 18 to 24 inches between the center of each mark.
Step 4
Pour a small pile of sand about 1 inch deep onto each chalk mark.
Step 5
Flatten each sand pile with your hand or a small board so each spot is even and smooth.
Step 6
Set one flat stone onto the first sand pad and press down until it sits firmly in the sand.
Step 7
Look at the stone from different angles to see if it is level with the ground.
Step 8
If a stone is tilted lift it up and add or remove a little sand then press it down again so it sits stable.
Step 9
Sweep sand around the edges of each stone to fill gaps and help them stay put.
Step 10
Wipe each stone with a damp cloth and let them dry before you start decorating.
Step 11
Paint fun designs on each stone using your acrylic paints and brushes and let the paint dry completely.
Step 12
With adult help spray or brush on clear outdoor sealant to protect your painted designs.
Step 13
Share a photo and story of your finished stepping stone walkway on DIY.org
Help!?
What can we use instead of hard-to-find materials like flat stones, a tape measure, or acrylic paints?
If flat stones are hard to find use pavers, large flat bricks, or thick wooden discs on the 1-inch sand pads (step 6), replace the tape measure with a yardstick or a length of string for marking in step 3, swap chalk for flour or masking tape for marks in step 3, and use outdoor craft paint or permanent markers in step 10 with a waterproof varnish or marine sealant in step 11.
My stones keep tilting or wobbling—what should I try to fix them?
If a stone is tilted in step 7, lift it, add or remove a little sand on the flattened 1-inch pad (steps 4–5), tamp it down with your hand or small board and check from different angles until it sits level and stable as described in step 7.
How can I adapt this walkway activity for different age groups?
For toddlers have an adult do the measuring and heavy lifting in steps 3 and 6 while the child helps sweep sand and paint in steps 8 and 10, and for older kids let them measure spacing, flatten sand pads, set stones, decorate, and apply sealant with supervision across steps 3–11.
How can we personalize or extend the stepping stone walkway beyond just painting?
Create mosaics by pressing glass beads or tiles into the sand before setting each stone in step 6, use glow-in-the-dark or textured paint in step 10, plant edging alongside the path after step 9, and share the finished photo and story on DIY.org as suggested in the final step.
Watch videos on how to build a backyard stepping stone walkway
A simple, elegant LEGO build
4 Videos
A simple, elegant LEGO build
Let's Make Paper Building Blocks | Crafts for Kids | STEM Project

Crafting in the Great Outdoors: Fun and Simple Backyard Projects
How To Make Paper House - Easy paper toys
Facts about garden landscaping and stonework for kids
🪴 Garden paths have been used for centuries — ancient Roman villas often included organized paved walkways.
📏 A comfortable stepping-stone spacing is about 24–30 inches (60–75 cm), which matches many people's natural stride.
🪨 Flat stones like flagstone and slate are popular because they split into thin slabs that are easy to lay as stepping stones.
🎨 Exterior acrylic paints dry quickly and resist weather, so they're a common choice for decorating outdoor stones.
🧱 Laying stones on a compacted sand or gravel bed helps keep them level and prevents wobbling over time.
How do I build a backyard stepping stone walkway?
What materials do I need to make a stepping stone walkway?
What ages is building a stepping stone walkway suitable for?
What are the benefits and safety tips for a backyard stepping stone project?
