Use scratch to design a character maker
Use Scratch to design an interactive character maker where you create sprites, add costumes, customize attributes, and program buttons to save or reset characters.

Step-by-step guide to design a character maker in Scratch
HOW TO CREATE YOUR OWN CHARACTER IN SCRATCH
Step 1
Open Scratch in your browser and start a new project to get a blank stage.
Step 2
Delete the default Cat sprite so you can build your character from scratch.
Step 3
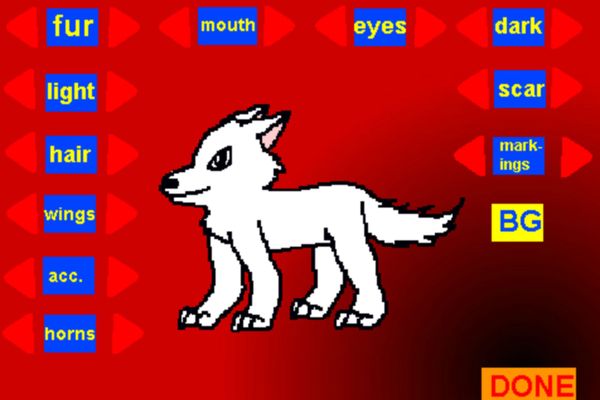
Add and paint at least four sprites named Body; Hair; Eyes; Mouth using the Paint Editor so each part can change separately.
Step 4
Add 2 to 4 different costumes to each part sprite so you have multiple styles to choose from.
Step 5
Create these variables for all sprites: hairIndex; eyesIndex; colorIndex; sizePercent; galleryX so you can control attributes and the save gallery.
Step 6
Make a button sprite called "Change Hair" and script it so when clicked it changes hairIndex by 1 then if hairIndex is greater than the number of hair costumes set hairIndex to 1 and broadcast "updateCharacter".
Step 7
Make a button sprite called "Change Eyes" and script it so when clicked it changes eyesIndex by 1 then if eyesIndex is greater than the number of eye costumes set eyesIndex to 1 and broadcast "updateCharacter".
Step 8
Make a button sprite called "Change Color" and script it so when clicked it changes colorIndex by 1 then if colorIndex is greater than 4 set colorIndex to 1 and broadcast "updateCharacter".
Step 9
Make a button sprite called "Change Size" and script it so when clicked it changes sizePercent by 25 then if sizePercent is greater than 125 set sizePercent to 50 and broadcast "updateCharacter".
Step 10
In each part sprite add code: when I receive "updateCharacter" switch to the costume number stored in its index variable set the color effect to (colorIndex * 25) and set size to sizePercent so the part updates when variables change.
Step 11
Make a button sprite called "Save" and script it so when clicked it sets galleryX to 120 and broadcasts "saveCharacter" so clones can be made into a gallery.
Step 12
In every part sprite add these scripts: when I receive "saveCharacter" create clone; when I start as a clone go to x (galleryX) y -100 change size to (sizePercent * 0.5) change galleryX by 60 and stop this script so each saved clone appears as a small copy in a row on the right.
Step 13
Make a button sprite called "Reset" and script it so when clicked it sets hairIndex to 1 eyesIndex to 1 colorIndex to 1 sizePercent to 100 and broadcasts "updateCharacter" to return the character to the default look.
Step 14
Share your finished interactive character maker and your favorite saved characters on DIY.org so everyone can see your awesome creation.
Help!?
What can I use if I can't access Scratch in a browser or the Paint Editor is hard to use?
Use Scratch Desktop or import premade PNGs/JPGs as costumes and name the imported sprites Body, Hair, Eyes, and Mouth so you can change parts without using the Paint Editor.
When I click Save my gallery clones overlap or the row jumps too far—how do I fix that?
Ensure only one sprite (for example the Body sprite) runs 'when I receive saveCharacter create clone' and the 'change galleryX by 60' step so galleryX increments once per saved character while the Save button still sets galleryX to 120 before broadcasting.
How can I adapt this activity for younger or older kids?
For younger kids reduce parts to Body and Hair with just 2 costumes each and larger Change buttons that change sizePercent by 25, while older kids can add keyboard controls, extra costume sets, a Randomize button that changes hairIndex/eyesIndex/colorIndex/sizePercent, or animate broadcasts like updateCharacter.
What are simple ways to extend or personalize the character maker?
Add a 'Randomize' button that sets hairIndex, eyesIndex, colorIndex and sizePercent to random values then broadcasts 'updateCharacter', and create a list or label to attach names to each saved clone before sharing on DIY.org.
Watch videos on how to design a character maker in Scratch
How to Make a Character Designer in Scratch | Tutorial
4 Videos

How to Make a Character Designer in Scratch | Tutorial
Scratch Basics - A Beginners Guide to Scratch
Beginners Guide To Scratch (VERY Simple)
DESIGN Your Own ANIMATED Character | Animations | How to | Step by Step Easy Scratch 3.0 Tutorial
Facts about Scratch programming for kids
🏫 Scratch was created at the MIT Media Lab and was first released to the public in 2007.
🎭 In Scratch, each sprite can have many costumes — switching costumes is how you animate or change outfits.
🖼️ Costumes in Scratch can be vector SVGs or bitmap PNGs, so vector costumes scale without getting pixelated.
📡 Save and reset actions in Scratch are often built with broadcasts and variables to store or restore character attributes.
🌍 Millions of projects are shared on the Scratch website, making it a huge kid-friendly community for creative coding.
How do I make an interactive character maker in Scratch?
What materials do I need to build a Scratch character maker?
What ages is a Scratch character maker suitable for?
What are the benefits and safety tips for kids making character makers in Scratch?
