Use scratch to create a custom block
Use Scratch to design and build a custom block (my block), add parameters, test it in projects, and reuse it to simplify code.

Step-by-step guide to create a custom block in Scratch
Makeblock: A Quick Introduction To Their Educational Kits
Step 1
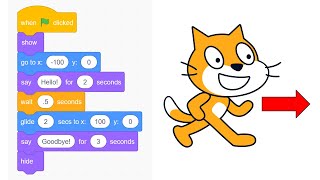
Open Scratch and create a new project so you have a fresh area to build in.
Step 2
Choose or paint a sprite to be the one that uses your custom block.
Step 3
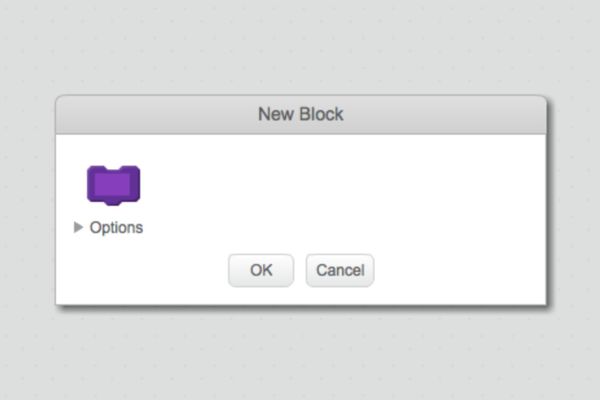
Click the My Blocks category and then click Make a Block to start a new custom block.
Step 4
Type my block as the block name in the Make a Block dialog.
Step 5
Click the + button in the dialog to add at least one input parameter and give it a short name like n or color.
Step 6
Click OK to create the block and open the define my block area where you will add code.
Step 7
Drag the code blocks you want the custom block to do into the define my block area.
Step 8
Insert the parameter reporter into the define code wherever the value should change the block’s behavior.
Step 9
Drag the my block reporter into the Scripts area and set the parameter value to a test value.
Step 10
Click the green flag or run the script to test how my block works with your test value.
Step 11
Drag my block into other parts of your project where you had repeated code to simplify your scripts.
Step 12
Save your Scratch project to keep your new custom block and changes.
Step 13
Share your finished creation on DIY.org
Help!?
What can I use if I can't access Scratch online or the Make a Block feature?
If you can't access the online editor or the 'Make a Block' button, install the Scratch 3.0 offline editor or simulate a custom block by creating a helper sprite that runs the repeated code when it receives a broadcast message, and upload an image from your computer instead of using the Paint Editor for the 'Choose or paint a sprite' step.
My custom block doesn't seem to do anything when I click the green flag—what should I check?
Check that you actually dragged code into the 'define my block' area, that you placed the 'my block' reporter into the Scripts area with a test parameter value, and that the script calling 'my block' is connected to a start block like the green flag or another event.
How can I adapt this custom block activity for different ages?
For younger kids use a single simple parameter like 'n' and let them drag basic motion or looks blocks into 'define my block', for middle grades add a color or number parameter and testing step, and for older kids require multiple parameters, loops, broadcasts or cloning inside 'define my block' and have them save and share the project on DIY.org.
How can we extend or personalize our custom block after making it?
Extend it by adding extra input parameters (for color, speed, or count), changing the sprite's costumes or adding sound blocks inside the 'define my block' code, reusing the custom block across multiple sprites to simplify scripts, and then save and share the finished project on DIY.org.
Watch videos on how to create a custom block in Scratch
Building Blocks Game for Kids | Make a Sandcastle! | CBeebies Get Creative App
4 Videos
Building Blocks Game for Kids | Make a Sandcastle! | CBeebies Get Creative App
PROGRAMMING for kids 👦 Block Programming 💻 Part 2
How to Make a Simple Animation in Scratch | Scratch Tutorial
Introducing Scratch Garden!
Facts about block-based programming for kids
🚀 Scratch has been used by millions of young creators worldwide to make games, stories, and animations.
🧩 Custom blocks (My Blocks) let you bundle repeatable code into a single reusable block—like making your own LEGO piece.
🧠 Parameters let a custom block accept inputs so the same block can do different jobs with different values.
🌍 Scratch is available in more than 70 languages, so kids around the world can learn coding in their own tongue.
🔁 Reusing custom blocks reduces duplicated code, makes projects shorter, and makes bugs easier to fix.
How do I create a custom block (My Block) in Scratch and use it in a project?
What materials and tools do I need to make a custom block in Scratch?
What ages is creating custom blocks in Scratch suitable for?
What are the benefits of using custom blocks in Scratch projects?
