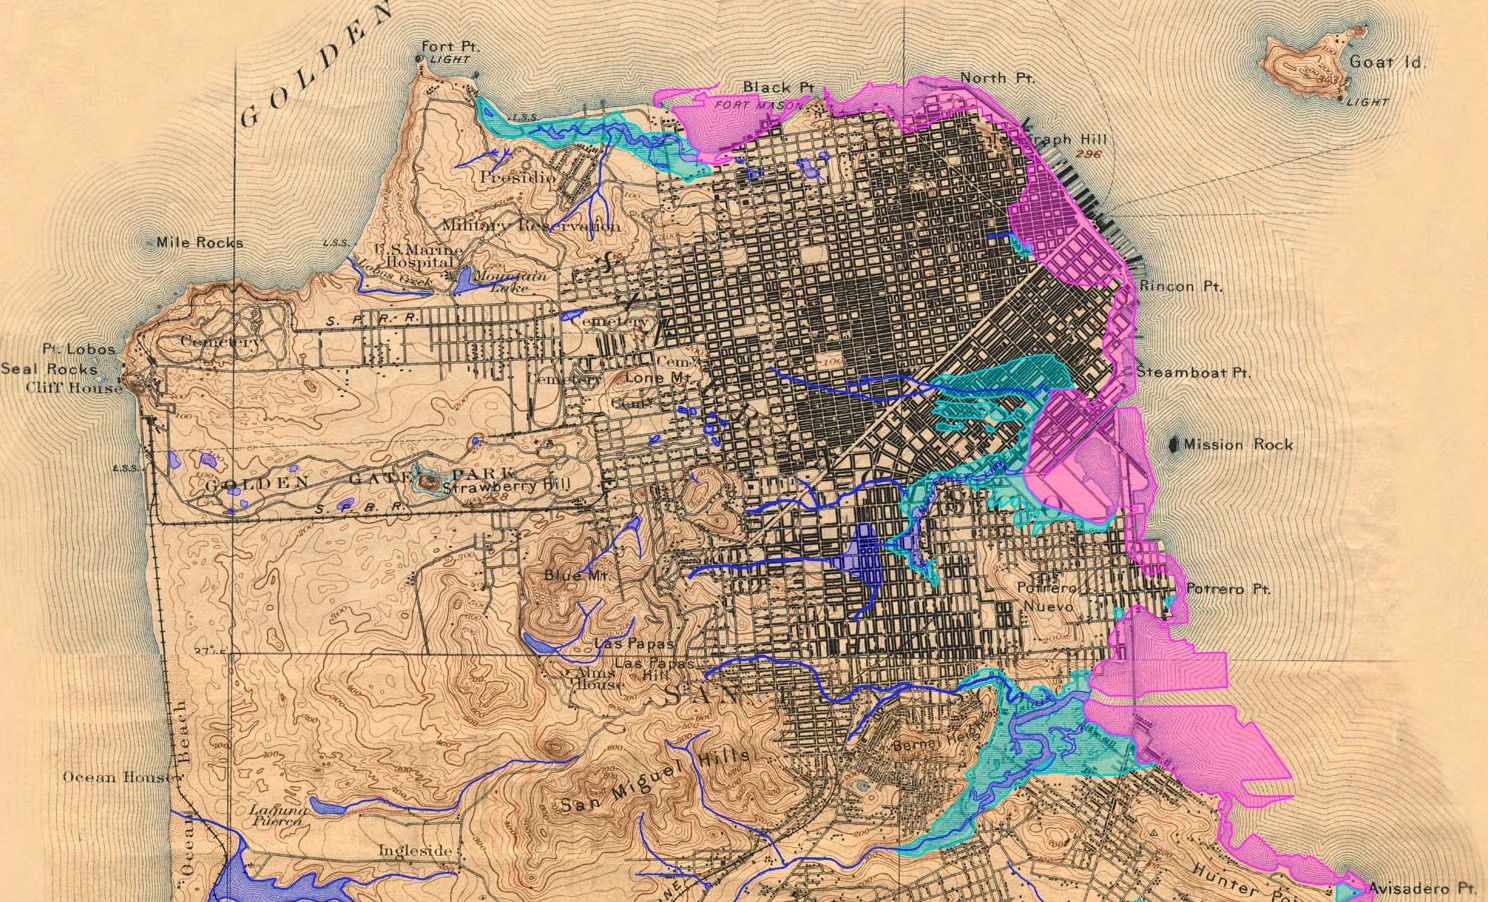
Map the past
Research local history, then draw and label a map showing how your neighborhood or town looked in the past using simple materials.


Step-by-step guide to map the past
MUST-KNOW HOW TO START AND SHUT DOWN A COMPUTER | COMPUTER BASICS FOR KIDS | Kids Computer Learning
Step 1
Gather all your materials and put them on a clear workspace.
Step 2
Decide which one neighborhood block or small area you want to map.
Step 3
Choose a past year or era to show on your map.
Step 4
Ask an adult to help you find at least three sources about how the area looked in the past.
Step 5
Write five important features from your research on sticky notes, one feature per note.
Step 6
Use your pencil to draw a light outline of the streets or boundary of your chosen area.
Step 7
Place each sticky note on the outline where that feature belonged.
Step 8
Draw the buildings parks and roads in pencil where your sticky notes are placed.
Step 9
Remove the sticky notes so you can see your pencil drawings clearly.
Step 10
Label each building park or road with neat writing next to the drawing.
Step 11
Draw a small compass rose on one corner of the map.
Step 12
Draw a simple scale bar and write the scale (for example 1 cm = 50 m).
Step 13
Add a clear title at the top with the place name and the year or era.
Step 14
Color your map using your colouring materials and tidy any pencil lines with the eraser.
Step 15
Share your finished historical map on DIY.org
Help!?
What can we use if we don't have sticky notes or certain colouring materials?
Tear small squares from scrap paper and tape them lightly in place instead of sticky notes, and use crayons, markers, or cut colored paper if you don't have the exact colouring materials.
My pencil outline smudges when I remove the notes or color—how can I avoid ruining the map?
Draw the streets and boundaries very lightly with an HB pencil, take a photo of the sticky notes in place, then trace buildings and labels with a darker pencil or fine pen after removing the notes and clean stray lines with the eraser.
How can I adapt the activity for younger or older children?
For younger kids, choose one small block, use one adult source and write three big features on large sticky notes with crayons, while older children should find three or more primary sources, draw an accurate scale bar with a ruler, add a compass rose, and label five or more features neatly.
How can we extend or personalize our finished historical map?
Add a legend and a short timeline, glue printed historical photos or textured paper where the sticky notes were, make a tracing-paper overlay to show a different era, or write a one-paragraph description to share with your map on DIY.org.
Watch videos on how to map the past
Art Education - Principles of Design - Proportion - Back to the Basics - Art Lesson
4 Videos
Art Education - Principles of Design - Proportion - Back to the Basics - Art Lesson

Scratch Basics - A Beginners Guide to Scratch

How to use PowerPoint: A Beginner's Step-by-Step Tutorial
![TinkerCAD - Tutorial for Beginners in 9 MINUTES! [ COMPLETE ]](https://img.youtube.com/vi/gOs6Mdj7y_4/mqdefault.jpg)
TinkerCAD - Tutorial for Beginners in 9 MINUTES! [ COMPLETE ]
Facts about local history and mapmaking
🗺️ Old maps sometimes included sea monsters, fanciful places, or decorative drawings to fill empty space.
🏠 Many street names (like Mill Lane or Orchard Street) preserve clues about what used to be in a neighborhood.
📸 Aerial photographs from the 1930s onward are a goldmine for seeing how towns and fields looked decades ago.
🧭 Early surveyors made maps using chains, compasses, and triangulation long before GPS existed.
🔎 Sanborn fire insurance maps often show building footprints, construction materials, and business types for past decades.
How do I make a Map the Past project (step-by-step)?
What materials do I need to map how my neighborhood looked in the past?
What ages is the Map the Past activity suitable for?
What are the benefits of mapping a neighborhood's past and variations to try?
