Graft a plant
Graft a young plant by joining a scion to rootstock with adult supervision, using simple tools, secure the union, care for it, and observe growth.


Step-by-step guide to graft a young plant
How to Graft Plants | Easy Step-by-Step Grafting Guide for Beginners
Step 1
Set up a clean flat workspace and bring all materials to it with an adult helper nearby.
Step 2
Ask the adult to wipe the knife and pruning shears with rubbing alcohol to sterilize them.
Step 3
Choose a healthy scion with 2 or 3 buds and a rootstock stem of similar thickness and tell the adult which ones to use.
Step 4
With adult help cut the scion from the donor plant so it has a straight fresh end and 2 or 3 buds.
Step 5
With adult help make a long sloping cut about 2 to 3 centimeters on the rootstock stem.
Step 6
With adult help make a matching sloping cut on the scion so the two cut surfaces will fit together.
Step 7
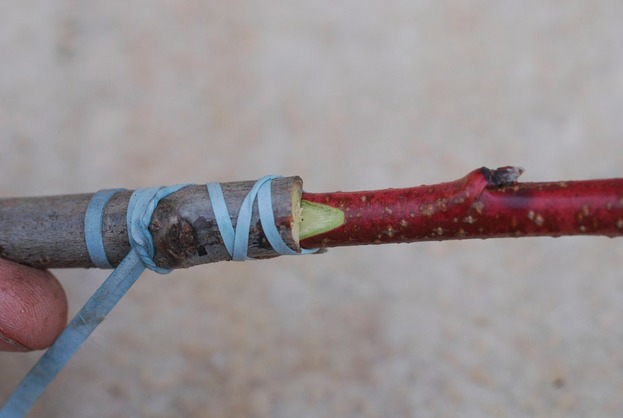
Fit the scion to the rootstock so the two flat cut surfaces sit tightly together and the buds point upward.
Step 8
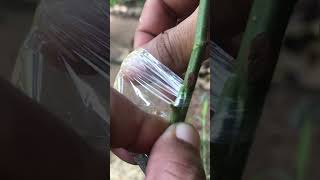
Wrap the graft union tightly with grafting tape or cling film so it cannot move and moisture is kept in.
Step 9
Ask the adult to smear grafting wax or a little petroleum jelly over the wrapped union to seal it.
Step 10
Push a stake into the pot and tie the grafted stem gently with the soft tie to keep it upright and steady.
Step 11
Water the soil lightly now so it is evenly moist but not soggy.
Step 12
Check the graft every 3 or 4 days for new growth and keep the soil lightly moist while the graft heals.
Step 13
When the scion shows steady new growth ask the adult to help remove tape and cut away any shoots below the graft then share a photo and notes about your finished graft on DIY.org
Help!?
What can we use instead of grafting tape or grafting wax if we can't find them?
If you don't have grafting tape, substitute clean cling film wrapped tightly around the graft union and then ask the adult to smear a little petroleum jelly over the wrap to seal it.
What should we do if the scion won't stay attached or the cut surfaces don't match?
If the flat cut surfaces don't fit tightly, ask the adult to make fresh matching long sloping cuts of about 2–3 centimeters on both the rootstock and scion so the surfaces sit tightly together before wrapping with grafting tape or cling film.
How can this grafting activity be adapted for younger or older children?
For younger children let them choose the scion and hold it while the adult does the sterilized knife and pruning shears cuts and wrapping, and for older kids have them sterilize the tools with rubbing alcohol and practice making the matching 2–3 cm sloping cuts under supervision.
How can we extend or personalize the project after the graft is done?
After the graft shows steady new growth, label the pot with scion/rootstock names and date, take photos at each 3–4 day check to build a progress journal, and share a final photo and notes on DIY.org while trying different scion varieties next time to compare healing and growth.
Watch videos on how to graft a young plant
"🌿 The Right Way to Graft Plants | Easy Grafting Technique for Growing New Species | Step-by-Step
4 Videos
"🌿 The Right Way to Graft Plants | Easy Grafting Technique for Growing New Species | Step-by-Step
Grafting Tree Step by Step for Beginners | How to Graft Fruit Trees Easily
Ultimate Guide to Grafting Trees Step by Step for 100% Success EP045 #grafting #graftingtechniques
Easy Rose Plant Grafting Simple Step-by-Step Guide for Beginners EP046#roseflower #grafting
Facts about plant grafting
🪴 Grafting has been practiced for thousands of years — archaeologists find evidence going back over 2,000–4,000 years!
🍎 Most commercial apple and citrus trees are grafted, so the fruit variety stays true instead of changing from seed.
✂️ A scion is the young shoot or twig you attach to the rootstock — it's the part that will grow the branches and fruit.
🌱 Rootstocks can control a plant's size, cold hardiness, and disease resistance — some make trees dwarf for small gardens.
🔬 For a graft to succeed the scion and rootstock tissues must fuse so water and nutrients can travel between them.
How do you graft a young plant step by step with a child?
What materials and tools do I need to graft a plant with a child?
What ages is plant grafting suitable for children?
What safety tips should I follow when grafting with a child?
