Build a plant press
Build a simple plant press from cardboard, blotting paper, and straps to flatten and preserve leaves and flowers for study and identification.


Step-by-step guide to build a plant press
How to Make a Plant Press
Step 1
Clear a flat workspace and lay out all your materials.
Step 2
Measure and mark two identical cardboard panels about A4 size using the ruler and pencil.
Step 3
Cut out the two cardboard panels with scissors following your marks.
Step 4
Cut 6 to 10 blotting paper sheets to match the size of the cardboard panels.
Step 5
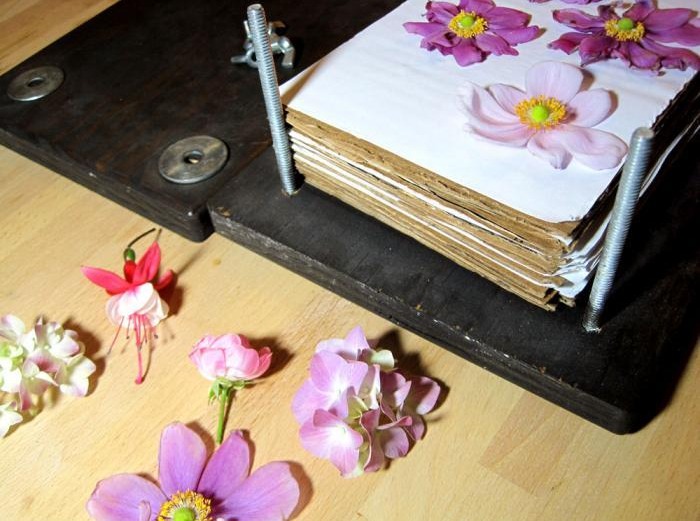
Lay one cardboard panel flat on the table to be the bottom of your press.
Step 6
Place one sheet of blotting paper centered on the bottom cardboard panel.
Step 7
Arrange leaves and flowers on the blotting paper without overlapping the pieces.
Step 8
Write a small label with the plant name and date on a slip of paper for each specimen.
Step 9
Tuck each label next to its plant specimen between the blotting paper layers.
Step 10
Cover the specimens with another sheet of blotting paper.
Step 11
Repeat adding blotting paper and specimens until the stack is about 2 to 3 inches thick.
Step 12
Place the second cardboard panel on top of the stack.
Step 13
Wrap the straps tightly around the cardboard stack and fasten them to compress the specimens.
Step 14
Leave the press in a warm dry place and replace any damp blotting paper every 48 hours until the plants are fully dry.
Step 15
Share your finished pressed plants and a picture of your plant press on DIY.org
Help!?
What can I use instead of blotting paper or the fabric straps if I can't find them at the store?
If blotting paper is unavailable, use several layers of plain coffee filters or unprinted paper towels cut to A4 to replace the blotting paper, and if straps aren't available, substitute heavy books or wide rubber bands to compress the cardboard stack when you wrap and fasten them.
Why are some plants still damp or wrinkled after a week in the press and how do I fix it?
If plants stay damp or develop mold after the 'leave the press in a warm dry place' step, immediately replace any damp blotting paper every 48 hours, tighten the straps or add more weight so the cardboard panels apply better compression, and separate overlapping specimens before re-pressing.
How can I adapt the steps for different age groups so kids stay safe and engaged?
For ages 3–5, have an adult pre-measure and cut the cardboard panels and blotting paper and let the child arrange leaves and stick the labels with supervision, while older kids (10+) can do the measuring, cutting, labeling, and keep a specimen log with species, date, and a photo to share on DIY.org.
What are some creative ways to extend or personalize the plant press activity after the plants are dry?
Decorate the cardboard panels before assembling, mount dried specimens on cardstock using the labels you wrote, photograph the finished press and specimens to share on DIY.org, or try adding thin tissue layers for delicate flowers during the 'leave the press in a warm dry place' drying step to preserve color.
Watch videos on how to build a plant press
Quick Flower Press DIY: Easy Steps!
4 Videos
Quick Flower Press DIY: Easy Steps!

🌺 A DIY Flower Press in Minutes!
🌼 DIY Flower Press for under $15! 🌼 Affordable DIY, tips & tricks for pressing flowers
How to press flowers
Facts about plant pressing and identification
🌿 A plant press works by sandwiching specimens between blotting paper and cardboard so they dry flat and keep their shape.
📚 Herbaria around the world hold roughly 390 million preserved plant specimens used for science and conservation.
🕰️ Some pressed plant specimens in herbaria are hundreds of years old and still useful to researchers today.
🎨 Pressing preserves leaf shape and veins well but many flower colors fade, so botanists often note colors or take photos first.
🪢 Kids can tighten a homemade press with straps, belts, or strong rubber bands — no special tools required.
How do I build a simple plant press to flatten leaves and flowers?
What materials do I need to make a DIY plant press?
What ages is making a plant press suitable for?
What are the benefits, safety tips, and fun variations for pressing plants?
