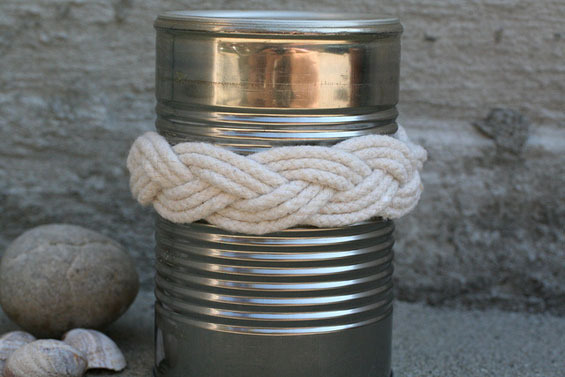
Tie a turk's head knot
Learn to tie a Turk's head knot using rope or cord, following step by step loops to create a woven knot to wear or display.


Step-by-step guide to tie a Turk's head knot
How to Tie a Turk's Head Knot (Quick Guide)
Step 1
Cut about 1 meter (3 feet) of cord with scissors.
Step 2
Tape one short tail of the cord to the marker so the end does not move.
Step 3
Wrap the cord around the marker three times so the loops sit side by side.
Step 4
Slide the three loops together so they touch and form three parallel strands.
Step 5
Take the free working end and weave it around the loops by going over the first strand then under the next then over the third and keep repeating this over‑under pattern until you return to the place you started.
Step 6
Follow the first woven strand with the working end by laying it side by side along the same path to create three layered leads.
Step 7
Push the strands gently so the woven shape becomes a neat flat round knot on the marker.
Step 8
Carefully slide the finished woven knot off the marker while holding the strands so the shape stays intact.
Step 9
Tighten the Turk’s head by pulling each of the three main strands a little at a time to even the weave.
Step 10
Tuck the two loose tail ends into the gaps of the weave so they are hidden.
Step 11
Secure the tucked ends with a small piece of tape so they do not slip out.
Step 12
If you want to wear it as a bracelet tie the two tail ends together with a square knot and tighten to fit your wrist.
Step 13
Take a photo and share your finished Turk’s head knot on DIY.org
Help!?
What can I use instead of the marker or the specific cord if I don't have them?
Use a toilet-paper roll or small wooden dowel in place of the marker and substitute a 3–5 mm paracord, shoelace, or yarn cut to about 1 meter while still using tape to secure the short tail as in step 2.
My loops keep slipping while I weave — how can I stop that and keep the shape neat?
Follow step 2 and tape the short tail to the marker, add a small piece of tape to anchor the three loops after step 4, hold the first woven strand with a finger while following it in step 6, and then tighten evenly by pulling each of the three main strands a little at a time as in step 10.
How can I adapt this Turk's head knot activity for younger or older children?
For younger kids use thicker cord or a wider marker/cardboard tube and pre‑wrap the three loops (steps 1–4) to simplify weaving, while older kids can try thinner cord, more wraps, or omit tape to practice tension control and tightening (steps 3, 6, 10).
How can we personalize or extend the finished Turk's head knot?
Personalize it by weaving with two different colored cords or sliding beads onto the cord before step 5, tuck and secure the tail ends as in steps 12–13, finish it into a bracelet with a square knot to fit your wrist (step 14), and then take a photo to share on DIY.org (step 15).
Watch videos on how to tie a Turk's head knot
How to make Turk's Head Knot Trivet and Coaster | Flat Turk's Head Knot Tutorial | Crafty Patti
4 Videos
How to make Turk's Head Knot Trivet and Coaster | Flat Turk's Head Knot Tutorial | Crafty Patti
Tie a Turks Head Knot on your Ships Wheel | Quick and Easy | Learn to Tie a Sailors Knot
Turks Head 5 Bight 4 Lead - Tying a Turks Head Knot Using Your Fingers - Easy to Tie Turks Head

Turk's Head Knot Tutorial - How to Make a Paracord Woggle Knot Tutorial
Facts about knot tying and rope crafts
🧶 The Turk's head knot is named because its braided shape was thought to look like a turban or 'Turk's head'.
⚓ Sailors have used Turk's head knots for centuries as decorative wraps, handgrips, and position markers on ships.
🔁 Many Turk's head knots can be tied with a single continuous length of cord by weaving repeating loops—no cutting or sewing required for some versions.
📐 Knotmakers describe Turk's head patterns by 'leads' and 'bights'—changing them changes how wide and intricate the knot looks.
📚 The Ashley Book of Knots (1944) is a classic reference that catalogs hundreds of decorative knots, including many Turk's head variations.
How do you tie a Turk's head knot step by step?
What materials do I need to tie a Turk's head knot?
What ages is learning a Turk's head knot suitable for?
What safety tips and fun variations are there for a Turk's head knot?
