Plane wood
Build a small wooden model airplane using safe tools, sanding, painting, and simple joins to learn measurement, shaping, and basic woodworking skills.


Step-by-step guide to build a small wooden model airplane
How to Make a Wooden Toy Plane: Step-by-Step Tutorial for Students
Step 1
Gather all the materials listed and lay them out on a clear workspace.
Step 2
Put on your safety goggles before you start working.
Step 3
Measure the fuselage and wing dimensions with the ruler.
Step 4
Mark the fuselage and wing shapes on the wood using your pencil.
Step 5
Ask an adult to cut out the marked shapes along your pencil lines.
Step 6
Sand all edges and surfaces with sandpaper until they feel smooth.
Step 7
Dry-fit the pieces by placing them together without glue to check the fit.
Step 8
Apply a thin line of wood glue to the joining edges where pieces will connect.
Step 9
Press the glued pieces together firmly so the edges meet neatly.
Step 10
Clamp the joined parts with clothespins or small clamps to hold them in place.
Step 11
Let the glue dry for at least 30 minutes or until it feels set.
Step 12
Lightly sand any dried glue bumps or rough spots so the model is smooth.
Step 13
Paint your airplane with acrylic paint and add fun details or stripes.
Step 14
Let the paint dry for at least 20 minutes so the colors do not smudge.
Step 15
Share your finished wooden airplane creation on DIY.org
Help!?
What can we use instead of wood glue, clothespins/small clamps, or acrylic paint if we can't find them?
If you don't have wood glue use strong white PVA glue or a low-temperature hot glue gun for quick bonding, replace clothespins or small clamps by holding pieces under heavy books while the thin line of glue sets, and swap acrylic paint for tempera or craft paint to finish your airplane.
What should we do if the fuselage and wing pieces don't fit together neatly after cutting?
If pieces don't fit together neatly after the adult cuts them, follow the dry-fit step, sand the joining edges with sandpaper to remove high spots, then reapply a thin line of wood glue and clamp the parts until the glue feels set.
How can this project be modified for different ages?
For younger kids have an adult pre-cut the fuselage and wings and let them sand, paint, and add stripes, while older children can measure, mark, and cut under supervision and try finer sanding or add a rubber-band propeller and balanced tail for flight.
What are some ways to extend or personalize the wooden airplane after painting?
After paint dries for at least 20 minutes, personalize with decals, stripes, a pilot sticker, add a rubber-band propeller or lightweight landing gear, and seal with clear varnish before sharing your finished wooden airplane on DIY.org.
Watch videos on how to build a small wooden model airplane
🔴 DIY simple BALSA PLANE for KIDS / BEGINNERS
4 Videos
🔴 DIY simple BALSA PLANE for KIDS / BEGINNERS
DIY Wooden Plane Model Kit Science

How To Build A Balsa Wood Model Aeroplane - Beginners Guide #1
How to Make a Simple Wooden Airplane at Home?😍
Facts about woodworking for kids
✈️ Model aircraft are tiny replicas used for hobbies, education, and competitions to learn about flight and design.
🪵 Balsa wood is one of the lightest commercial woods, making it perfect for easy shaping and flying model airplanes.
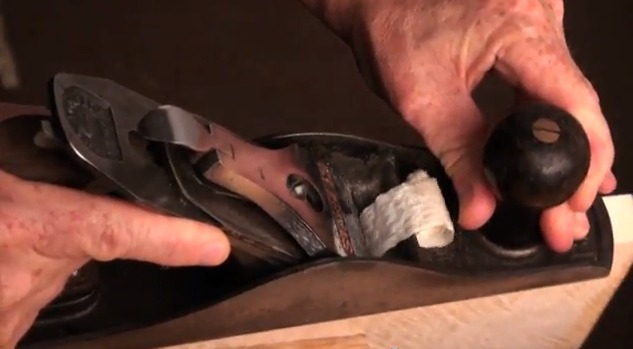
🪚 A hand plane shaves thin curls of wood to create smooth, flat surfaces — it's been a staple woodworking tool for centuries.
🔢 Sandpaper grit numbers go from coarse to fine: higher numbers (like 220) give a much smoother finish than lower numbers (like 80).
🧪 Wood glue works by soaking into wood fibers and bonding them; clamping while it dries makes joints strongest.
How do I build a small wooden model airplane with a child?
What materials and tools do I need to build a wooden model airplane?
What ages is this wooden airplane activity suitable for?
What safety precautions should I follow when woodworking with children?
