Make your own clay
Make your own homemade salt clay using flour, salt, and water. Knead, shape figures, air-dry or bake, then paint decorations.


Step-by-step guide to make your own salt clay
How to Make Modelling Clay at Home for Kids | Homemade Modelling Clay
Step 1
Wash your hands with soap and dry them so your dough stays clean and fun to use.
Step 2
Measure 2 cups of flour and 1 cup of salt into the mixing bowl.
Step 3
Stir the flour and salt together until they look evenly mixed.
Step 4
Slowly add about 3/4 cup of warm water a little at a time while stirring until the mixture forms a rough dough.
Step 5
Knead the dough on a clean surface for 5 minutes until it is smooth and not sticky.
Step 6
Shape your dough into figures or ornaments using your hands to pinch and smooth the shapes.
Step 7
Use a straw or toothpick to add small details or to make a hole for hanging if you want an ornament.
Step 8
Decide whether you will air-dry your pieces or ask an adult to bake them in the oven.
Step 9
For air-drying place your creations on a parchment-lined tray and let them dry for 24 to 48 hours until hard.
Step 10
If baking ask an adult to bake your pieces at 250°F (120°C) on a parchment-lined tray for about 1–2 hours, checking every 15–20 minutes until hard.
Step 11
Let baked creations cool completely before touching them so they do not break.
Step 12
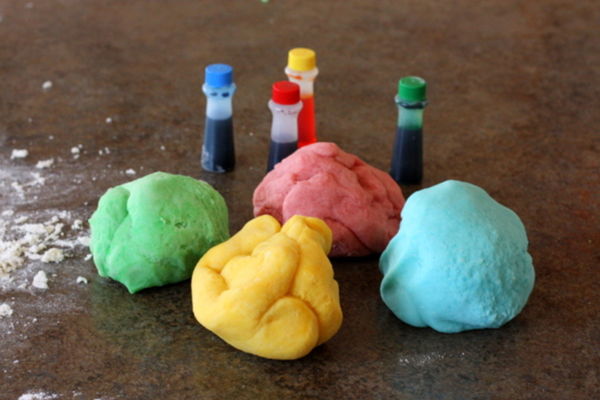
Paint and decorate your dry clay figures using paints or other colouring materials to make them bright and unique.
Step 13
Let the paint dry completely so your decorations do not smear.
Step 14
Share a photo of your finished clay creation on DIY.org so everyone can see your awesome work!
Help!?
What can we use if we don't have parchment paper or can't find table salt?
If you don't have parchment paper, place shapes on a lightly greased baking tray, and if table salt is unavailable use 1 cup fine sea salt or substitute 1 cup cornstarch for the salt knowing the finished air-dried or baked pieces will be a bit softer.
What should we do if the dough stays sticky after kneading or pieces crack while drying or baking?
If the dough is sticky after the 5-minute knead, add small tablespoons of flour while kneading until smooth, and if pieces crack during air-drying or baking at 250°F (120°C), lightly mist and smooth cracks before continuing to dry or lower the oven time and check every 15–20 minutes to avoid burning.
How can I adapt the activity for younger children or older kids?
For toddlers, skip the oven step and let them pinch simple shapes and use a straw with close supervision, while older kids can carve finer details with toothpicks, create ornaments with hanging holes, and have an adult bake at 250°F (120°C) for a firmer result.
How can we extend or personalize our clay creations after they are dry?
Knead a few drops of food coloring into the dough before shaping for colored clay, embed beads or glitter before drying or baking, make hanging holes with a straw, then paint and seal painted pieces with clear varnish after they are completely dry.
Watch videos on how to make your own salt clay
Making an Animal Sculpture - EASY beginners Air Dry Clay
4 Videos
Making an Animal Sculpture - EASY beginners Air Dry Clay

Shape, Create, and Play 🖌️ | Easy Clay Crafts for Kids!
Cute & Easy Clay Ideas To Do When Bored
How to Make a Hand Built Ceramic Sculpture: Step by Step Tutorial for Beginners
Facts about clay crafts for kids
🧂 Salt dough's high salt content helps preserve creations and can reduce mold, so your figures can last longer.
🎨 Play-Doh was originally sold as a wallpaper cleaner in the 1930s before being rebranded as a children's modeling compound in the 1950s.
🥣 Salt clay is made from three common kitchen staples—flour, salt, and water—so it's cheap and easy to make at home.
🔥 You can air-dry salt clay over a few days or gently bake pieces to speed drying—just use low heat to avoid cracking or browning.
🖌️ Once hardened, salt dough takes acrylic paint well and can be sealed with varnish or diluted white glue to help protect it.
How do I make homemade salt clay with my child?
What materials do I need to make salt clay?
What ages is making salt clay suitable for?
Is making salt clay safe and what precautions should I take?
