Make a coil pot
Make a coil pot using air-dry clay: roll coils, stack and join them, smooth surfaces, and decorate patterns to learn basic pottery techniques.

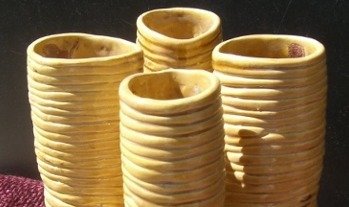

Step-by-step guide to make a coil pot
Clay Coil Pots | Beginner-Friendly Craft for Kids
Step 1
Spread the wax paper or nonstick board on a flat table to make a clean work surface.
Step 2
Break off a piece of clay about the size of a tennis ball for your pot base.
Step 3
Flatten the clay with your palm into a disc about 1/4 to 1/2 inch thick to form the base.
Step 4
Roll a long even coil by rolling clay between your palms or with the rolling pin until it is about pencil thickness.
Step 5
Score the top edge of the base and the bottom of the coil with a toothpick or clay tool to roughen the surfaces.
Step 6
Lightly wet the scored areas with a damp sponge or a tiny drop of water so they become sticky.
Step 7
Place the coil on the base edge and press gently to join it to the base.
Step 8
Smooth the inside seam with your finger or a damp sponge to strengthen the join.
Step 9
Repeat the rolling scoring wetting placing and smoothing steps to add more coils until the pot reaches the height you want.
Step 10
Smooth the outside walls with a damp sponge or your finger to even the surface.
Step 11
Use a toothpick or clay tool to carve or press patterns into the walls while the clay is still damp.
Step 12
Let your pot dry completely according to the clay package instructions which may take 24 hours or more.
Step 13
Paint or color your dry pot with paint or markers if you want to add bright designs.
Step 14
Share a clear photo of your finished coil pot on DIY.org to show everyone what you made.
Help!?
What can I use instead of wax paper or a nonstick board if I can't find them?
Use parchment paper, a silicone baking mat, or a smooth plastic cutting board under the clay as substitutes for the wax paper or nonstick board from step 1.
My coils keep falling apart or won't stick to the base—how do I fix that?
If coils split or won't bond, re-score the top edge of the base and the bottom of the coil (step 5), add a tiny drop of water or use the damp sponge to make the scored areas sticky (step 6), press firmly, and smooth the inside seam with your finger or sponge (step 8) to strengthen the join.
How can I adapt this coil pot activity for different ages?
For preschoolers, use larger pre-rolled thicker coils and have them press coils onto a flattened base while an adult handles scoring and wetting (steps 2–6), and for older kids, have them roll pencil-thin coils, build taller pots by repeating coils (step 9), and carve detailed patterns (step 11).
What are some ways to extend or personalize the finished coil pot?
Personalize by pressing found objects or textured stamps into the walls before drying (step 11), mixing colored clays or painting with acrylics or markers after the pot dries (step 12), or adding a coil handle and a lid to turn it into a small container.
Watch videos on how to make a coil pot
How to Make a Coil Pot | Art Lessons for Kids
4 Videos

How to Make a Coil Pot | Art Lessons for Kids
How To Make Coil Pots! Easy beginner Tutorial For Children!
Making a Simple Clay Coil Pot - Teaching Clay to Elementary Students - Episode 8 - Part 1
How to Make Easy Coil Pots
Facts about hand-building pottery for kids
🏺 The coil pottery technique is over 7,000 years old — ancient makers used coils to build pots long before the potter's wheel existed.
🌀 Rolling and stacking coils lets you create tall, curvy, or textured shapes without any special tools — perfect for kids' imaginations.
👐 Air-dry clay hardens without a kiln — most small coil pots dry in 24–72 hours depending on thickness and humidity.
🎨 Smoothing joins and adding a little water (like slip) helps coils fuse so the finished pot is stronger after drying.
🌿 Decorating coil pots with patterns (spirals, stamps, finger impressions) is both ancient and a great way to tell a story with clay.
How do I make a coil pot with air-dry clay?
What materials do I need to make a coil pot with air-dry clay?
What ages is making a coil pot with air-dry clay suitable for?
What are the benefits of making coil pots with air-dry clay?
