Start a seashell collection
Collect, clean, sort, identify, and label empty seashells from the beach, then measure and display your collection while learning about shells' shapes and habitats.


Step-by-step guide to start a seashell collection
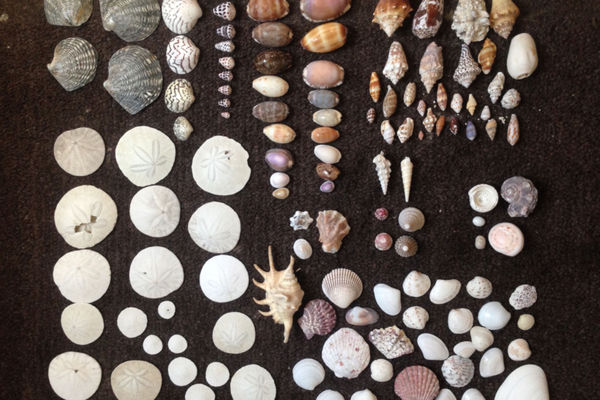
What does a seashell collection look like? 4 years collecting shells every week adds up quick!
Step 1
Gather all your materials and put them into your beach bag so you are ready to go.
Step 2
Ask an adult to come with you to the beach before you start collecting shells.
Step 3
Walk along the shore and pick up only empty shells that you find on the sand or washed up on the beach.
Step 4
Leave any shells that still have animals inside or tiny fragile shells where you found them.
Step 5
Rinse each collected shell in your bucket or a water container to wash off sand and bits.
Step 6
Gently scrub the inside and outside of each shell with the soft brush to clean it.
Step 7
Lay the shells on paper towels and let them dry completely before you touch them again.
Step 8
Sort the dry shells into groups by shape or color on a clean flat surface.
Step 9
Use the magnifying glass to look closely at one shell at a time and draw or write its special features in your notebook.
Step 10
Measure the length and width of each shell with the ruler and write those numbers next to your notes.
Step 11
Use the shell ID guide to find the likely name and habitat for each shell and write that information in your notebook.
Step 12
Write a small label for each shell with its name and size using labels and a marker.
Step 13
Attach each label near its shell and arrange the labeled shells on your display tray by the groups you made.
Step 14
Make a title card with your name and the date and place it on your display so everyone knows who made it.
Step 15
Take a photo of your finished display and share your creation on DIY.org.
Help!?
What can we use if we don't have a soft brush, magnifying glass, or shell ID guide?
Use a clean toothbrush as the soft brush, a smartphone camera zoom or reading glasses instead of the magnifying glass, and free online shell ID sites or a library book in place of a printed shell ID guide when identifying shells.
What if shells still have sand or a smell after rinsing and scrubbing?
If shells still have sand or a smell after rinsing and scrubbing with the soft brush, soak them briefly in warm soapy water, scrub again, rinse, and then lay them on paper towels to dry completely as the instructions direct.
How can I adapt the activity for different ages?
For preschoolers, limit steps to collecting only empty shells, rinsing them in the bucket, and simple color sorting, while older children can use the magnifying glass, ruler, shell ID guide, write detailed notes in the notebook, and make labeled displays on the tray.
How can we extend or personalize the seashell display?
Extend the project by turning the notebook into a mini field guide—photograph each shell, note measurements and habitat from the shell ID guide, laminate or write labels with the marker, arrange them on the display tray with your title card, then photograph and share the finished display on DIY.org.
Watch videos on how to start a seashell collection
How to identify shells (browsing shells families) ! Sea shell Collection
4 Videos
How to identify shells (browsing shells families) ! Sea shell Collection
What do shell collections look like? Sharing my shell collection that I've been building for 2 years

How to display and store sea shells ! Seashell Collection
Collecting Seashells & Learning Shell Names at Sanibel Island, FL - Seashell capital of the world!
Facts about seashells and marine habitats
🐚 Seashells are the hard outer coverings made by mollusks like snails and clams to protect their soft bodies.
🐌 Many snail shells grow in a spiral pattern—each whorl is a new room the animal adds as it grows!
🦀 Hermit crabs don't make shells; they find and move into empty seashells and upgrade to bigger ones as they grow.
🌊 Some beaches are practically paved with shells—Shell Beach in Australia is almost entirely made of tiny shells.
📏 Collectors and scientists measure shells by length, width, and growth lines to learn about age and habitat.
How do I start a seashell collection with my child?
What materials do I need to collect, clean, and display seashells?
What ages is a seashell collection activity suitable for?
What safety tips and benefits come from creating a seashell collection?
