Take photographs underwater
Learn to take underwater photographs using a waterproof camera or sealed phone pouch, practicing framing, lighting, and safe swimming with adult supervision.

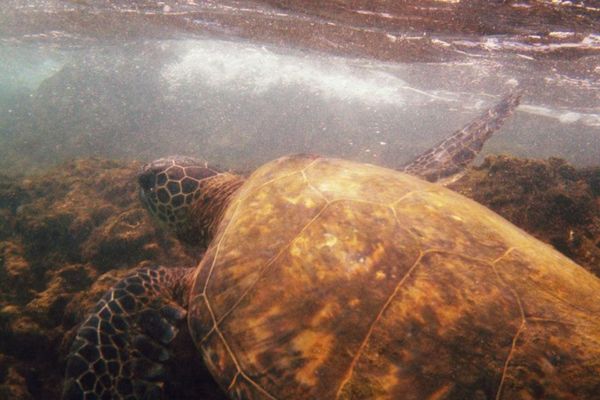

Step-by-step guide to take underwater photographs
A Step-By-Step Guide to Underwater Wildlife Photography | Framed In Nature | BBC Earth
Step 1
Gather all Materials Needed and put them by the pool or bathtub.
Step 2
Ask an adult to supervise the whole activity before you start.
Step 3
Check the waterproof camera or sealed phone pouch for any holes or damage.
Step 4
Close the pouch or secure the camera inside according to its instructions.
Step 5
With your adult's help, submerge the empty sealed pouch in shallow water for about 30 seconds to check for leaks.
Step 6
Put on your goggles and any floatation aid you will use.
Step 7
Set the camera to underwater mode or a bright auto setting.
Step 8
Enter the shallow water with your adult beside you.
Step 9
Place a small colorful toy a short distance underwater to use as a subject.
Step 10
Hold the camera steady with both hands and keep your elbows close to your body.
Step 11
Take a close-up photo of the toy while keeping the camera steady.
Step 12
Move back a little and take a mid-distance photo of the toy and background.
Step 13
Take a wide shot that includes more of the pool or the person swimming to show context.
Step 14
Take one creative shot like an underwater selfie or a splash action photo.
Step 15
Share your finished creation on DIY.org.
Help!?
I don't have a waterproof camera or sealed phone pouch — what can I use instead?
Use a disposable waterproof film camera, an action camera with its waterproof housing, or a manufacturer-rated waterproof smartphone case (not a zip-top bag), and still perform the 30-second submerged leak check before using it.
What should I do if water gets into the pouch during the 30-second leak test?
Stop immediately, dry and inspect the pouch, reseal it carefully or replace it with an undamaged pouch or a disposable waterproof camera before proceeding to protect the device.
How can I adapt this underwater photography activity for younger or older kids?
For younger children (about 3–6) do the activity in a bathtub or kiddie pool with an adult holding the sealed pouch and placing the small colorful toy close while the child presses the shutter, and for older kids (8+) let them set underwater mode, practice close-up, mid-distance, and wide shots themselves, and attempt creative shots like underwater selfies.
How can we make the photos more interesting or personalize the project before sharing on DIY.org?
Extend the activity by creating a themed photo series with several small colorful toys, add a waterproof LED or bright pool backdrop, experiment with angles like underwater selfies and splash action shots, then edit the set into a short story to share on DIY.org.
Watch videos on how to take underwater photographs
10 Underwater Photography Tips for EVERYONE
4 Videos

10 Underwater Photography Tips for EVERYONE
S4:E14| How to learn Underwater Photography & Videography | Renowned Photographer Kewin Lorenzen
Getting Started in Underwater Photography Made EASY!
What Is The Best Way To Get Started In Underwater Photography & Video
Facts about underwater photography for kids
🐠 Red light disappears quickly underwater — by about 5–10 meters most reds look blue or green unless you add light or correct color.
📸 Using a strobe or flash underwater restores colors and freezes motion, but it can also cause backscatter (tiny bright spots from particles).
🌊 Most colorful, well-lit underwater photos are taken in shallow water because natural light drops off fast as you go deeper.
🥽 Many waterproof phone pouches and cameras are rated for shallow depths — always test a pouch with a paper towel before putting a device inside.
🎯 Underwater framing works best when you get close to your subject; water reduces contrast and detail, so 'zoom with your fins' for clearer shots.
How do I teach my child to take underwater photographs safely and effectively?
What materials do I need for a child to learn underwater photography?
What ages is underwater photography suitable for and how much supervision is required?
What safety tips should parents follow when kids take underwater photos?
