Make something to sell
Design and make a set of handmade paper bookmarks to sell, practicing measuring, cutting, decorating, packaging, and setting fair prices with simple math.

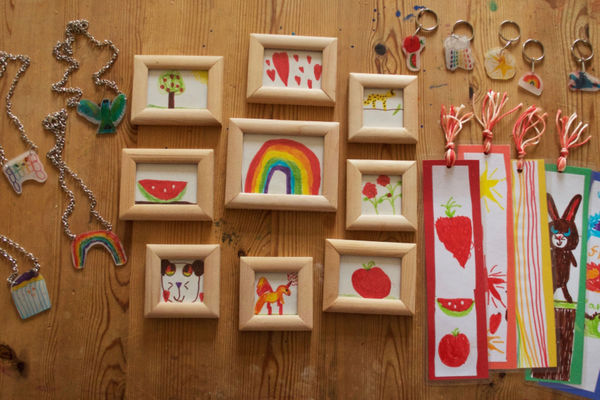

Step-by-step guide to make a set of handmade paper bookmarks to sell
No Sewing Machine!🧵I Make 10 Pieces A Day And Sell Them All 🍓Felt Doll DIY
Step 1
Gather all your materials and clear a flat workspace so you have room to make your bookmarks.
Step 2
Draw a rectangle 6 inches by 2 inches on the paper using the ruler and pencil for a standard bookmark size.
Step 3
Cut out the rectangle carefully along your pencil lines to make the bookmark shape.
Step 4
Use the scissors to round the four corners of the bookmark so they are smooth and safe to handle.
Step 5
Lightly sketch a design or pattern with your pencil on the front of the bookmark to plan your decoration.
Step 6
Color in your design using markers crayons or colored pencils to make it bright and neat.
Step 7
Add stickers washi tape or other decorative items with the glue stick to make your bookmark special.
Step 8
Use the hole punch to make one hole centered near the top edge of the bookmark if you want to add a tassel.
Step 9
Thread a short piece of ribbon through the hole and tie a knot to make a cute tassel.
Step 10
Slide the finished bookmark into a small clear bag or envelope to keep it clean and ready to sell.
Step 11
Add up the cost of the materials you used for one bookmark and divide if needed to find the material cost per bookmark.
Step 12
Decide on a fair selling price by adding a small profit amount to the material cost and write the price on a sticky label.
Step 13
Stick the price label onto the packaged bookmark so buyers can see the cost.
Step 14
Take a photo of your finished bookmarks and share your creation on DIY.org to show the world what you made.
Help!?
What can we use instead if we don't have a hole punch or small clear bags?
If you don't have a hole punch or a small clear bag, use a sandwich bag or envelope for packaging and carefully make the hole with a sharpened pencil or large sewing needle when you reach the 'make one hole' step.
My bookmark tore when I punched the hole—how can I fix that?
If the paper rips when you punch the hole near the top edge, reinforce that area with a small piece of washi tape or clear tape before punching so the ribbon can be threaded without tearing the bookmark.
How can I adapt this activity for younger or older kids?
For preschoolers, have an adult pre-cut the 6 inch by 2 inch rectangles and let them color and stick decorations (steps: cut out the rectangle, color in design, add stickers), while older kids can measure, round corners, punch the hole themselves, tie tassels, and calculate material cost and selling price.
What are some ways to make the bookmarks fancier or sell better?
To enhance and protect your finished bookmark before packaging (step: slide the finished bookmark into a small clear bag), laminate it or cover it with clear packing tape, add a braided ribbon tassel, and bundle several together with a price label to sell as a set.
Watch videos on how to make a set of handmade paper bookmarks to sell
10 Creative and Easy Kids Craft | Fun Crafts for Kids | Handmeyd Treasures
4 Videos
10 Creative and Easy Kids Craft | Fun Crafts for Kids | Handmeyd Treasures
10 Sewing Projects to MAKE and SELL To make in under 10 minutes

30 Unique Crafts to Make and Sell
10 Crafts to MAKE & SELL | The DIY Mommy
Facts about paper crafts and entrepreneurship for kids
📚 Bookmarks have been used for centuries — readers in medieval times used ribbons or paper strips to mark pages.
🧾 Modern paper is mostly made from wood pulp; cellulose fibers are pressed and dried into thin sheets.
📏 Measure twice, cut once — a classic tip that helps save paper and avoid mistakes while crafting.
🎁 Nice packaging (like a clear sleeve and a handwritten tag) can make a simple bookmark feel like a special gift.
💰 Small handmade bookmarks often sell for just a few dollars each; simple, fair pricing helps buyers choose quickly.
How do we design and make a set of handmade paper bookmarks to sell?
What materials do I need to make handmade paper bookmarks for selling?
What ages is designing and making sellable bookmarks suitable for?
What are the benefits and safety tips for kids making bookmarks to sell?
