Perform minor surgery
Safely practice minor surgery skills on an orange using a blunt needle, thread, and toy scalpel under adult supervision to learn stitches and wound care.


Step-by-step guide to perform minor surgery on an orange
Step 1
Wash your hands with soap and water to be clean and safe.
Step 2
Put a tray on a table and place the orange and all materials on it.
Step 3
Ask your adult to hold the orange and help make a small straight 2 cm cut in the skin using the toy scalpel.
Step 4
Gently open the cut a little with your finger so you can see the edges you will stitch.
Step 5
Thread the blunt needle with about 30 cm of thread and tie a knot at one end so it won’t pull through.
Step 6
Starting at one end of the cut push the needle through the orange skin from underneath to the top so the knot stays hidden.
Step 7
Push the needle back through the opposite side from top to underneath to make a simple interrupted stitch.
Step 8
Gently pull the thread until the two edges of the cut touch but do not squeeze the orange.
Step 9
Tie a secure knot to hold the stitch in place and ask your adult for help if you need it.
Step 10
Trim the extra thread near the knot with your adult’s help.
Step 11
Repeat Steps 6 to 10 placing stitches about 1 cm apart until the whole cut is closed.
Step 12
Cover the stitched area with a clean piece of gauze or a cotton ball and press gently.
Step 13
Put an adhesive bandage over the gauze to keep the area clean.
Step 14
Clean your hands and the tray when you are finished.
Step 15
Share your finished creation on DIY.org.
Help!?
What can we use if we don't have a toy scalpel, blunt needle, or gauze?
If you can't find a toy scalpel or blunt needle, have an adult make the small 2 cm cut (Step 3) and substitute a plastic butter knife for cutting, a blunt sewing or plastic lacing needle threaded with embroidery floss instead of surgical thread (Step 5), and use a clean cotton ball or folded tissue in place of gauze (Step 12).
My thread keeps slipping or the orange edges won't meet—what should I try?
If threading or stitch closure is hard, use a needle threader or tape to stiffen the 30 cm thread (Step 5), have an adult hold and mark the straight 2 cm cut (Step 3), and pull the stitch gently (Step 8) before tying a secure knot so the edges touch without squeezing the orange (Step 9).
How can I adapt this activity for younger or older children?
For younger kids let an adult make the 2 cm cut (Step 3) and use thick yarn with a blunt plastic needle for single stitches, while older children can thread the needle themselves (Step 5), space stitches about 1 cm apart (Step 11) and practice different stitch patterns independently before covering with gauze (Step 12).
How can we make the activity more creative or educational after finishing the stitches?
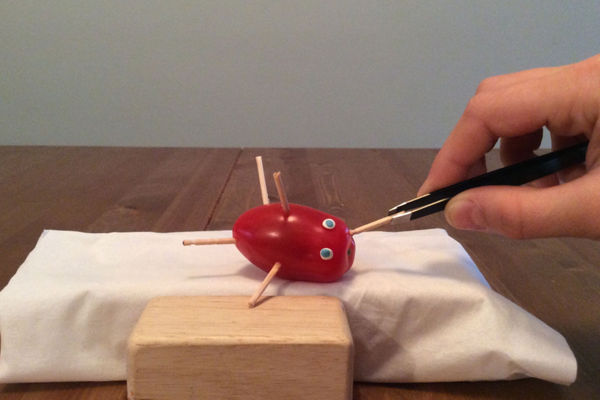
To extend the activity, try suturing different 'skins' like a banana or tomato to compare how stitches hold (Steps 6–11), use colored thread to personalize the look before covering with gauze and an adhesive bandage (Steps 12–13), and photograph the tray to share on DIY.org.
Watch videos on how to perform minor surgery on an orange
Minor Surgical Procedures in General Practice
4 Videos
Minor Surgical Procedures in General Practice
Having Surgery
UCSF Pediatric Surgery Gastrostomy Tube Teaching
Surgery tour at TMC for Children
Facts about suturing and wound care
🧡 Many medical students and trainees practice suturing on oranges because the peel and flesh mimic layers of skin and tissue.
🪡 Blunt practice needles and toy scalpels are used to learn hand movements safely — always with an adult watching nearby.
🧵 Sutures come in absorbable types (that dissolve) and non-absorbable types (that are removed later) with brand names like Vicryl and Nylon.
🏥 Two common stitch styles are interrupted (individual knots) and running (continuous) — each is handy for different wounds.
🔬 Practicing on fruit or synthetic skin is a low-stress way to build confidence before moving on to supervised real-life training.
How do I safely perform a mock minor surgery on an orange with my child?
What materials do I need to practice stitches on an orange?
What ages is this mock surgery activity suitable for?
What are the benefits and safety tips for practicing stitches on an orange?
