Build a kaleidoscope
Build a simple kaleidoscope using a cardboard tube, reflective strips, translucent beads, and clear plastic; explore symmetry and colorful patterns safely with supervision.


Step-by-step guide to build a kaleidoscope
DIY | How to Make a REAL Kaleidoscope (So Easy!)
Step 1
Lay out all materials on a clean table so you can reach them easily.
Step 2
Use the ruler to measure the length of the cardboard tube from end to end.
Step 3
Use the pencil to draw that same length as a straight line on three reflective mirror strips.
Step 4
Cut the three reflective strips along the pencil lines with scissors.
Step 5
Tape the long edges of the three reflective strips together so they make a triangular prism with the shiny sides facing inward.
Step 6
Slide the triangular mirror prism carefully into the cardboard tube so it fits snugly inside.
Step 7
Place the clear plastic sheet on the table and trace two circles slightly larger than the tube opening.
Step 8
Cut out the two clear plastic circles with scissors.
Step 9
Put a small pile of translucent beads in the center of one plastic circle.
Step 10
Place the second plastic circle on top of the beads so the beads are sandwiched between the two circles.
Step 11
Tape all around the edges of the two plastic circles to seal the bead chamber so no beads fall out.
Step 12
Tape the sealed bead chamber firmly to one end of the cardboard tube.
Step 13
Cut a small round viewing hole in the opposite end of the tube for your eye to look through.
Step 14
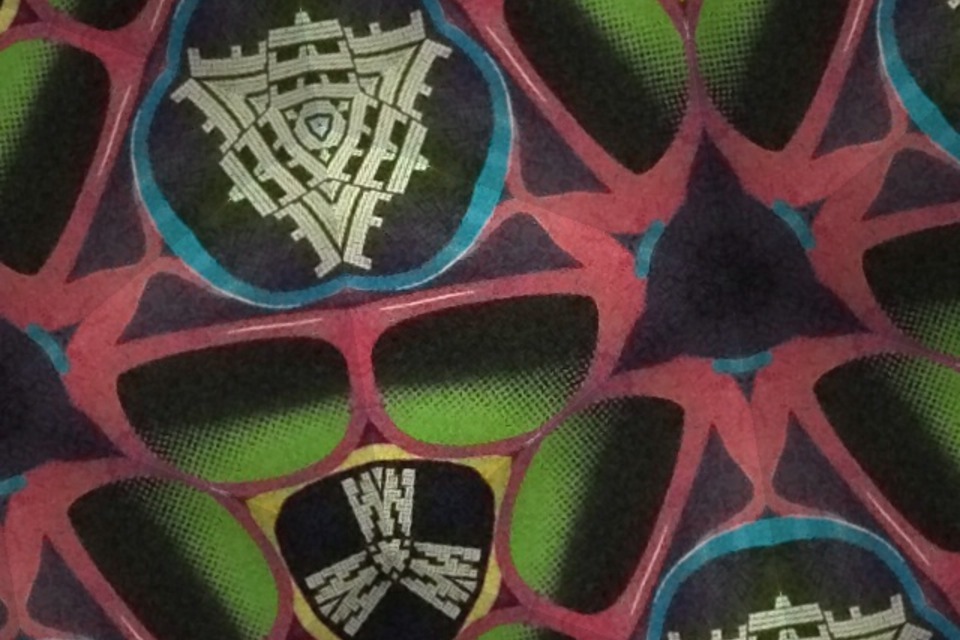
Look through the viewing hole and slowly rotate the bead chamber to explore the colorful symmetrical patterns.
Step 15
Share a photo or video of your finished kaleidoscope and what you discovered on DIY.org.
Help!?
What can I use if I can't find the reflective mirror strips?
If reflective mirror strips aren't available, substitute smooth aluminum foil or reflective mylar cut to the same length you measured with the ruler and taped onto three stiff cardstock strips before joining them into the triangular prism.
Why do the patterns look fuzzy or uneven when I look through the viewing hole?
If patterns look blurry or faint, check that the shiny sides are facing inward as instructed and that the three reflective strips are taped edge-to-edge without gaps so the triangular prism fits snugly inside the cardboard tube.
How can I adapt this kaleidoscope activity for different ages?
For younger children, pre-cut the reflective strips and clear plastic circles and use large translucent beads while an adult handles scissors and the tape steps, and for older kids let them measure and cut the strips themselves and try different bead sizes or a longer cardboard tube for more complex patterns.
How can we extend or personalize our finished kaleidoscope?
To enhance the kaleidoscope, tape colored cellophane over the bead chamber, replace the translucent beads with sequins or small colored buttons for bolder patterns, and decorate the cardboard tube exterior before sharing your photos on DIY.org.
Watch videos on how to build a kaleidoscope
Kaleidescope making at home/how to make a kaleidoscope/make a kaleidoscope for science project
4 Videos
Kaleidescope making at home/how to make a kaleidoscope/make a kaleidoscope for science project

How to make a Kaleidoscope at home without mirror | DIY Kaleidoscope | Fun designs | Science project
How to Make DIY Kaleidoscope | Easy Science Project for Class 5 to 8

DIY STEM Project For Kids: How To Make A Kaleidoscope
Facts about optics and symmetry for kids
🌀 The kaleidoscope was invented by David Brewster in 1816 and quickly became a popular toy and curiosity.
🔍 A simple kaleidoscope uses multiple reflections (often three mirrors) to turn a few objects into repeating, colorful patterns.
🌈 Translucent beads act like tiny stained glass — light passing through them mixes colors to make the shifting designs you see.
📐 The number of repeated segments you see depends on the angle between the mirrors — smaller angles make more repeats.
🛡️ For safety, use reflective plastic or mirror tape instead of glass and have an adult help when cutting and assembling.
How do you build a simple kaleidoscope?
What materials do I need to build a kaleidoscope?
What ages is making a kaleidoscope suitable for?
What are the benefits and safety tips for making a kaleidoscope?
