Floss
Learn and practice proper tooth flossing using dental floss, a mirror, and adult supervision to remove plaque and keep teeth healthy.


Step-by-step guide to tooth flossing for kids
How to Floss Your Teeth - Life Skills for Kindergarten, First, and Second Grade!
Step 1
Wash your hands with soap and water for 20 seconds.
Step 2
Place the dental floss and mirror on the sink or counter so they are within reach.
Step 3
Ask an adult to stand with you and help if you need it before you start.
Step 4
Pull off about 18 inches of floss from the container.
Step 5
Wind most of the floss around one middle finger and the rest around the other middle finger leaving about 1 to 2 inches to work with.
Step 6
Hold the floss tightly between your thumbs and index fingers so the working length is taut.
Step 7
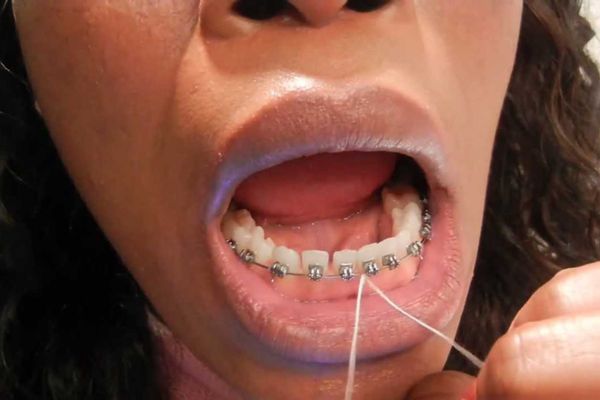
Stand in front of the mirror and open your mouth so you can see the teeth you will floss.
Step 8
Gently slide the floss between two teeth using a back-and-forth sawing motion down to the gumline.
Step 9
Curve the floss into a C shape around the side of one tooth.
Step 10
Move the floss gently up and down against the tooth to clean below the gumline without snapping into your gums.
Step 11
Unwind a clean section of floss from your fingers so a fresh piece is ready before you floss the next gap.
Step 12
Continue flossing each space between teeth including the back molars until all teeth are cleaned.
Step 13
Rinse your mouth with water and spit into the sink.
Step 14
Throw the used floss into the trash.
Step 15
Share your finished flossing routine and what you learned on DIY.org.
Help!?
What can we use if we don't have dental floss or a mirror?
If regular dental floss or the bathroom mirror isn't available, you can use floss picks or a small interdental brush in place of the dental floss and a hand mirror in place of the sink mirror, and follow step 3 by asking an adult to help.
What should I do if the floss keeps snapping or won't go between my teeth?
If the floss snaps or won't pass between tight teeth, switch to waxed floss if you have it and use the gentle back-and-forth sawing motion while curving the floss into a C shape around each tooth as described in the instructions to avoid snapping into your gums, and have the adult helper guide your fingers if needed.
How can I adapt this flossing routine for younger or older kids?
For younger children, an adult should hold the floss or use a floss pick while standing with the child as in step 3, and for older kids let them practice pulling about 18 inches, winding it around their middle fingers, and flossing each gap before sharing their routine on DIY.org.
How can we make the activity more fun or personalized after flossing?
After rinsing and spitting into the sink, personalize the activity by using flavored floss, keeping a sticker chart to track each flossed day, and recording a short video explaining what you learned to upload to DIY.org as the final step.
Watch videos on how to floss teeth for kids
How to Floss for Kids - Cleaning between the teeth for Children
4 Videos
How to Floss for Kids - Cleaning between the teeth for Children

Flossing technique: toddler & child

Parents' Guide to Toothbrushing and Flossing for Children ages 3-6 years old
Fun Flossing Tips for Kids (Ages 2-7): Why, When & How to Floss!
Facts about dental hygiene for kids
🦷 Floss reaches between teeth and under the gumline to remove plaque your toothbrush can't reach.
🧵 Use about 18 inches (45 cm) of floss, wrap it around your fingers, and glide it gently in a C-shape — don't snap it.
👶 Kids can start flossing once two teeth touch; a mirror and adult supervision make it safer and easier.
📅 Flossing once a day, along with brushing, helps keep gums healthy and reduces spots where cavities can start.
🪥 Flossing, brushing, and regular dentist checkups work together to keep your smile bright and strong.
How do I teach my child to floss their teeth properly?
What materials do I need to help my child learn flossing?
What ages are children ready to start flossing and when can they do it alone?
Is flossing safe for kids and what are the benefits?
