Send a postcard
Design and decorate a homemade postcard, write a friendly message, address and stamp it, then mail it to a friend or family member.


Step-by-step guide to send a postcard
How to make a card envelope | super easy envelope for postcards | colorful paper
Step 1
Gather all your materials and put them on a clear workspace so everything is ready.
Step 2
Use the ruler to measure and mark a rectangle about 4 inches by 6 inches on the paper for your postcard shape.
Step 3
Cut out the marked rectangle carefully along the lines to make your postcard base.
Step 4
Decorate the front of your postcard using your coloring materials stickers or glued cutouts to make it bright and fun.
Step 5
Let any glued pieces or wet markers dry completely so nothing smudges.
Step 6
Turn the postcard over and draw a straight vertical line down the center to separate the message side from the address side.
Step 7
Write a friendly message on the left side using your pen or marker and tell the person something nice or a fun story.
Step 8
On the right side write the recipient’s full name and mailing address clearly.
Step 9
Write your return address neatly in the top left corner of the right side.
Step 10
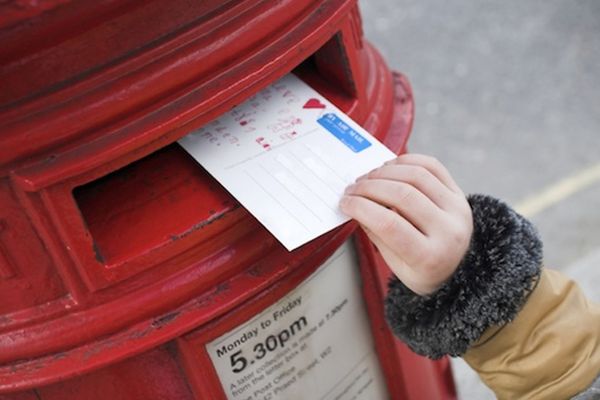
Place the postage stamp in the top right corner of the address side.
Step 11
Show your finished postcard and stamp to an adult to check that the address and postage are correct.
Step 12
With an adult go to a mailbox or post office and mail your postcard so it can travel to your friend or family member.
Step 13
Share a photo of your finished postcard and tell the story of who you mailed it to on DIY.org
Help!?
What can we use if we don't have 4x6 paper or cardstock for the postcard base?
Use a cleaned cereal-box or thin cardboard and measure and mark a 4-inch by 6-inch rectangle with your ruler and marker, then cut it out as the postcard base.
My glued pieces keep slipping or my markers smudge—how can I fix that during decorating?
Apply glue sparingly (a glue stick or small dab of white glue), press glued cutouts flat and let them and any wet markers dry completely under a heavy book before you turn the postcard over.
How can I adapt the steps for different ages so it's safe and fun?
For younger children, pre-measure and pre-cut the 4x6 rectangle and let them decorate with stickers while an adult writes the address and places the stamp, and for older kids have them use the ruler to measure, cut the rectangle, write the full message and address, and take the postcard to the mailbox with supervision.
How can we extend or personalize the postcard activity to make it more special?
Personalize the decorated front by gluing a small printed photo, pressing a flower, or adding foil or textured paper, write a creative story on the message side, then mail it and share a photo of the finished postcard on DIY.org.
Watch videos on how to send a postcard
✉️ "How to Write Sender & Receiver on a Postcard | Step-by-Step Guide"
3 Videos
✉️ "How to Write Sender & Receiver on a Postcard | Step-by-Step Guide"
How to Make a Postcard in Canva | Postcard Design Tutorial Free | Step-By-Step Process #canva

How To Mail A Postcard? - LearnToDIY360.com
Facts about mailing and letter-writing for kids
✉️ The world’s first government-issued postcards appeared in Austria-Hungary in 1869 — that’s how postcards began!
💌 Studies show receiving handwritten mail can boost happiness and feel more personal than digital messages.
💸 Postcards often cost less to mail than letters because they don’t need envelopes — great for low-cost snail mail!
🔖 The most valuable stamp ever sold was the British Guiana 1c Magenta, fetching about $9.5 million at auction.
📏 A common postcard size in the U.S. is 4 × 6 inches (about 10 × 15 cm) — a perfect little canvas for drawings and stickers!
How do I make and mail a homemade postcard with my child?
What materials do I need to make a postcard for mailing?
What ages is making and mailing a homemade postcard suitable for?
What are the benefits and safety tips for sending homemade postcards, and any fun variations?
