Make a travel journal
Make a personalized travel journal using paper, stickers, maps, and drawings to record routes, observations, souvenirs, and memories during trips.


Step-by-step guide to make a travel journal
Step 1
Gather all your materials and put them on a clear table or desk.
Step 2
Decide how big you want your journal pages to be and stack that many plain sheets together.
Step 3
Cut a piece of construction paper or cardstock to match the page size to make a cover.
Step 4
Place the cover on top of the stacked pages so the edges line up.
Step 5
Bind the pages by stapling along the left edge twice or by punching holes and tying with string.
Step 6
Write a fun title on the front cover with your pencil or colouring materials.
Step 7
Decorate the cover using stickers and colouring materials.
Step 8
Turn to a fresh page that will be your travel route page.
Step 9
Glue or tape a printed map onto the route page or draw your travel route with pencil and colouring materials.
Step 10
Label several pages with headings like Routes Observations Souvenirs Memories and Drawings.
Step 11
Attach an envelope or sealable bag to one page to make a pocket for small souvenirs.
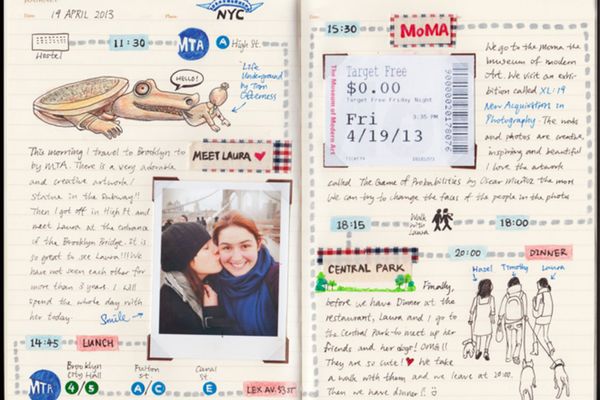
Step 12
Write your first journal entry with the date and one or two observations or drawings from your trip.
Step 13
Take photos of your finished travel journal and share your creation on DIY.org
Help!?
What can we use instead of construction paper or cardstock for the cover if we can't find them?
If you can't find construction paper or cardstock for the cover, cut and decorate a flattened cereal box or glue two sheets of printer paper together to match the page size and use that as the cover.
What should we do if the staples won't hold the stacked pages together or the spine feels loose?
If stapling along the left edge twice doesn't hold the stacked pages, punch holes and tie with strong string as instructed or reinforce the spine with clear packing tape before decorating the cover.
How can we adapt the steps for younger or older kids so the activity is safe and engaging?
For preschoolers, have an adult pre-cut and stack the plain sheets and let them decorate the cover with stickers and colouring materials, while older kids can cut the cover, draw detailed travel routes on the route page, and bind the journal themselves with punched holes and string.
What are simple ways to extend or personalize the travel journal after it's finished?
To personalize and extend the journal, attach photos and ticket stubs into the sewn or glued envelope pocket, add labeled pages like Memories and Drawings as listed in the instructions, and decorate the cover with a unique title and washi tape.
Watch videos on how to make a travel journal
How to Make a Creative Travel Journal in Canva - Document Your Adventures
4 Videos
How to Make a Creative Travel Journal in Canva - Document Your Adventures
🌸 how to complete a travel journal // flip through + easy tips & spread ideas
How to Start a Travel Journal and 20 Creative Ideas to Get You Started

How Do I Create A Travel Journal For Kids? - The Family Getaway Guide
Facts about travel journaling and scrapbooking
✈️ Explorers like Charles Darwin and Captain Cook kept travel journals that helped scientists and historians learn about new places.
🗺️ The word "cartography" comes from Greek words meaning "map" and "writing" — it's the art and science of map-making.
📚 A travelogue can be a book, film, or blog that shares someone's journey, discoveries, and personal stories.
🖼️ Scrapbooking became popular in the 19th century when people pasted keepsakes and clippings into books to preserve memories.
✍️ Drawing, sticking souvenirs, and writing about trips helps your brain notice details — a travel journal makes memories last longer.
How do I make a travel journal with my child?
What materials do I need to make a personalized travel journal?
What ages is a travel journal suitable for?
What are the benefits of making a travel journal with kids?
