Make a compass
Make a simple compass using a magnetized needle floated on a cork or bowl of water to find north and learn about magnetism.


Step-by-step guide to make a simple compass
How Do You Use A Baseplate Compass For Basic Hiking Navigation? - The Hiker's Advice
Step 1
Gather all materials and place them on a flat table in a well-lit area.
Step 2
Magnetize the needle by stroking it with the magnet about 30 times in the same direction from the eye toward the point.
Step 3
Push the magnetized needle through the center of the cork or foam so the needle sticks out evenly on both sides and can balance.
Step 4
Fill the shallow bowl about three quarters full with water.
Step 5
Gently place the cork with the needle on the water so it floats freely without touching the bowl sides.
Step 6
Wait until the needle stops spinning and points steadily in one direction.
Step 7
Gently nudge the bowl and let it settle so you can confirm which end of the needle keeps returning to the same direction.
Step 8
Use the marker to write an "N" on the rim of the bowl at the spot the needle points to.
Step 9
Move the bowl a short distance and check that the same end of the needle still points toward your "N" mark to confirm your compass works.
Step 10
Share your finished compass and what you learned about magnetism on DIY.org.
Help!?
What can we use instead of a sewing needle, cork, or magnet if we can't find them?
Use a straightened paperclip or safety pin as the 'needle,' swap the cork for a wine cork, small plastic bottle cap, or piece of craft foam to push the needle through, and use a fridge magnet or any strong bar magnet for the step where you stroke the needle about 30 times from the eye toward the point.
The needle isn't spinning or keeps pointing randomly—what should we check and fix?
If the needle doesn't spin or drifts, re-stroke it with the magnet about 30 times in the same direction, make sure you pushed the needle through the center so it sticks out evenly on both sides and the cork floats freely without touching the bowl sides in water filled three quarters full, then gently nudge the bowl and let it settle to confirm.
How can we change the activity for younger or older kids?
For younger children have an adult do the magnetizing and push the needle through the cork while the child places the cork in the water and marks 'N' with the marker, and for older kids let them vary the number of magnet strokes, try different magnets or needles, and record whether the same end still points to their 'N' after moving the bowl.
How can we make the compass more interesting or keep it as a project?
Decorate the cork and bowl rim, glue a paper compass card with your 'N' mark, try sealing the floating assembly in a shallow lid to make a portable compass, compare results using different needles or magnets by repeating the magnetize-and-float steps, and then share your finished compass and findings on DIY.org.
Watch videos on how to make a simple compass
How to Use a Compass for Hiking and Survival
4 Videos
How to Use a Compass for Hiking and Survival
How Do Hikers Orient A Map Using A Compass? - The Hiker's Advice

How Do You Use A Sun Compass For Navigation? - The Hiker's Advice

What Is The Easiest Way To Use A Hiking Compass For Navigation? - The Hiker's Advice
Facts about magnetism
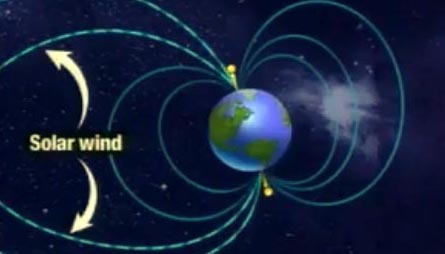
🧭 Compasses point to Earth's magnetic north because the magnetized needle aligns with Earth's magnetic field.
🧲 You can magnetize a sewing needle by stroking it with a magnet about 30–50 times in the same direction — then it acts like a tiny compass.
🌍 Earth's magnetic north slowly drifts each year by many kilometers, so compass readings change over long periods.
🕰️ The first recorded use of magnetic compasses for navigation was in China during the Song dynasty (around the 11th century).
💧 A floating needle compass works because low friction and water's surface tension let the magnetized needle rotate freely to point north.
How do you make a simple compass using a magnetized needle and cork or a bowl of water?
What materials do I need to make a floating needle compass with my child?
What ages is this floating compass activity suitable for?
What safety tips should I follow when making a needle compass?
