Conduct a soil test
Collect soil samples, test texture, drainage, and acidity using water, vinegar, and baking soda, and record observations to learn about soil health.


Step-by-step guide to conduct a soil test
Easy DIY Soil Test
Step 1
Gather all your materials and bring them to an outdoor table or a flat spot near where you will test soil.
Step 2
Pick two different places to test and write their names as Spot A and Spot B in your notebook.
Step 3
Use the trowel to scoop a small handful of soil from about 2 inches deep at each spot and put each sample into its own labeled cup.
Step 4
Take a pinch of soil from Spot A and rub it between your fingers to feel if it is gritty smooth or sticky and say the word out loud.
Step 5
Take a pinch of soil from Spot B and rub it between your fingers to feel if it is gritty smooth or sticky and say the word out loud.
Step 6
Write the texture words gritty smooth or sticky next to Spot A and Spot B in your notebook.
Step 7
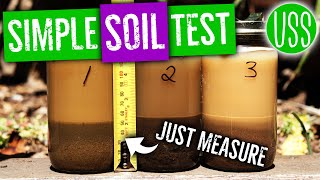
Put about one third cup of soil from Spot A into the clear jar and add water until the soil is covered.
Step 8
Screw the lid on the jar and shake it hard for one minute to mix the soil and water well.
Step 9
Set the jar somewhere safe and leave it to settle for at least one hour so layers form.
Step 10
After the jar settles look at the layers and draw or write how much of the jar is sand silt and clay in your notebook.
Step 11
For a drainage test put half a cup of soil from Spot A into the drainage cup and press it down gently to pack it lightly.
Step 12
Pour one cup of water on top of the soil in the drainage cup and watch how fast it drains then write fast medium or slow for Spot A in your notebook.
Step 13
Put one teaspoon of dry soil from Spot A into a small cup then add one teaspoon of white vinegar and watch for fizzing to test alkalinity then write what you saw in your notebook.
Step 14
Put one teaspoon of soil from Spot A into another small cup add one teaspoon of water to make a muddy paste then add half a teaspoon of baking soda and watch for fizzing to test acidity then write what you saw in your notebook.
Step 15
Clean up your tools and wash your hands with adult help then share your soil test results and pictures of your notes and jars on DIY.org
Help!?
What can we use if we don't have a clear jar, trowel, or labeled cups?
If you don't have a clear jar use a clean clear plastic bottle or glass drinking cup for steps 7–10, substitute a sturdy spoon or butter knife for the trowel when scooping in step 3, and mark paper or masking tape on any small container to act as labeled cups for step 3.
What should we do if the jar leaks, the soil won't settle into layers, or the drainage test doesn't work?
For step 8, tighten the lid and wrap the jar in a towel before shaking to avoid leaks, break up large clumps with the trowel before adding water so layers can form in step 9, and for the drainage test in step 12 avoid packing the soil too firmly and poke small holes in the drainage cup if water won't move through.
How can we change the activity for different ages so it's safe and fun for younger children or challenging for older kids?
For younger children have an adult do step 3 scooping and step 14 washing hands while they focus on rubbing soil and saying gritty/smooth/sticky in steps 4–6, and for older kids add measurements of layer heights in step 11, time the drainage in step 12 in seconds, and use pH strips alongside the vinegar and baking soda tests in steps 13–14.
How can we extend or personalize the soil test beyond the basic instructions?
Extend the activity by testing more than two spots, photographing each labeled cup and settled clear jar from step 11, recording sand/silt/clay percentages in your notebook as a chart, and planting identical seeds in soils with different drainage speeds from step 12 to compare growth.
Watch videos on how to conduct a soil test
The Soil Profile - Kids Science Experiments
4 Videos

The Soil Profile - Kids Science Experiments
Simple Soil Testing // How To Test Your Soil
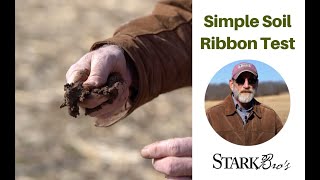
How to Do a Simple Soil Ribbon Test
Soil Drainage and Retention - Experiment for kids
Facts about soil science for kids
🧪 Vinegar fizzes in soils with carbonate minerals (like lime), which is a quick sign of alkaline conditions.
🦠 A single teaspoon of healthy garden soil can contain billions of microorganisms — far more than the number of people on Earth.
🌱 Most vegetables grow best in slightly acidic to neutral soil (pH about 6.0–7.0).
🏖️ Soil texture matters: sandy soils drain fast, clay soils hold water, and loam gives a great balance for plants.
🌍 Soils store more carbon than the atmosphere and plants combined, so healthy soil helps fight climate change.
How do you conduct a simple home soil test with kids?
What materials do I need for a kids' soil testing activity?
What ages is a soil testing activity suitable for?
What are the benefits of doing a soil test with children?
