Try chromatography
Use paper chromatography to separate marker ink colors on a coffee filter using water, watching pigments spread and learning about mixtures and solubility.

Step-by-step guide to use paper chromatography to separate marker ink colors
Chromatography | #aumsum #kids #science #education #children
Step 1
Gather the materials listed above.
Step 2
Cut a coffee filter into a strip about 2 cm wide and 10 cm long using scissors.
Step 3
Use a pencil to write a small mark near the top edge of the strip to show which end is the top.
Step 4
Make a small dot with a washable marker about 1 inch (2 cm) from the bottom edge of the strip.
Step 5
Tape the top edge of the strip to the pencil so the strip can hang down straight from it.
Step 6
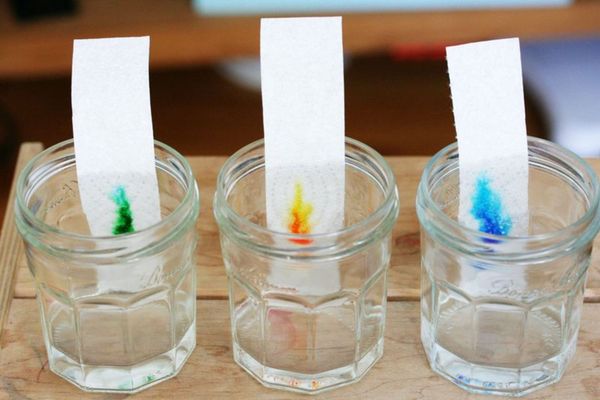
Pour water into the clear cup until the water is about 1 cm deep.
Step 7
Rest the pencil across the top of the cup and lower the strip so the bottom just touches the water while the marker dot stays above the water.
Step 8
Watch the water climb the strip and carry the colors into separate bands for about 5 to 15 minutes.
Step 9
When the colors stop moving, lift the pencil and remove the strip from the cup.
Step 10
Lay the wet strip flat on a paper towel and let it dry completely.
Step 11
Repeat the experiment with a different marker color or by making a mixed dot to compare results.
Step 12
Draw or write what colors you found separated on a clean sheet of paper.
Step 13
Share a photo of your finished chromatography strips and explain what you discovered on DIY.org.
Help!?
What can we use if we don't have coffee filters or washable markers?
If you don't have coffee filters, cut a plain paper towel or facial tissue into a 2 cm × 10 cm strip and, if you lack a washable marker, use a water-based highlighter or a dab of food coloring (avoid permanent markers because they usually won't separate).
Why did the dot smear or the colors not separate, and how can I fix it?
If the dot smeared or colors didn't separate, make sure the pencil-taped top lets the strip hang straight, the marker dot is about 2 cm from the bottom and stays above the ~1 cm water level, use a fresh coffee filter strip, and wait the full 5–15 minutes for bands to form.
How can I change the activity for younger or older kids?
For toddlers (3–5) have an adult pre-cut the filter, place a single large dot, and help hold the pencil while they watch colors for 3–5 minutes, and for older kids (8+) have them compare marker brands, time each run, record separated colors on paper, and calculate simple Rf ratios.
How can we extend or personalize the chromatography experiment?
Try making mixed-dot patterns, testing a small cup of isopropyl alcohol instead of water to separate different inks, turn dried strips into bookmarks or art, and photograph your finished strips to compare results on DIY.org.
Watch videos on how to use paper chromatography to separate marker ink colors on a coffee filter
Chromatography Butterflies Activity for Kids
4 Videos

Chromatography Butterflies Activity for Kids

Colourful Chromatography! (Easy At-Home Science for Kids)
How To Do A Chromatography Experiment? (BBC Bitesize KS3 Chemistry)

Color Chromatography for Kids!
Facts about chemistry experiments for kids
🔬 Chromatography was invented by botanist Mikhail Tsvet in 1903 to separate plant pigments.
🎨 Many “black” markers are actually mixtures of several colored pigments that separate when run on paper.
🌈 Water climbs up paper by capillary action, carrying pigments that travel at different speeds to form colorful bands.
☕️ Coffee filters are made of cellulose paper fibers, which makes them absorbent and perfect for simple chromatography.
🧪 Scientists often use an Rf value—the ratio of how far a pigment travels—to help identify substances separated by paper chromatography.
How do you do paper chromatography with a coffee filter to separate marker colors?
What materials do I need for a coffee filter chromatography experiment?
What ages is paper chromatography with markers suitable for?
What are the educational benefits of doing paper chromatography with kids?
