Practice survival skills
Practice basic outdoor survival skills by building a simple emergency shelter, assembling a small survival kit, tying useful knots, and learning safe signaling techniques.


Step-by-step guide to practice survival skills
Basic Survival Skills for Children
Step 1
With an adult, pick a safe flat spot near home away from loose branches and clear away sticks and rocks from the ground.
Step 2
Ask an adult to check the weather is safe for practicing outdoors before you start.
Step 3
Collect all the materials from the list and carry them to your chosen spot.
Step 4
Lay the tarp flat on the ground and place the two sturdy sticks upright about shoulder-width apart at the tarp’s center.
Step 5
Tie the paracord between the tops of the two sticks to make a ridgeline and drape the tarp over the cord to form a simple shelter shape.
Step 6
Secure the tarp edges by placing rocks or tucking them under logs so the shelter will not blow away.
Step 7
Put your blanket or emergency blanket inside the shelter to make a dry warm sleeping area.
Step 8
Put your water bottle snack flashlight whistle mirror and bandana into the backpack to assemble your small survival kit.
Step 9
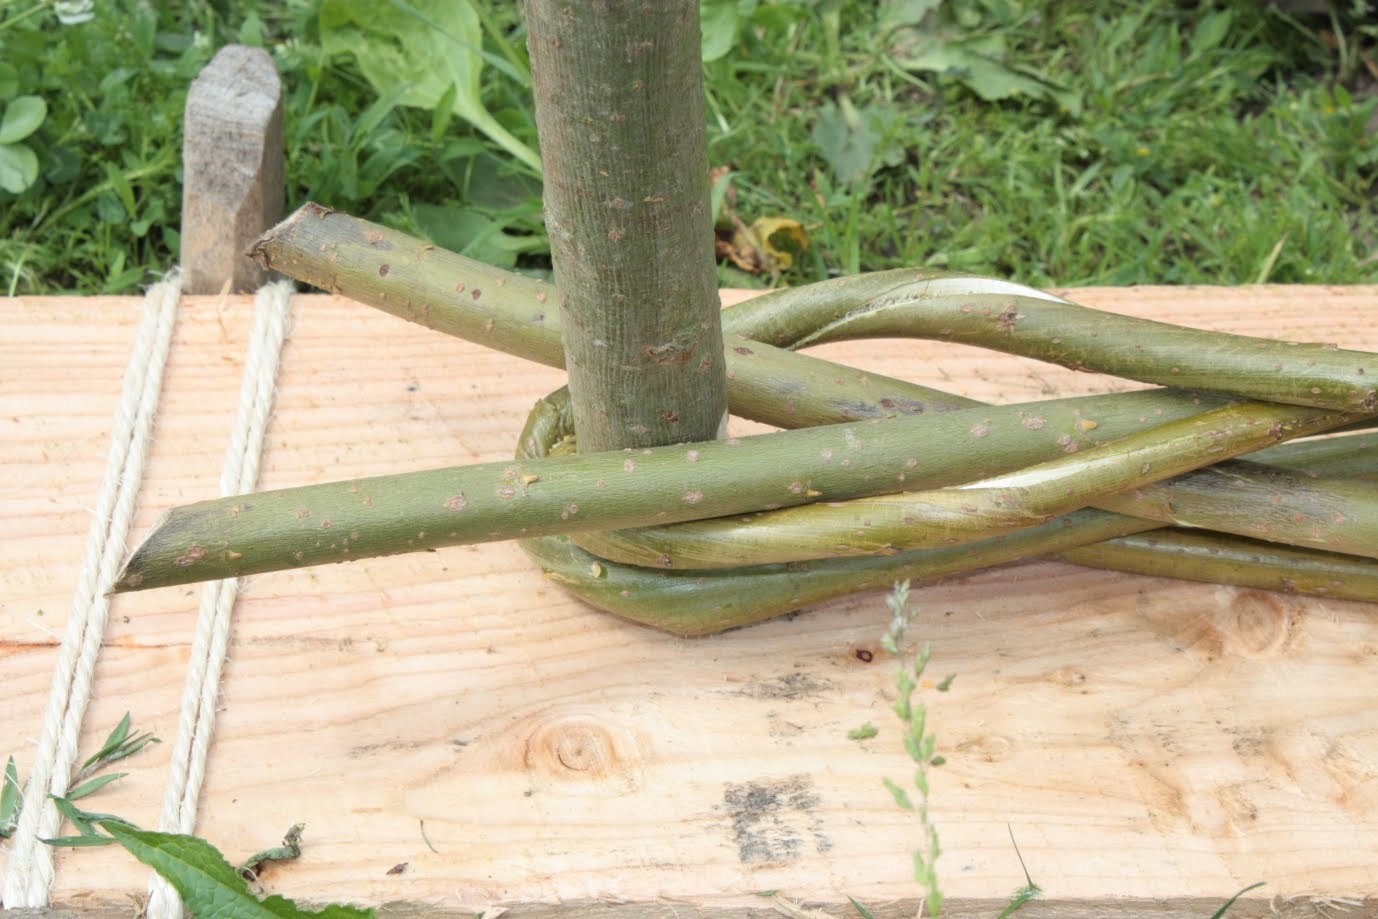
Practice tying a square knot by crossing two cord ends right over left then left over right and pulling tight until it locks.
Step 10
Practice tying a clove hitch by wrapping the cord twice around a stick crossing in the middle and tucking the end under the last turn then pulling tight.
Step 11
Practice a whistle distress signal by blowing three short sharp blasts then waiting one minute and repeating while an adult watches.
Step 12
Practice mirror signaling by aiming the mirror or shiny foil at the sun and making short flashes toward a distant object or person while a helper watches.
Step 13
Put on your survival kit and sit inside your shelter while staying close to your adult partner to check everything feels safe and comfortable.
Step 14
Share a photo and short description of your shelter and survival kit on DIY.org to show what you made and learned.
Help!?
What can we use if we don't have a tarp or paracord listed in the materials?
If you don't have a tarp, use a heavy-duty trash bag or picnic blanket, and if you lack paracord use strong rope, a spare belt, or a tightly twisted bandana to make the ridgeline between the two sticks and drape the shelter.
What should we do if the tarp keeps blowing away or the ridgeline sags while we try to build the shelter?
If the tarp blows or the ridgeline sags, push the two sturdy sticks deeper into the ground, wrap and tighten the paracord with a clove hitch around each stick, and secure the tarp edges with extra rocks or tuck them under logs so the shelter stays taut.
How can we adapt the activity for younger children or make it more challenging for older kids?
For younger children have them help clear sticks and rocks and drape the tarp while an adult sets the sticks and ties knots, and for older kids have them construct the ridgeline, practice the square knot and clove hitch themselves, and run timed whistle and mirror-signal drills.
What are simple ways to extend or personalize our shelter and survival kit after finishing the basic steps?
To extend the activity add insulation under the blanket with leaves or a sleeping pad, attach reflective tape to the tarp to boost mirror signaling, pack a small first-aid item into the backpack, and decorate or label the kit before sharing your photo on DIY.org.
Watch videos on how to practice survival skills
10 Survival Skills to Teach Your Children ~ Preparedness
4 Videos
10 Survival Skills to Teach Your Children ~ Preparedness

20+ Wilderness Survival Tips and Bushcraft Self Reliance Skills
Safe and Unsafe Situations | Safety Tips for Kids!
Survival Guidance Quiz for Kids | Learn Survival Strategies and Be Prepared for Any Emergency
Facts about outdoor survival skills for kids
🛖 A sturdy lean-to or debris hut can cut heat loss dramatically and keep you much warmer than staying exposed to wind and rain.
🎒 A tiny survival kit (whistle, firestarter, bandage) can fit in an Altoids tin or small plastic container for easy carrying.
🔗 The bowline is a classic lifesaving knot that creates a secure loop which is easy to untie even after heavy load.
📣 Three repeated signals (three whistle blasts, three mirror flashes, or three fires) are internationally recognized as a distress call.
🔥 Dry, fluffy tinder like birch bark, dry grass, or cotton soaked in petroleum jelly helps a single spark grow into a reliable fire.
How do we practice basic outdoor survival skills with children?
What materials do I need to practice these survival skills with kids?
What ages are suitable for practicing outdoor survival skills?
What are the key safety tips when teaching children survival skills?
