Pack a camp bag
Pack a camp bag by selecting and organizing essential clothing, food, first-aid items, and gear using a checklist to prepare safely for outdoor adventures.


Step-by-step guide to pack a camp bag
Backpacking with kids - Packing a kid's backpack for the backcountry
Step 1
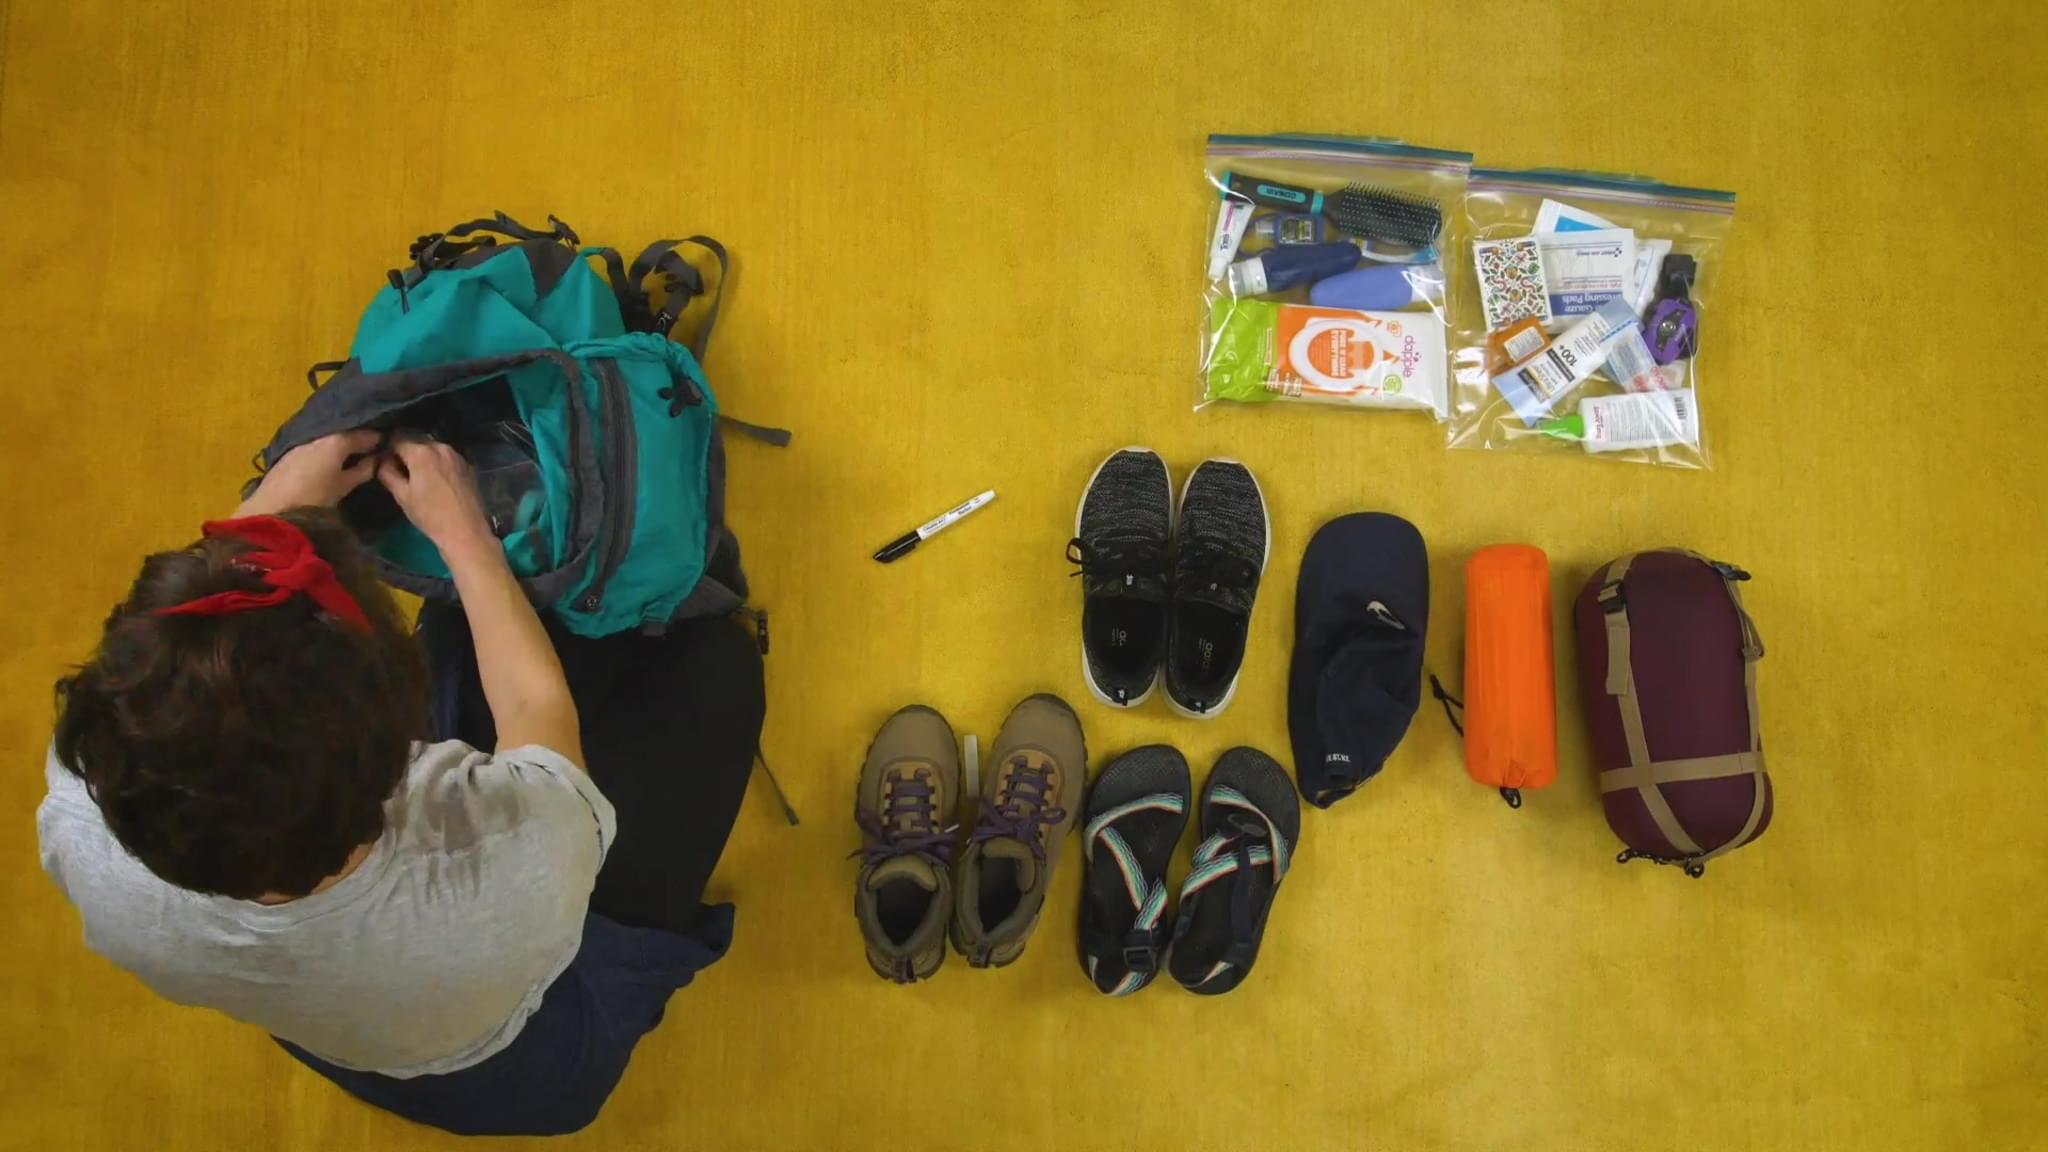
Set up a clean workspace by placing your backpack and checklist on a flat table or the floor.
Step 2
Read the checklist from top to bottom to see what you need for your trip.
Step 3
Mark the items you still need to pack by putting a check or circle next to them on the checklist.
Step 4
Lay out all the clothing layers and shoes on your workspace so you can see everything.
Step 5
Fold all the clothing items neatly so they take up less space.
Step 6
Place the folded clothes into the backpack starting with the bulkiest items first.
Step 7
Put your closed-toe shoes into the bottom or a side compartment of the backpack.
Step 8
Pack your water bottle and snacks in easy-to-reach pockets or the main compartment.
Step 9
Put the small first-aid kit into an external pocket where you can grab it quickly.
Step 10
Add the flashlight rain jacket hat sunscreen and map or compass into the backpack pockets.
Step 11
Close and zip all compartments of the backpack so nothing falls out.
Step 12
Put the backpack on and tighten the straps until it feels comfortable and balanced.
Step 13
Share a photo and a short note about your packed camp bag on DIY.org.
Help!?
What can I use instead of a small first-aid kit, flashlight, or paper map if I can't find them?
Substitute a zippered pouch with bandages and antiseptic wipes for the small first-aid kit, use your phone's flashlight or a headlamp instead of the flashlight, and save an offline map or screenshot on your phone or print a map to pack in place of a paper map or compass.
My backpack won't zip closed or feels unbalanced after packing; what should I do?
Repack by folding or rolling clothing to compress them, place the bulkiest items and closed-toe shoes at the bottom or close to your back, redistribute heavy items toward the center, then tighten the straps and try zipping all compartments again.
How can I adapt this packing activity for younger or older kids?
For preschoolers use a picture-based checklist and have them lay out and place a few key items like the water bottle and hat while an adult handles zips and shoes, and for older kids let them follow the full checklist—fold clothes, pack bulkiest items first, put the first-aid kit in an external pocket, tighten straps, and share the photo on DIY.org.
How can we personalize or extend the activity to make it more fun or useful?
Personalize the pack by decorating the backpack and adding a name tag, use colored packing cubes or labeled zip bags for clothes and snacks, put the rain jacket and map/compass in a waterproof stuff sack, attach a whistle to a strap, and then post the decorated bag plus a short note on DIY.org.
Watch videos on how to pack a camp bag
Pro Camp Packing Tips: How to Pack Like a Pro for Your Kid's Summer Camp
4 Videos
Pro Camp Packing Tips: How to Pack Like a Pro for Your Kid's Summer Camp
PACKiNG FOR TEEN SUMMER CAMP!! *Tips and tricks!* 🏕️ 🐟
PACK WITH ME FOR CAMP | tips for packing for camp + what to pack
CAMPING PACKING LIST - FAMILY TENT CAMPING - CAMPING HACKS AND TIPS - CAMPING WITH KIDS - ORGANIZE
Facts about camping preparation for kids
🏕️ Many backpackers aim to keep their base weight (gear without food/water) under about 10 kg (22 lb) to hike more comfortably.
🎒 Placing heavy items close to your back and near the center of the pack helps you stay balanced and reduces shoulder strain.
🩹 A compact first-aid kit with bandages, antiseptic wipes, tweezers, and pain relievers can handle most minor camp injuries.
🍫 High-calorie, low-weight foods like nuts, dried fruit, and energy bars give lots of fuel without extra bulk.
🌧️ Layering clothes (base layer, insulating layer, waterproof shell) makes it easier to stay warm and dry in changing weather.
How do I teach my child to pack a camp bag?
What materials do I need to pack a camp bag activity?
What ages is packing a camp bag activity suitable for?
What are the benefits and safety tips for packing a camp bag?
