Organize using cardboard
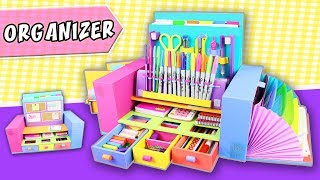
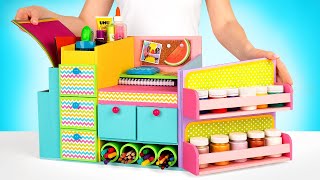
Make a cardboard desk organizer with compartments, labels, and decorations to sort school supplies while measuring, cutting safely, and arranging items neatly.


Step-by-step guide to make a cardboard desk organizer
7 diy easy storage boxes from cardboard //organizer tutorial
Step 1
Gather all the materials from the list and bring them to your workspace.
Step 2
Decide how big you want your desk organizer to be and draw the outline of the base on a large piece of cardboard using your ruler and pencil.
Step 3
Measure and mark the pieces you need on the cardboard including the base the four sides and the divider pieces.
Step 4
Ask an adult to cut out all the marked pieces on the cutting mat using scissors or a craft knife.
Step 5
Use a ruler and a blunt pencil to score fold lines on the side pieces then fold along those lines to make neat edges.
Step 6
Apply glue to the base edges and attach the folded side pieces to the base to form the box frame.
Step 7
Let the glued box dry completely before you continue.
Step 8
Slide the divider pieces into the box to arrange how many compartments you want.
Step 9
Apply glue to the divider edges and fix them in the positions you planned.
Step 10
Let the divider glue dry fully so the compartments are sturdy.
Step 11
Cut small paper labels for each compartment from the paper for labels.
Step 12
Write names or pictures on the labels to show what goes in each compartment.
Step 13
Stick the labels onto the compartments and decorate the outside of your organizer with colouring materials and stickers.
Step 14
Put your pencils pens erasers scissors and other school supplies into the correct compartments so everything is neat.
Step 15
Share your finished cardboard desk organizer on DIY.org
Help!?
What can we use if we don't have a cutting mat, craft knife, or PVA glue?
If you don't have a cutting mat or craft knife, use a sturdy wooden board or thick cereal-box cardboard as a cutting surface and have an adult cut the marked pieces with strong scissors, and if PVA glue isn't available use a glue stick or double-sided tape to attach the sides and divider pieces.
My side pieces won't fold cleanly or the box gets lopsided—what should I do?
If folds tear or edges are uneven when you score and fold the side pieces, re-score the fold lines with your ruler and blunt pencil, fold slowly along the scored line, and clamp glued edges with clothespins or heavy books while the glue dries to keep the box square.
How can I change the activity for different ages?
For younger kids (3–6), have an adult pre-cut the base and side pieces and let them glue, slide divider pieces, stick paper labels and decorate with colouring materials and stickers, while older kids (7+) can measure and mark with a ruler and pencil, score with a blunt pencil, and use a craft knife under supervision to cut for neater compartments.
What are simple ways to make the organizer more useful or special?
To personalize and improve durability, paint or decoupage the outside after the glued box dries, add removable divider pieces for adjustable compartments, stick clear tape or Mod Podge over paper labels, and glue on extra-cardboard pockets for rulers or scissors.
Watch videos on how to make a cardboard desk organizer
6 SIMPLE DIY ORGANIZERS FOR STORAGE FROM CARDBOARD BOXES| HANDMADE CRAFT FROM CARDBOARD BOXES
4 Videos

6 SIMPLE DIY ORGANIZERS FOR STORAGE FROM CARDBOARD BOXES| HANDMADE CRAFT FROM CARDBOARD BOXES
10 GREAT CARDBOARD DIYS FOR KIDS
DESKTOP ORGANIZER from Cardboard - Back to school | aPasos Crafts DIY
MAKING A NEW CARDBOARD ORGANIZER!
Facts about cardboard crafts for kids
📦 Cardboard is mainly made from paper fibers and is one of the most recycled materials worldwide.
♻️ Corrugated cardboard's wavy middle layer (the 'fluting') gives it strength while staying lightweight.
✂️ A utility or craft knife lets you make precise cuts — always use a cutting mat and adult supervision for safety.
📐 Measure twice, cut once — small measuring mistakes add up, so planning helps compartments fit perfectly.
🎨 Decorating with paint, washi tape, stickers, or labels makes your organizer personal and easier to use.
How do you make a cardboard desk organizer with compartments, labels, and decorations?
What materials do I need to make a cardboard desk organizer?
What ages is making a cardboard desk organizer suitable for?
What safety tips should I follow when making a cardboard desk organizer?
