Make an illusion costume
Design and build an illusion costume that makes the wearer appear to float or have a double image using cardboard, fabric, and safe craft tools.
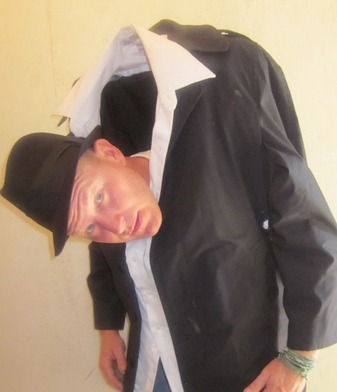
About this activity
Design and build an illusion costume that makes the wearer appear to float or have a double image using cardboard, fabric, and safe craft tools.
What you need
Step by step
- 1
Step 1
Gather all the materials on a clear table so everything is easy to reach.
- 2
Step 2
Put on old clothes and cover the table with scrap paper to keep it tidy.
- 3
Step 3
Stand next to the cardboard and use the marker to trace a torso silhouette from your shoulders to your hips.
- 4
Step 4
Cut out the first cardboard silhouette carefully with safety scissors.
- 5
Step 5
Trace and cut a second identical cardboard silhouette for the offset double image.
- 6
Step 6
Decorate both cardboard silhouettes to match your shirt or costume using colouring materials.
- 7
Step 7
Tape two clear plastic strips vertically to the back of one silhouette to act as spacers that will hold the front piece out a few inches.
- 8
Step 8
Tape the ends of the elastic strap to the top corners of the back silhouette to make two shoulder loops that fit over your shoulders.
- 9
Step 9
Slide the decorated second silhouette onto the clear plastic strips so it sits in front and is held away from your chest.
- 10
Step 10
Drape the fabric over your shoulders and tuck or tape the edges to hide the plastic strips and tape supports.
- 11
Step 11
Put on the harness by slipping your arms through the elastic loops and standing up slowly.
- 12
Step 12
Stand in front of a mirror and slide the front silhouette along the plastic strips until the doubled image looks like a floating or double person.
- 13
Step 13
Take photos or a short video and share your finished illusion costume on DIY.org
Fun facts
How do you make an illusion costume that makes the wearer appear to float or have a double image?
Start by sketching the illusion (floating person, double torso). Measure the wearer and build a lightweight frame from cardboard or foam board to support fake legs or a second torso. Attach dowels or thin PVC for structural supports, then drape fabric to hide supports and create the illusion. Add a harness or belt to secure the frame to the child’s waist/shoulders. Paint or decorate details to match clothing. Test balance and mobility in a safe space and adjust straps before wearing in public.
What materials do I need to build a floating or double-image illusion costume?
Gather lightweight cardboard or foam board, craft glue and hot glue (adult use), scissors and a craft knife (adult use), dowels or thin PVC, measuring tape, fabric for draping, Velcro or straps, zip ties, paint or markers, elastic or suspenders for a harness, safety goggles, and optional LEDs. Keep basic sewing supplies and padding for comfort. Use sturdy but light materials to keep the costume safe and easy to wear.
What ages is this illusion costume activity suitable for?
This project suits children aged 8 and up with close adult supervision for cutting and hot glue steps. Ages 4–7 can participate in designing, painting, and attaching fabric with help. Teens (13+) can lead construction with minimal supervision but should still follow safety rules for tools. Always match complexity to the child’s skill level and provide adult help for structural and sharp-tool tasks.
What safety tips should I follow when making and wearing an illusion costume?
Prioritize stability: test frame strength and secure harnesses to prevent tipping. Adults should handle knives, hot glue, and PVC cutting. Ensure the child has clear sightlines and freedom to move; avoid materials that block breathing. Use flame-resistant fabric, add reflective tape for night use, and pad pressure points. Practice walking and sitting in a safe area before use. Keep small parts away from toddlers and inspect fastenings before each wear.
Watch & Learn
Need help?
What can we use if we can't find clear plastic strips or an elastic strap?
Use two strips cut from a clear report cover or a thin plastic cutting board for the vertical spacers (step 6) and substitute the elastic strap by taping or sewing two fabric loops or wide ribbon to the top corners of the back silhouette to make shoulder loops (step 7).
My front silhouette keeps sagging or sliding—how do I stop it?
Reinforce the taped clear plastic strips (step 6) with stronger packing tape on both sides, add a third spacer in the middle, and place small tape or Velcro stops near the ends of the strips so the front silhouette (step 9) rests securely without sliding.
How should we change the steps for younger children or older kids doing this alone?
For preschoolers have an adult do tracing and cutting (steps 3–5) and let them color and tuck the fabric (steps 8–9), while older children can cut their own cardboard, use sturdier spacers and secure the elastic harness themselves for a more durable costume (steps 6–7).
What are simple ways to improve or personalize the illusion costume?
Personalize the effect by painting the two silhouettes to match specific clothes (step 5), adding removable paper hands or props to the front silhouette to enhance the floating-person illusion (step 11), or taping small LED strips behind the front piece for dramatic photos (step 12).