Go yarn bombing
Create colorful yarn wraps and safely install them with permission on a tree, fence, or bike rack to learn patterns, measurements, and cooperation.


Step-by-step guide to yarn bombing (creating yarn wraps and installing them safely)
Yarnbombed trees. Crochet, knitting and crafts in street art event
Step 1
Choose a tree fence or bike rack you would like to yarn bomb.
Step 2
Ask an adult or the property owner for permission to install yarn wraps on your chosen spot.
Step 3
Have an adult come with you to help during the installation.
Step 4
Gather your materials and bring them to the chosen spot.
Step 5
Measure the circumference or width and the length of the area you will wrap using the tape measure.
Step 6
Cut yarn into lengths based on your measurements and add about 20 centimeters extra for tying.
Step 7
Lay out the cut yarn on the ground to arrange a color pattern you like.
Step 8
Work with your helper to decide who will wrap which section.
Step 9
Tie the first yarn end securely to the object with a double knot or anchor it with a zip tie.
Step 10
Wrap yarn tightly and evenly around the object following your planned color pattern.
Step 11
Secure each yarn end with a knot and tuck the tail in or stitch it with a yarn needle.
Step 12
Trim any long tails so they don't flap or get caught.
Step 13
Inspect the wraps to make sure nothing can snag people or animals and tighten any loose areas.
Step 14
Clean up the area by picking up leftover yarn scraps and your tools.
Step 15
Share your finished yarn-bomb creation on DIY.org.
Final steps
You're almost there! Complete all the steps, bring your creation to life, post it, and conquer the challenge!

Help!?
What can we use if we don't have a tape measure, yarn needle, or zip ties?
Use a length of string or a strip of paper to measure the circumference and then measure that against a ruler, substitute a blunt plastic sewing needle or tapestry needle for the yarn needle or simply tuck and knot tails securely, and replace zip ties by anchoring the first yarn end with a double knot around the object as described in step 8.
What should we do if the yarn keeps slipping or gaps appear while wrapping?
Make sure the first yarn end is tied with a tight double knot or anchored with a zip tie (step 8), pull each wrap snugly and evenly as you go (step 9), and fix any gaps by stitching loose areas with the yarn needle or adding an extra knot and tucking the tail (step 11).
How can we adapt this yarn-bomb activity for younger or older kids?
For younger children have an adult do the measuring, cutting, and knotting (steps 5–8) while the child lays out color patterns and wraps short sections, and for older kids let them use the tape measure to plan dimensions, cut yarn with the extra 20 cm for ties, stitch ends with the yarn needle, and post the finished work on DIY.org.
How can we personalize or enhance our yarn-bomb beyond basic wraps?
Add pom-poms, knit or crocheted panels, reflective yarn, or stitched shapes with the yarn needle, arrange layered color patterns when you lay out the cut yarn (step 6), and trim and inspect tails carefully so decorations won't snag people or animals (steps 12–13).
Watch videos on how to yarn bomb and install yarn wraps safely
Yarn bombing ideas from Turku Finland. Street art using yarn crafts
3 Videos
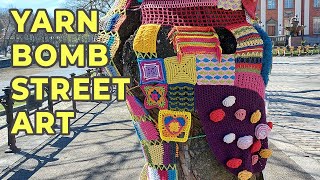
Yarn bombing ideas from Turku Finland. Street art using yarn crafts
Yarn Printing: Easy Art for Kids!

How yarn bombing grew into a worldwide movement | Magda Sayeg
Facts about yarn crafts and community art for kids
📏 Good yarn wraps start with measurements: measure circumference and length, then add a little extra for overlaps and knots.
🌳 Wrapping trees can hold moisture and hurt bark if left too long—always get permission and remove wraps after the agreed time.
🧶 Yarn bombing (also called guerrilla knitting) was popularized by Magda Sayeg, who started wrapping public objects in 2005.
🎨 Yarn bombing is a playful form of street art that uses bright colors and patterns to surprise and delight passersby.
🤝 Yarn bombing works best as a team activity—planning, asking permission, and tidy cleanup teach cooperation and community respect.
How do you do a yarn bombing activity with a child step-by-step?
What materials do I need for a child-friendly yarn wrap project?
What ages is yarn wrapping and yarn bombing suitable for?
What safety and permission steps should we take before yarn bombing?


One subscription, many ways to play and learn.
Only $6.99 after trial. No credit card required