Make custom beads
Create your own custom beads from clay, pasta, or recycled materials. Paint, string, and design patterns to make bracelets and necklaces.


Step-by-step guide to make custom beads
How to Make Paper Beads Easily with Kids Tutorial | Welcome to Nana's
Step 1
Gather all your materials and bring them to your workspace so everything is easy to reach.
Step 2
Cover your table with the tray or wax paper to keep it clean and put a paper towel nearby for spills.
Step 3
Choose which material you will make beads from today: clay pasta or a recycled item.
Step 4
Make bead shapes from your chosen material by rolling clay into balls shaping pasta if needed or cutting and shaping recycled pieces.
Step 5
Use a toothpick or skewer to poke a hole through each bead so you can string them later.
Step 6
Dry or bake your beads until they are hard using the method for your material and ask an adult to help if baking is needed.
Step 7
Paint or color each bead and add fun patterns like dots stripes or swirls.
Step 8
Let the paint or color dry completely so the beads do not smudge.
Step 9
Cut a length of string or elastic cord that fits your wrist or neck and leave extra for tying.
Step 10
String your beads in a pattern you like by sliding them onto the cord one by one.
Step 11
Tie the ends of the cord into a strong knot and trim any extra string to finish your bracelet or necklace.
Step 12
Share a photo and description of your finished creation on DIY.org so others can see your cool bead design.
Help!?
If I can’t find clay, pasta, or the exact supplies listed, what can I use instead?
If you don't have oven‑bake clay or pasta, use air‑dry clay or homemade salt dough for the 'Make bead shapes' and 'Dry or bake' steps, replace a skewer with a coffee stirrer or toothpick for poking holes, and use yarn or elastic hair ties instead of elastic cord for stringing.
My beads crack or the holes close up—what should I do?
To prevent cracking or closed holes during the 'Dry or bake your beads' step, dry beads slowly on wax paper, re‑poke holes with a toothpick when they are leather‑hard, and bake at a lower temperature with adult supervision if using oven‑bake clay.
How can I adapt this activity for different ages?
For toddlers use large pasta or pre‑drilled wooden beads and supervise the 'String the beads' step, for school‑age kids let them shape and paint clay or recycled pieces, and for older kids introduce fine patterns and using a needle for tighter stringing.
How can we personalize or extend the finished bracelets or necklaces?
Enhance the final piece by varnishing painted beads after the 'Let the paint or color dry' step for shine and durability, adding letter or charm beads during the 'String the beads' step to spell a name or message, and sharing a photo and description on DIY.org as the instructions suggest.
Watch videos on how to make custom beads
How to Make Polymer Clay Beads 🙌🏼
4 Videos
How to Make Polymer Clay Beads 🙌🏼
DIY Homemade Beads / How to make Beads at home / DIY Colourful Beads / Homemade Pearl

How to Make Paper Beads
Learn the BEST HACKS to Make GORGEOUS FANCY Paper Beads🤩
Facts about bead-making and jewelry crafts
🐚 The oldest known beads, made from seashells, are over 100,000 years old — people loved making jewelry way back!
🎨 Polymer clay can be baked in a regular home oven (around 275°F/130°C) to harden into durable beads.
🍝 Dried pasta is a classic kid-friendly bead material — it’s lightweight, easy to paint, and super affordable.
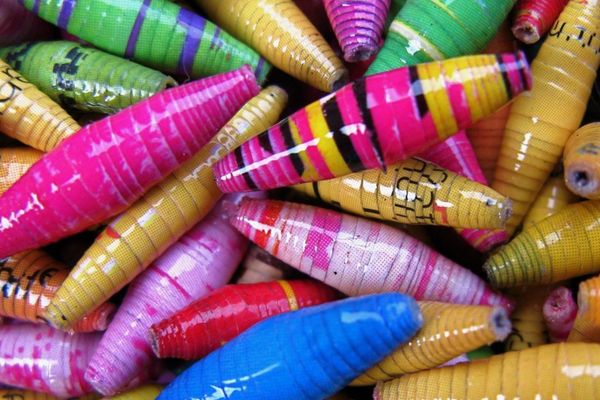
♻️ Paper and bottle-cap beads are popular upcycled projects that turn trash into wearable art and reduce waste.
🔁 Making a repeating color pattern (like red-blue-green) helps kids learn counting and sequences while designing jewelry.
How do I make custom beads from clay, pasta, or recycled materials?
What materials and tools do I need to make custom beads at home?
What ages are suitable for bead-making and how to adapt it for different children?
What are the benefits, safety tips, and fun variations for making custom beads?
